year long art collaboration - victorian room - breakdown & q&a
Caspar and Verena spent a year of their lives working together to create this authentic Victorian Room. In this extensive breakdown, as well as a Q&A, we dive into the minds of both artists to see how they planned this project, worked together and stayed motivated for over a year.
Caspar:
Hi to everyone, my name is Caspar, I’m from Munich and currently working as an Environment/Prop Artist at Digitalmindsoft, a smaller studio based in Ulm, Germany.
After having lots of fun with the editor of Warcraft 3 in my early years, I decided to study Interactive Entertainment at the Qantm-Institute in Munich and later graduated with a Bachelor degree at the SAE Institute. After my graduation followed some months of intensive portfolio work and training to finally land my first job in form of an internship at Digitalmindsoft where I’m currently still working.
Verena:
Hey everyone, my name is Verena, I’m an Environment/Prop Artist and Caspar was my Lead Artist for several years at Digitalmindsoft. I recently moved to Berlin to work at Ubisoft Berlin.
When I graduated from school I had the chance to study at the Games Academy Frankfurt am Main. I learned all the basics there and got to know a lot of people. After that I moved three more times to add a Bachelor degree, internship at Goodgame Studios and Master degree to my CV. So most of my career as a professional I worked for Digitalmindsoft and am now happy to be part of the Ubisoft team.

Victorian Room Reference, Inspiration and Engine
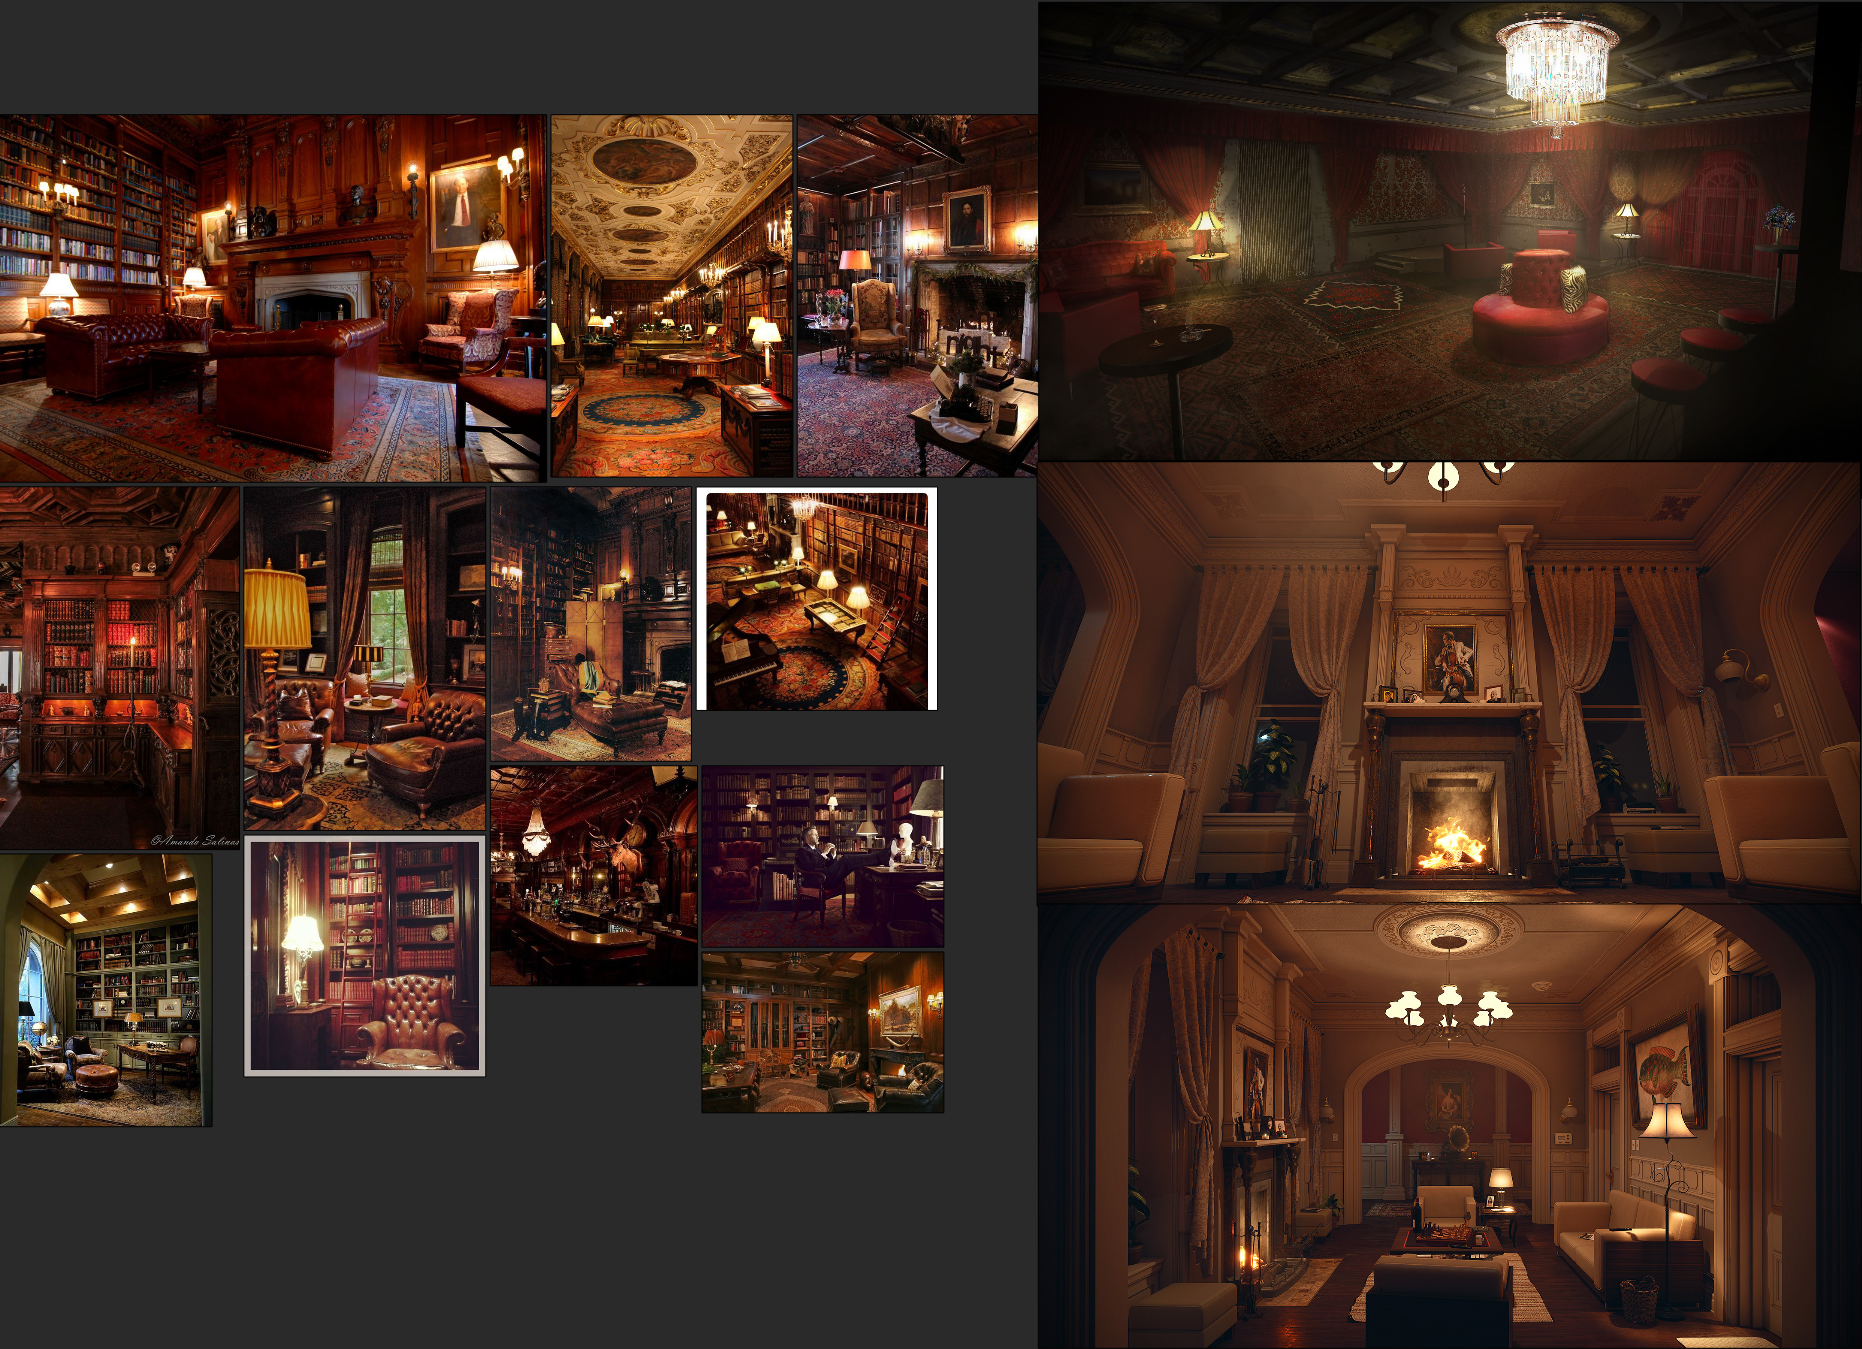
It was clear from the beginning that we wanted to work on a scene that has a lot of details in it. The Victorian era offers some stunning shapes and nice materials, so it didn’t take long to find this inspiring reference:

Reference

Reference
Although it looks quite abandoned it still has that warm, inviting mood we wanted to achieve. These images provided a perfect base for us. We could stick to them as close as possible and still had a lot of creative freedom in terms of populating the scene. To guarantee the desired amount of detail and storytelling we collected many additional real life references.

Inspiration Sheet
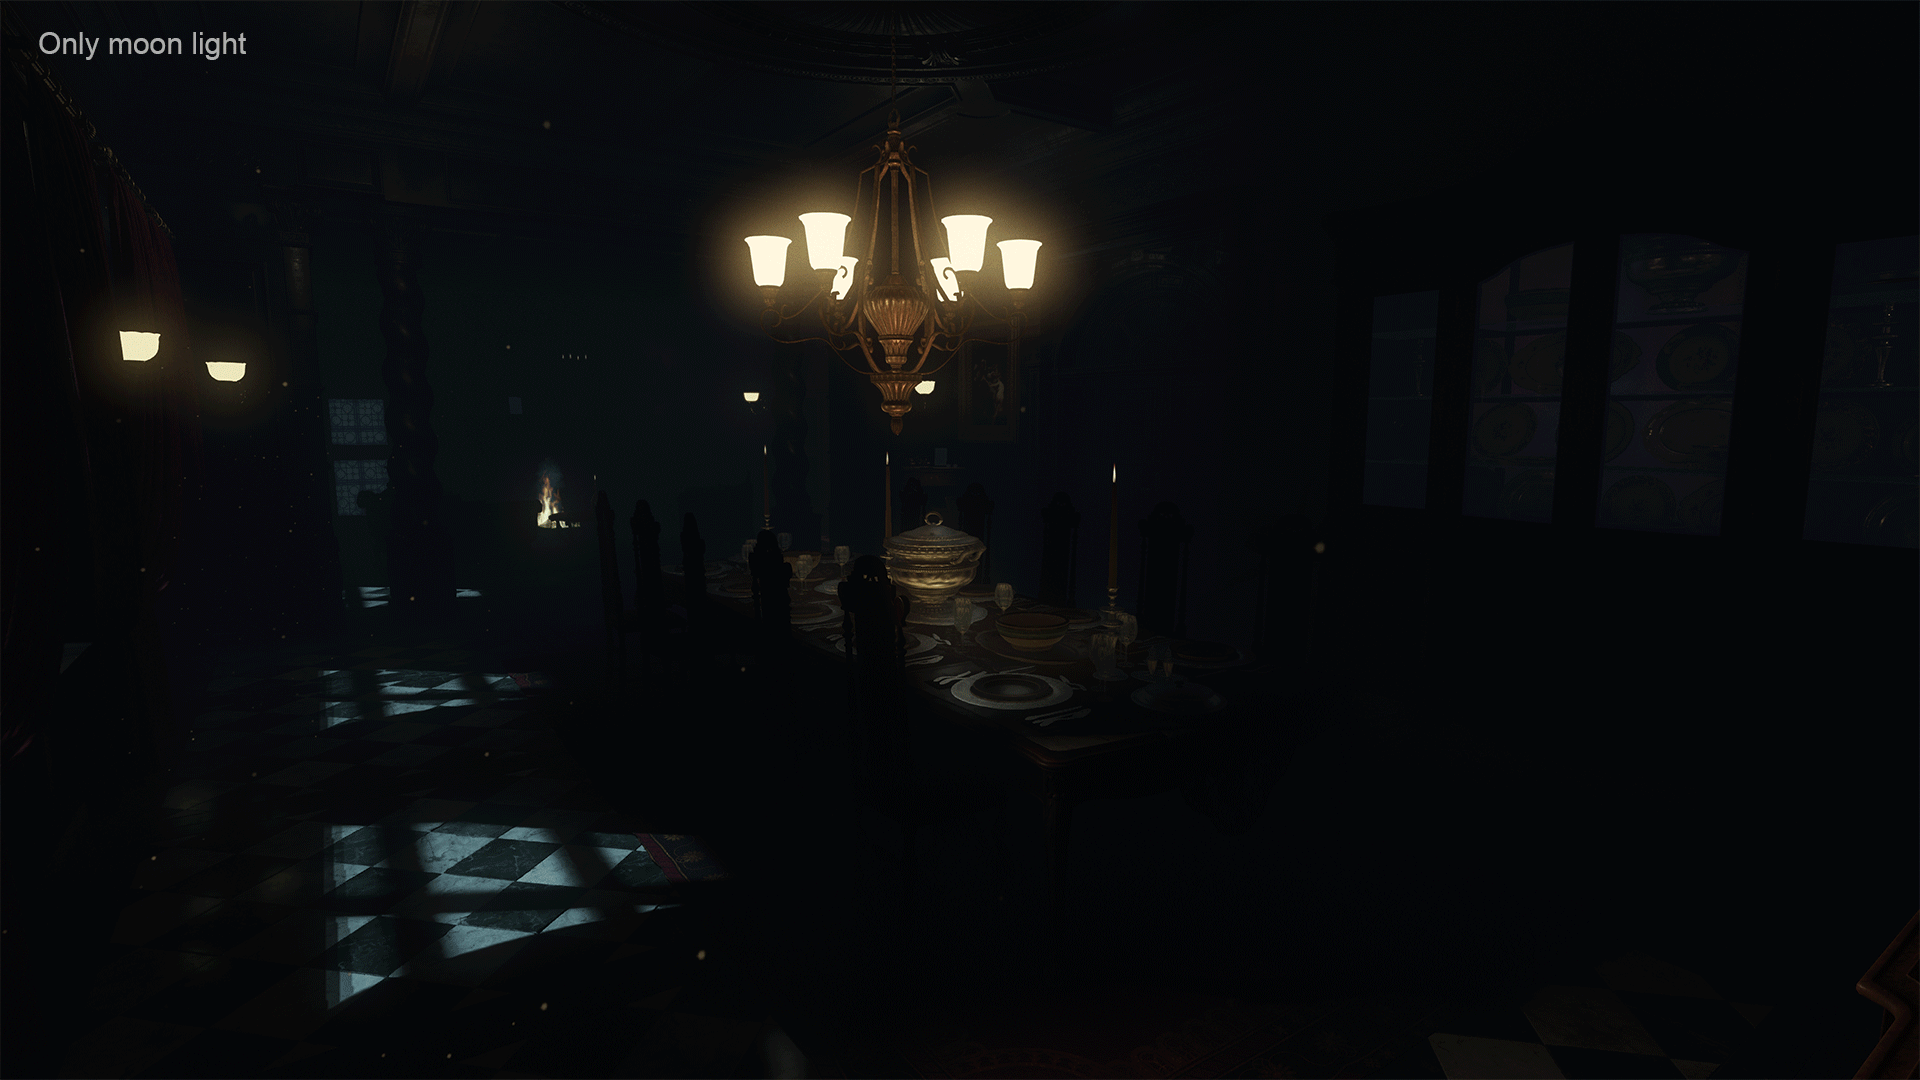
Our goal was basically to create a scene that invites the viewer to explore it. We knew back then that the lighting was crucial to get to this point so we decided to work with CryEngine as you can achieve stunning results in terms of lighting. Other artists often replied to our final scene that they would love to be in that room and that is exactly what we aimed for.
Staying Motivated
Verena:
As we mentioned before both of us were Environment Artists at the same company. Working there felt like being part of a family so we know each other very well and had already shipped a game together. It was clear then that a collaboration on a private project wouldn’t be a problem at all and we both felt like we wanted to enhance our skills by testing new tools and workflows and by getting out of our comfort zones. So the next step was looking for challenging references.
Caspar:
Another reason we decided to work on a personal project together was the fact that since then, at Digitalmindsoft, we only worked on RTS games with a modified version of the GEM-Engine. Since GEM-Engine only supports the classic non pbr Diffuse/Spec/Gloss pipeline and is also very restrictive in terms of lighting, we really wanted to push ourselves in up-to-date technologies.
So one of the reasons we kept going with this rather long lasting project and didn’t abandon it, was definitely due to the fact that we kept learning and experimenting on a lot of new topics. The other reason was the mindset behind our teamwork: we kept pushing and updating each other in a collaborative manner.
Color Scheme, Mood and Lighting
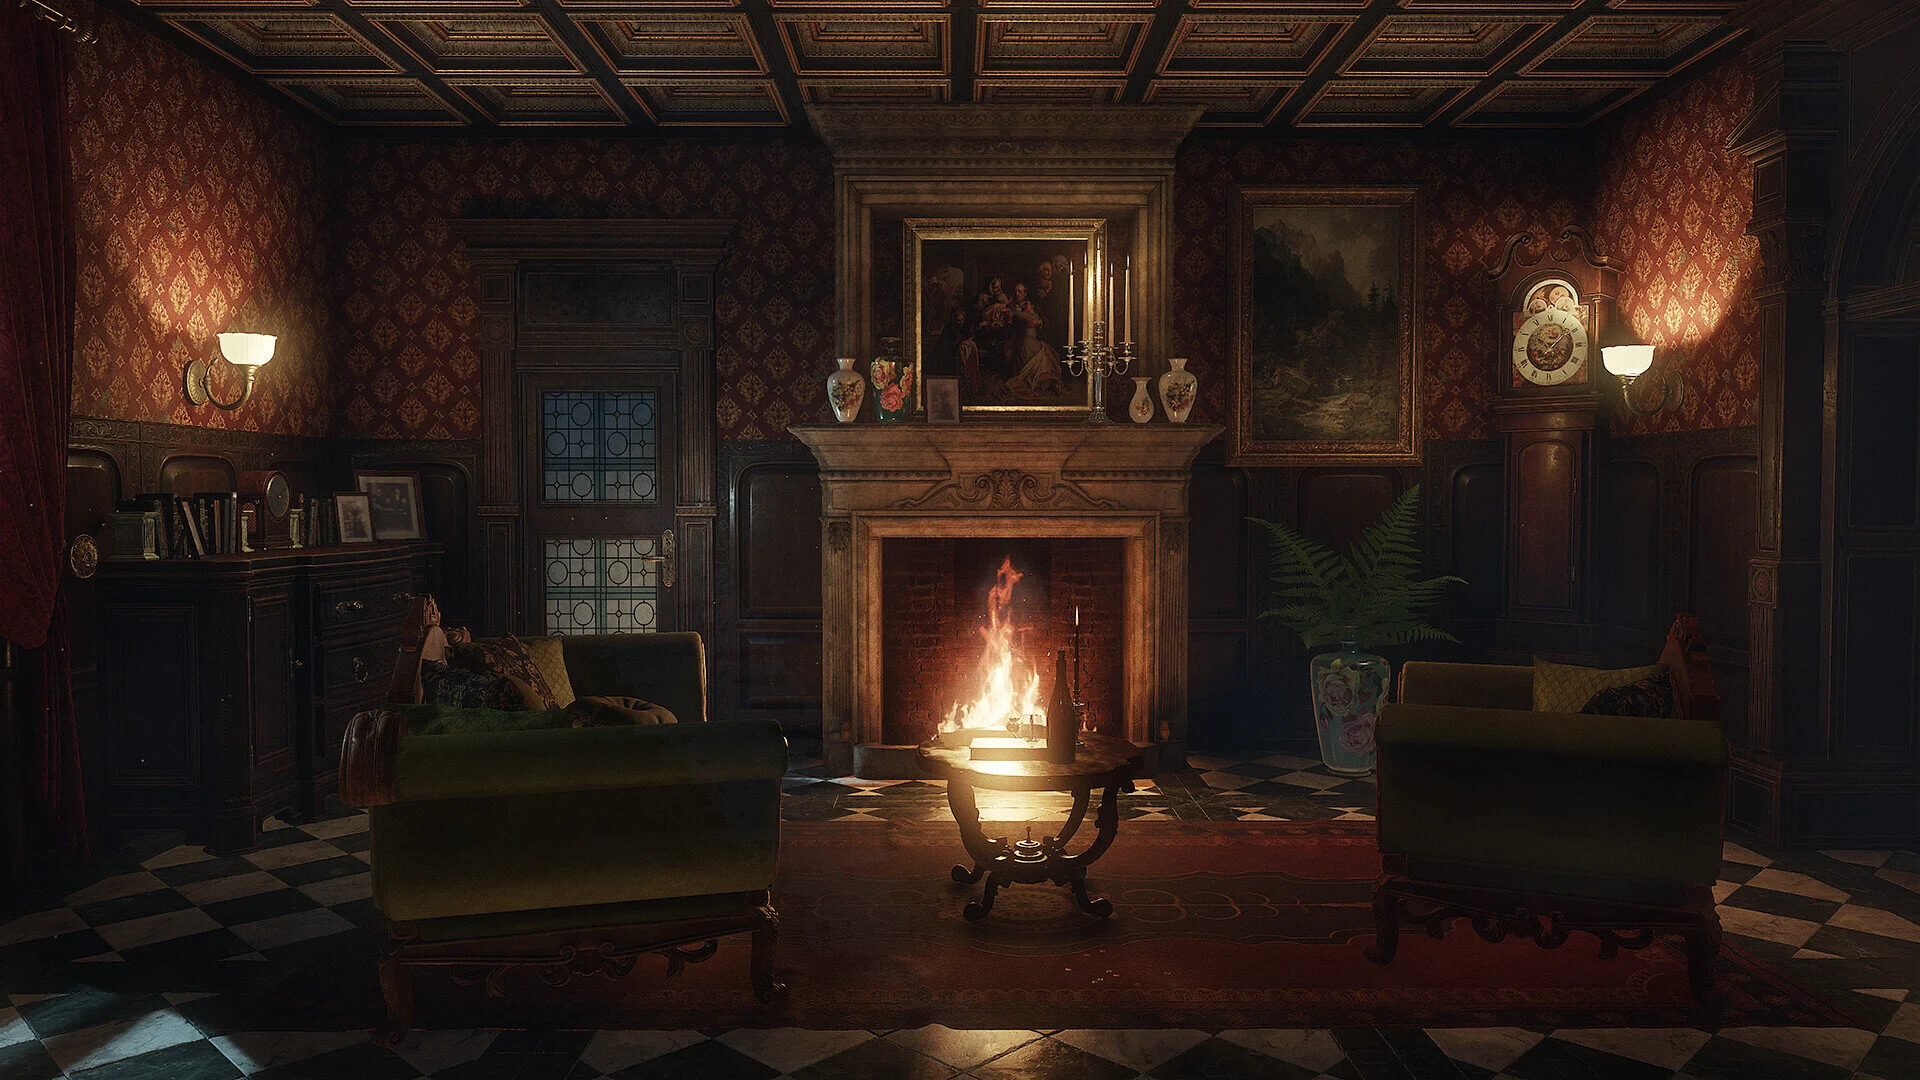
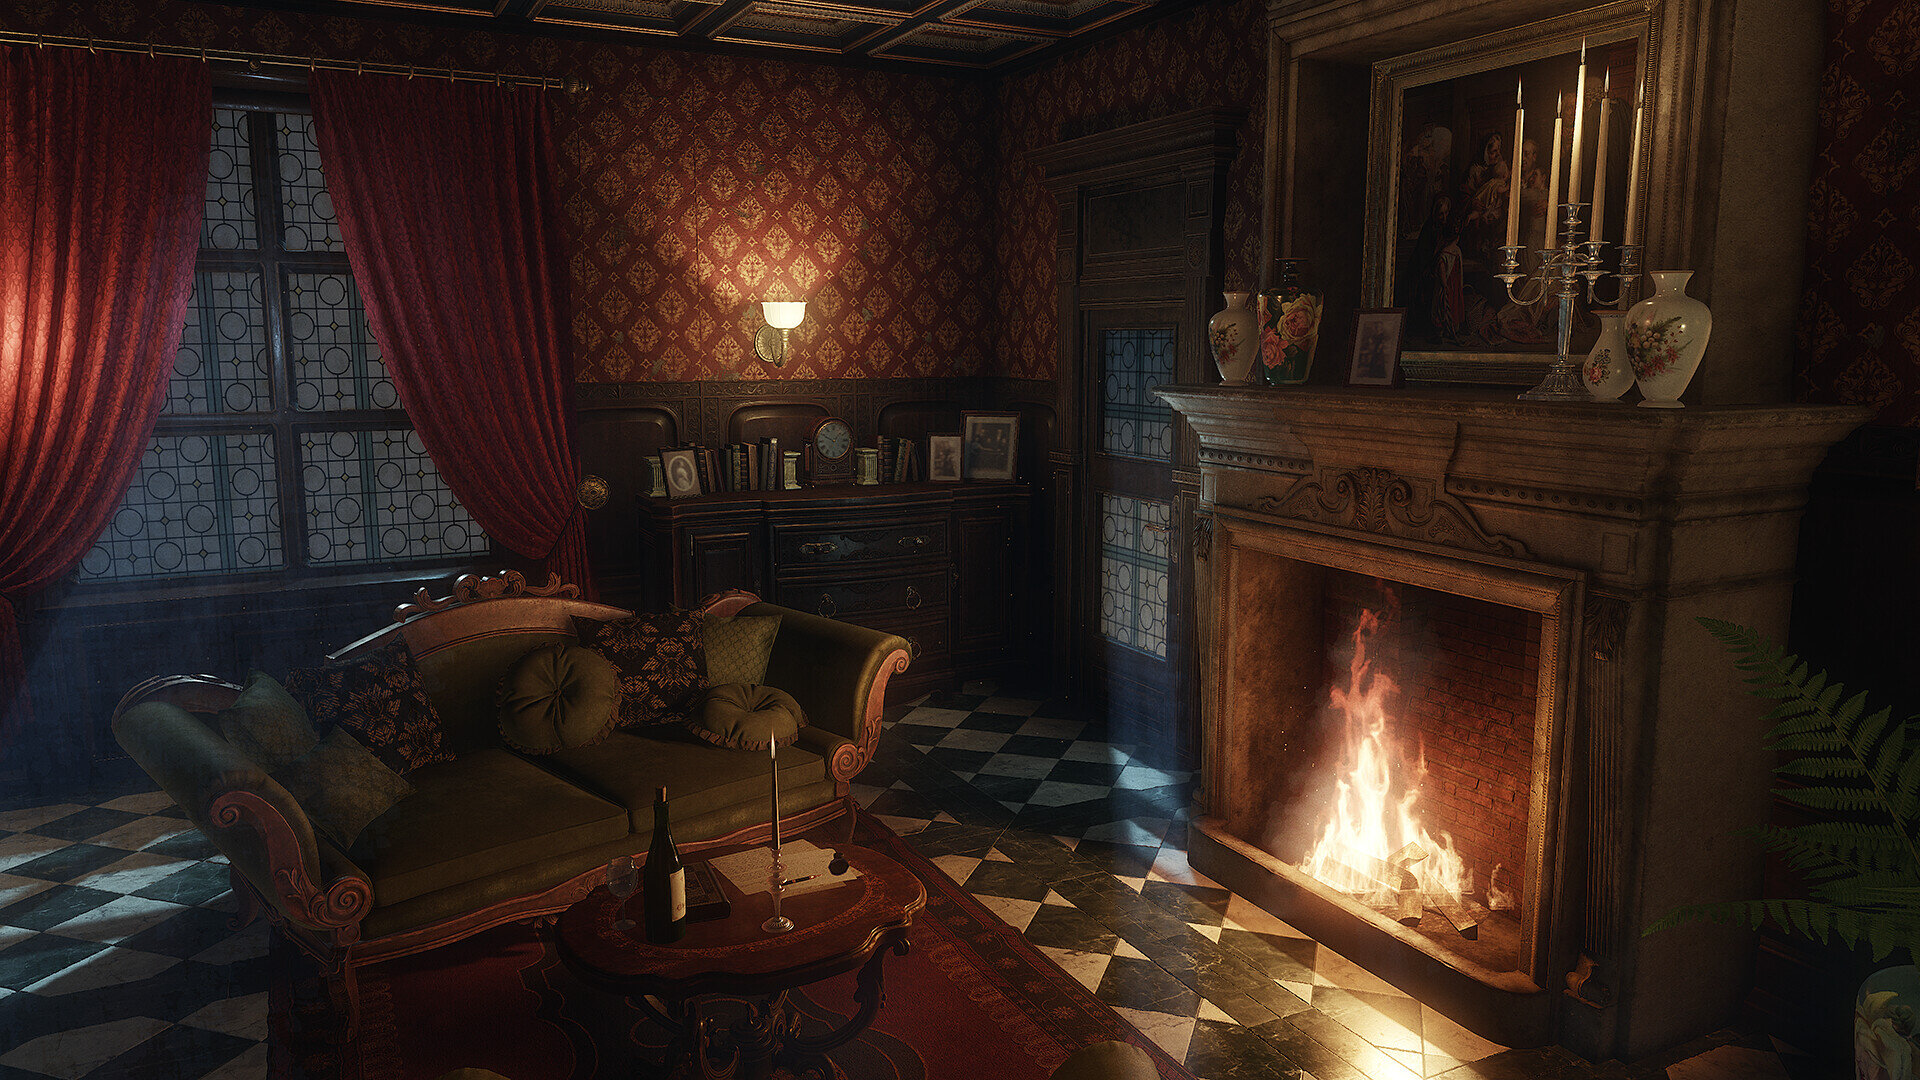
After finding the perfect reference, we thought about which mood we’d like to achieve. Should the room be abandoned with damaged textures, dust and cobwebs all over the place, or should it be still in frequent use with an animate feeling to it and more pristine assets. We finally decided on going with the more alive and busy feeling.
The basic colors to support our desired mood were warmer colors in terms of lighting and textures. Besides that we didn’t want to have too many vibrant colors in this rather small area, so we wanted to go with a more desaturated look besides some few exceptions. The curtains are one of these examples, they’re way more saturated then a lot of the rest and produce some nice contrast, especially in contrast to all the wooden assets.
Due to the nature of this room, it was clear for us that we wanted to achieve most of the contrast and ambiance through the lighting setup. Having a warm fireplace in contrast to more artificial wall lamps made the decision on how to light this scene quite easy. These main light sources also gave a good chance of producing a nice contrast. So besides thinking about the obvious primary light sources, we thought about which time of day we’d like have. In the reference you can see that it’s bright day light outside. As we also wanted to highlight the fireplace as mentioned before we decided to go with a night setting and also a semi transparent window material.
Ref Lighting Sheet
As you can see in our lighting/mood board, most of the used colors represent more earth like colors without too much saturation. So we made a rough color palette.

Color Palette
Working Together - Pipeline and Consistent Quality
Caspar:
To be more efficient and to guarantee a consistent and uniform style we created a kit of highpoly ornaments in 3ds Max, some materials in Substance Designer, which we then used as smart materials, and also adjusted a lot of native materials in Substance Painter (porcelain, silver, brass, gold and so on) so they would fit for the specific use inside CryEngine. All these results were then used extensively throughout the whole process of asset creation. It was a bit of a back and forth at the beginning which involved a lot of testing until we were happy with the overall look. But as soon as we had our ornament and material library finished we could start populating the scene.
Verena:
In terms of scaling we shared the 3ds Max file containing the blockout of the scene and used real world measures to guarantee a consistent look throughout the project.
We decided to give each single asset a unique look as this project wasn’t about getting a lot done in a small amount of time but about details, storytelling and atmosphere. That’s why we created highpoly models and baked unique texture maps for each one. That way the best quality could be achieved. During the whole process a good communication was key to get a consistent look. We shared a lot of work in progress on a regular basis to get feedback as soon as possible and to make sure that the asset was heading in the right direction.


Deciding Workflow and Splitting Tasks
The Victorian Room was specifically developed as part of our portfolio. Because of that we didn’t have to be efficient in the first place, could focus on the details and quality and therefore modeled unique assets with unique texture maps. It wasn’t about being fast but about giving each asset a greater value regarding the overall scene and storytelling.
After analyzing the scene and breaking everything down into modular assets, tileable materials, repetitive shapes and individual assets, we created a Trello board to organize our tasks. It’s a great tool for that purpose and the tasks could be easily moved and assigned.
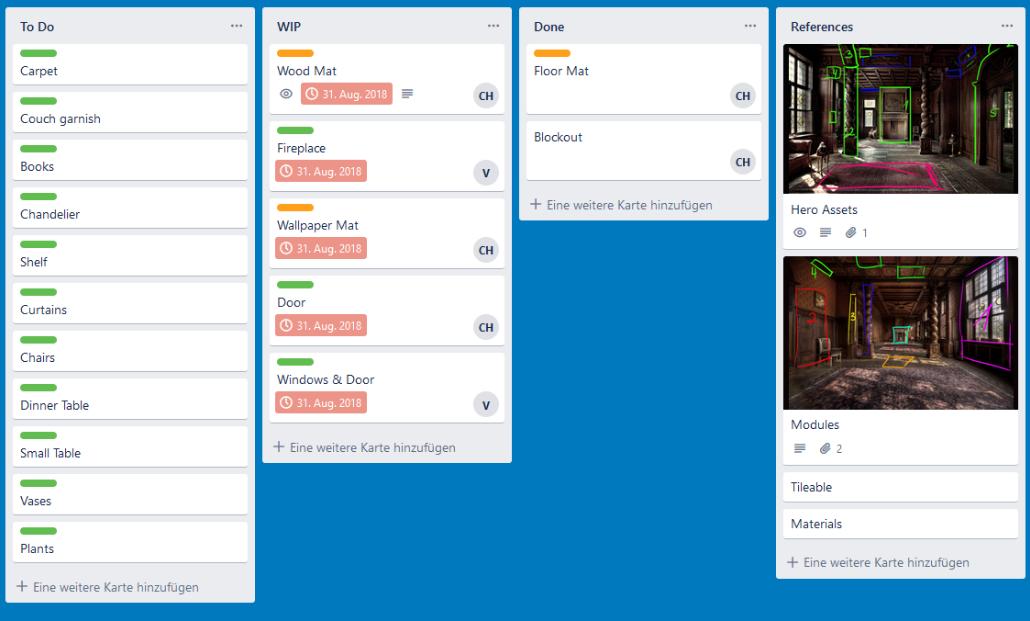
Trello Board
There were various other programs and tools that we used to create the Victorian Room like PureRef for all the references, 3ds Max and ZBrush for Modeling, Substance Painter and Designer for texturing, Marmoset Toolbag 3 for baking, Marvelous Designer for fabrics, 3D Coat for the retopo, FumeFX for the effects and Premiere Video for the composition of the video.
The First Steps - Blockout and Proportions in CryEngine
First of all we created a blockout scene in 3ds Max with two cameras that matched our two main reference images. This made sure that the proportions were correct and that we got the right scaling.

Blockout

Blockout
After exporting the blockout to CryEngine and we applied some photo textures on it to get a first impression.

Blockout with Textures

Blockout with Textures
Creating the Assets and Set Dressing
Verena:
We didn’t choose the most innovative workflow for our assets as our focus was on the details. What we did is basically the old fashioned way of modeling a highpoly mesh in 3ds Max and ZBrush and baking it in Marmoset. Texturing was all about adjusting the smart materials in Substance Painter, stamping some normal and height information of ornaments in some places and tweaking the little details. With the Amazon Lumberyard presets, Allegorithmic offers an easy way to export the textures to the CryEngine.
As for populating the scene we stuck very close to our reference images that portrayed the life during the Victorian era. How they lived and how they liked to set up their places. Listening to the kind of music or watching movies with the same setting also helps to get in the right mood.
On top of that we were lucky to know someone who knows some expert for antiquities ;) We used that acquaintanceship frequently to check if our assets fit the era.
Caspar:
In terms of set dressing we wanted to create a detailed, saturated and warm ambiance. This meant a lot of individual work on different parts but it was definitely rewarding. We exported each asset individually and did all the placement by hand directly in the engine to have the most possible control over each aspect of the room. Afterwards the lighting would be adjusted and finalized according to the placement (e.g candles).
We went the extra mile with these little unique details because we wanted to create an animate world where everyone could imagine to sit down for a while. We didn’t just want to present individual assets but try to tell a story with this environment. So after creating the hero assets, we went on with all the props to be able to create said atmosphere. A rather busy dining room where you could sit, talk and celebrate with your guests, as well as the more calming and relaxing fireplace area where you settle down to read and let the stress fade away.

Creating the Essentials
After planning the blockout we talked about a general polycount and texture resolution budget. Since this scene should act as a presentation piece with a lot of close up shots, we went for a higher polycount and bigger texture maps.
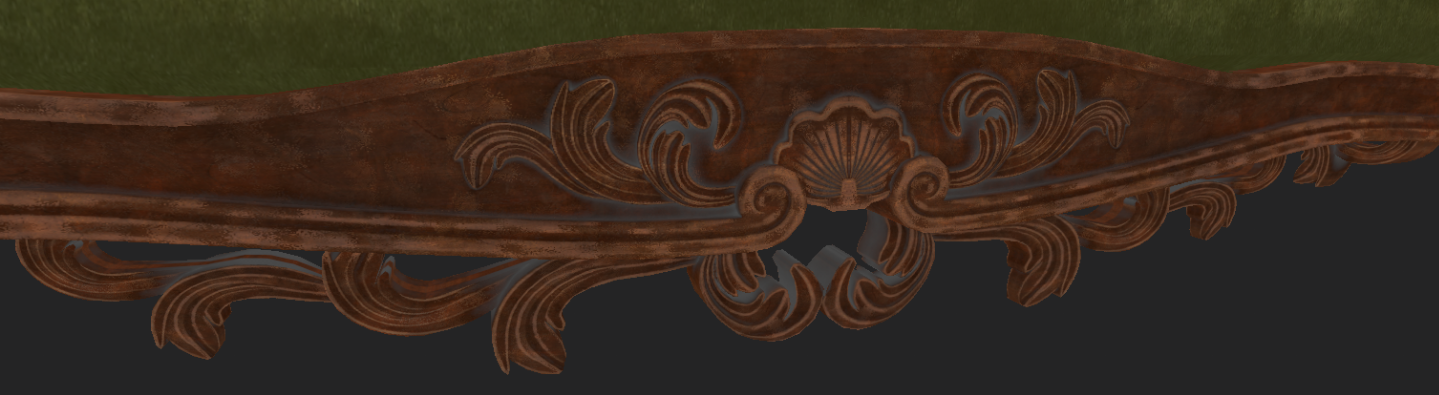
Due to the nature of the Victorian era we needed a lot of ornamental assets and therefore created a basic highpoly kit of ornaments inside 3ds Max first. They were made by using the classic subd approach. With this kit we could produce all the ornamental assets way faster. In the following picture you can see most of the kit. These were also the base for the normal map decal that we used as stamps in Substance Painter.

Ornament Kit
After that we created several materials in Substance Designer that were later used as smart materials in Substance Painter and also adjusted several native Painter materials for the use inside CryEngine. Here you can see most of the materials we created/adjusted.

Materials
We adjusted some materials inside Painter according to the specific CryEngine PBR values. These values can be found in their online documentation.
Creating the Assets
We used the old fashioned high poly to low poly workflow to achieve the best quality for each asset and baked unique maps.

Column Breakdown

Table Breakdown
The texture was done in Substance Painter by relying mainly on our smart materials and adding details like dust. That way we were able to gain a consistency throughout the scene while mixing the three wood materials in different ways to avoid monotony.
Diffuse Only
Lighting
Caspar:
Since this was my first lighting job after quite some time, I did a lot of research on this topic first. I looked at a lot of real world references as well as into lighting studies by fellow artists. In my opinion, screening real world references of the Victorian era was also an essential part since each era kind of has its typical light colors and styles.
After that I went on to set up the right exterior lighting. Since we wanted it to be during nighttime, I adjusted all the needed settings in the environment editor (ToD, moon and sky color, sun rays and some post processing).

The next step was to create the obvious light sources, so the wall lamps, the fireplace and and the chandelier. Since we wanted the dining area to be brighter due its nature, I focused a bit more on the artificial lights and more powerful ambient lighting throughout this area. On the other hand the fireplace should have a soothing atmosphere so I focused a lot more on the fire itself than on the wall lamps. CryEngine gives you a good tool to animate the lights according to their usage.
After setting up the basic lighting, I used two “master” environment probes for each area to achieve a basic brightness and then went on to more specific areas where the light source itself had problems brightening the area in a proper fashion.
The next step was to polish the lighting by adding quite a lot ambient lights with a very soft fade. This created a nice contrast to the “sharp” light sources of the wall lamps.
The final step was to create some environment probes which only affect the reflections. Since we have a lot of metallic objects in our scene, I had to go over a few areas to get the reflections right.
Verena:
As Caspar already mentioned references are key to a good result. What kind of mood do you want to achieve including the overall color, contrast and brightness of the scene? How does it impact the story? You’re usually super motivated at the beginning of such a project but it is essential to take your time and to dig deep into research before getting started. Test different lighting conditions and if something didn’t turn out the way you wanted it to, start all over again. We lit this scene at least three times and it got better each time. This whole process was very time consuming but it will keep you from reworking everything in the long run. Keep in mind that for most scenes the lighting is very important. And by that, we don’t just mean the light itself. Contrast and shadows are very powerful tools for storytelling, so make sure to use them! All in all: take your time, do some tests and ask for feedback even in this early stage to get the best possible results.

Lighting the Scene
The Lighting was definitely a big challenge but extremely rewarding in the end.
Caspar started by setting up the night time sky by adjusting the color of the moon, the position so it would shine through the windows and produce nice rays. Giving the sky a more blueish tone helped to give a good contrast between the warm, orange/yellow lights inside.
After that, the basic light sources were created, so in our case the wall lamps, the chandelier and the fire itself. For the fire, an animated light source was used, since it was clear to us that we wanted to do a video since the beginning.

Project Light
When talking about shadows there’s one thing you have to keep in mind, at least with current versions of CryEngine. Lights that are able to cast shadows simultaneous on the screen are limited to a number of 12. If you go above that, you’ll get flickering artifacts. So the best thing would be to plan your scene around this fact, at least if you’re using a light heavy scene like we did. You have to manually turn on the shadows, otherwise, when spawning a light entity, shadows will be off by default.
We created our scene with Total Illumination V2 active. Keep in mind that we went for a really high quality scene, so some settings may be a bit high.
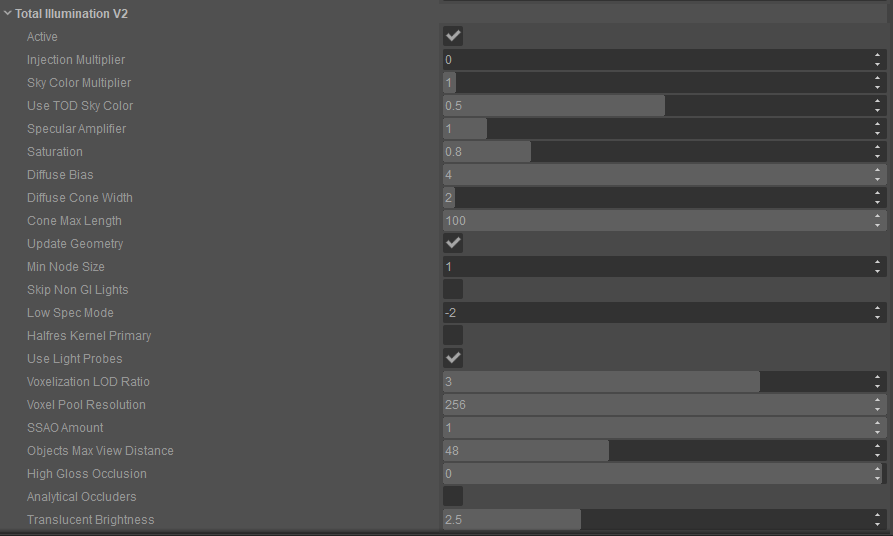
Level Setting Window
You can adjust the voxel density for a better quality global illumination. In our case a min node size of 1 gave good results. You can visualize the density by typing e_svoDebug 6 into the console. So as you can see, the density is rather high in our scene.
For more information on the individual settings you should definitely visit their documentation.

Voxel Min Node 1
After setting up the wall lamps, the chandelier and the fireplace, several environment probes were placed.
Adjusting the probes helped to brighten up spaces that are too dark and barely readable which would otherwise create too much contrast and noise. Adjusting the color of the probes just slightly to add some subtle variation and contrast gave us a good ambiance.
Here you can see the difference with and without the probe:
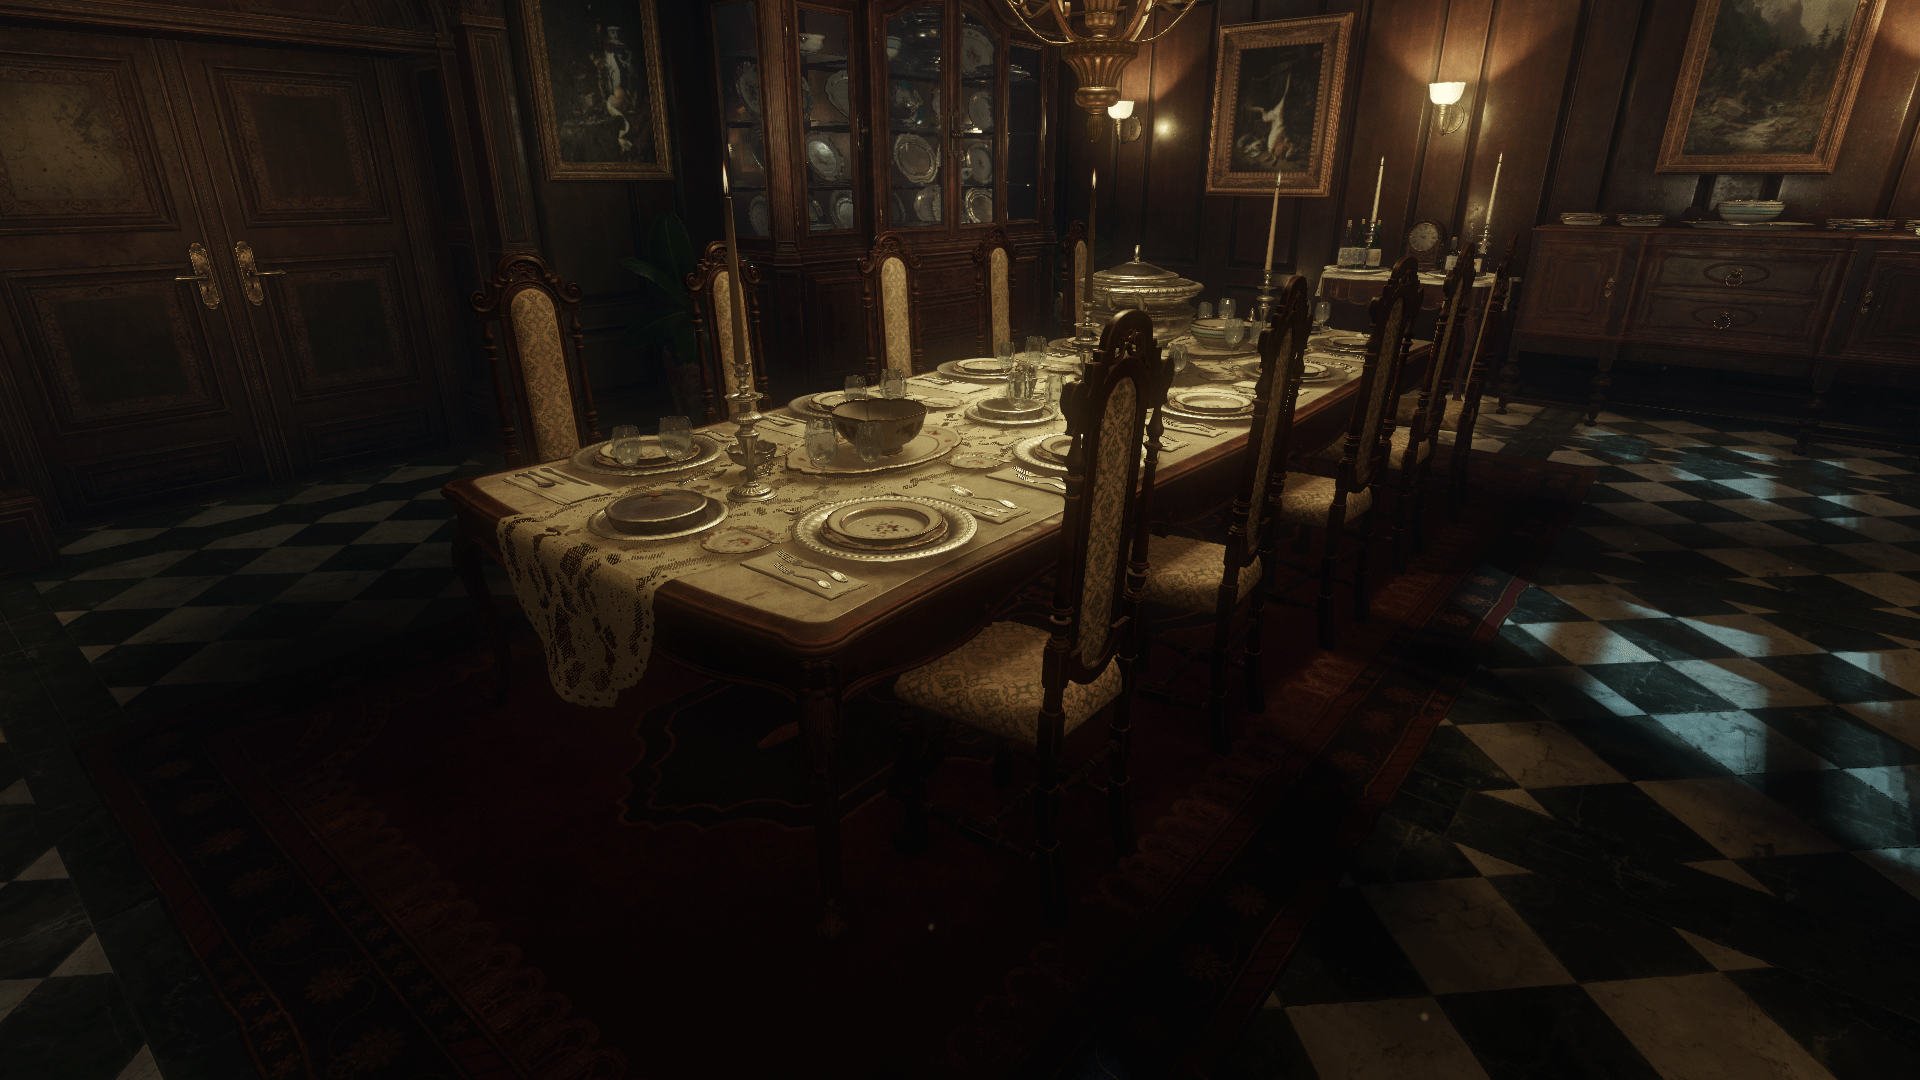
Env Probe Dining Table
Note that there are two different probes in CryEngine, one is kind of handled as a light source and is found under Create Object -> Misc -> Environment Probe. With those you can brighten up places which are barely reached by the following light bounces. The other environment probe is for reflections, you can find it under Create Object -> Components -> Lights -> Environment Probe.
The reflection probes were placed after the lighting was finished. They use a cubemap to support reflections which is especially useful for metallic surfaces. Here you can compare the results with and without a reflection probe:
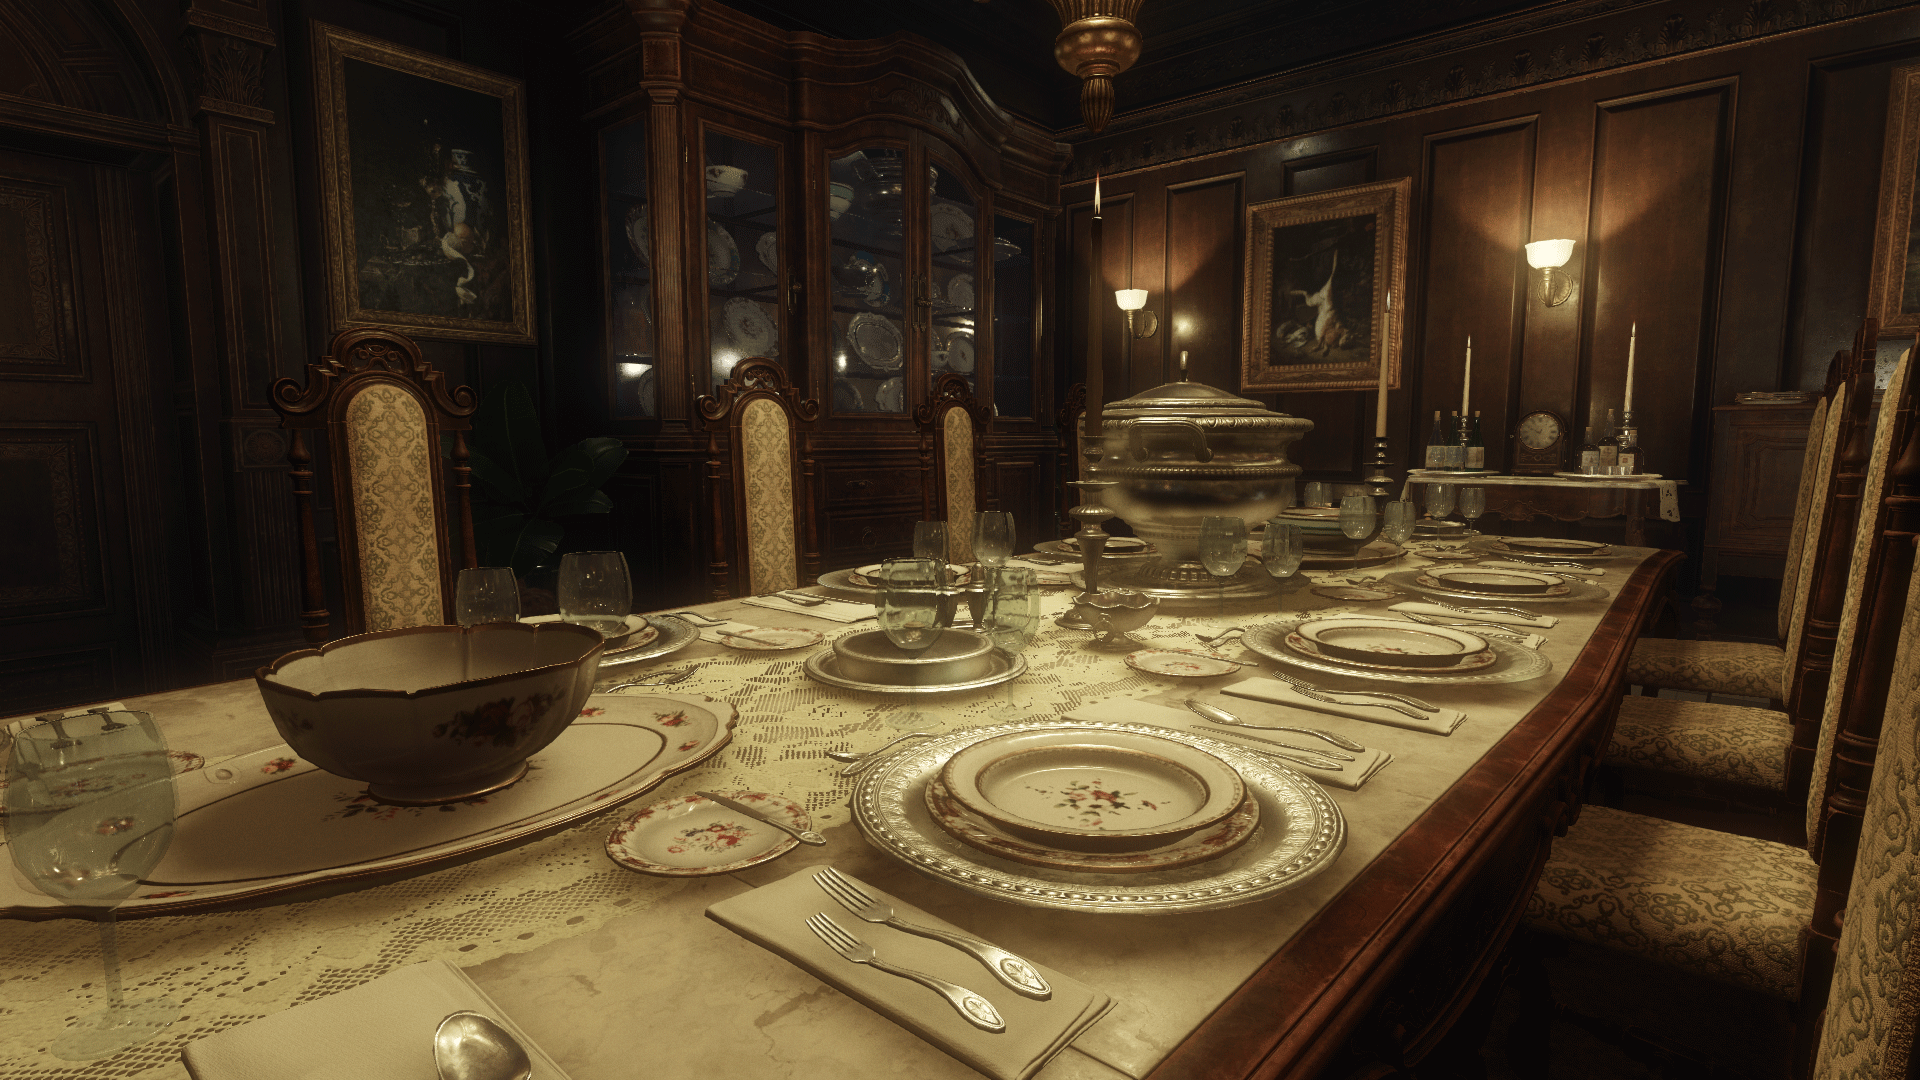
Dining Table Reflections
The polishing of the lighting was all about adding a lot of ambient lights with specific colors and fades. This helped creating the desired contrast and mood fore the individual parts of the room. So after setting up basic point lights with different strength, color and fade, the next thing to do was the specific detail lighting. For example adding some blue lights to highlight certain areas that are influenced by the moon light. This helped emphasize the desired effect.
Here you can see one example of that:

Sofa Projector
The individual steps and final result looked like this:
Lighting Stages
Workflow and Advice for Future Collaborators
Verena:
After all the research we analyzed our main reference via Skype meetings and desktop sharing, defined our goals and broke everything down into smaller tasks. The latter was done in three basic steps. Defining the fundamental and modular parts, such as the walls, the floor, materials which would be used throughout the project, deciding on the required hero assets and places and adding all the props that were necessary for the storytelling to that asset list. In that order we started to work on the scene, getting more and more into detail, using a Trello board to assign tasks and to track our progress. It was handy for us to divide responsibilities according to the two different areas, so Caspar was mainly responsible for the dining room while I was working on the fireplace area. A good communication is very important to consider everyone’s wishes and needs and also for the planning. Getting feedback regularly throughout asset production was one thing but we also needed to be honest about how much time each one of us wanted to spend on the project and how the progress was. The distribution of the assets was done accordingly to guarantee an enjoyable collaboration.

Caspar:
It’s also very important to compare the individual visions and thoughts of the overall scene in a consistent timely manner. This helps preventing frustration of one of the team members during the project because every artists voice should be heard throughout the project.
Having a basic schedule with more or less fixed milestones also helps to prevent losing interest in the project. In conjunction with this, you should have regular meetings to talk about what you’re working on at the moment, how long it’ll take to finish and what’s next after that. This is kind of no brainer, just stay in touch on a regular basis, it helps planning further steps and also motivating each other.
When talking about time, you should also consider planning some off times. This helps charging your creativity, especially when talking about long lasting projects. Besides that, there will always be some unpredictable events that may case some time off the work.
Another important point is, especially when you do such a project to learn and train yourself, to share the knowledge you earn during this project with your team member. This could be a new plugin, a new workflow, possible engine fixes and so on. And there will probably be a lot of these while you’re researching.
Lastly I’d encourage everyone to regularly check on the overall picture of the scene since in the long run it’s not about creating individual assets, but creating an atmospheric scene together.
Dressing The Scene
The main goal of the set dressing was to create a welcoming environment. We added lots of smaller props to support that intention. The living area is all about being comfortable and being able to relax. It’s a more private space with framed pictures of family members, books, private letters and other pieces of decorations. Basically everything that gives the viewer an impression what kind of person lives there.

Fireplace
The dining room on the other hand is a more official space. Guests would usually sit there, eating and having conversations. We populated this area with hardly any props concerning the private life of it’s owner and focused on assets that communicate social status and wealth. The challenge was that it should still have a light and therefore inviting mood.

Dining Area
We reinforced the meanings of the two areas with additional light sources and highlighted details. The candles on the dining table break up the tension of the otherwise heavy and rich furniture while the fireplace itself and the otherwise dark areas in the living room create have a soothing and relaxing effect.
Creating the FX
Similar to the lighting, creating and adjusting particle effects was definitely outside the comfort zone. After a lot of reading the decision on a FumeFX license was made. Since this license expired some time ago, we unfortunately can’t show you any screenshots of the plugin and the creation of the sprite sheets in 3ds Max.
Creating the sprite sheets for the fire itself, a different one for the smaller flames and third one only for the smoke did the job. This way it was possible to ensure the most control over each individual aspect of the fx.

Base Flames

Smoke

Secondary Flames

Candle Flame
The final color adjustments, opacity settings and alike were made inside CryEngine’s particle editor.
For the fireplace, separated particle entities were created and merged together. It consists of four effects, the basic, bigger flames, smaller flames, the smoke and flying embers. They are all blended together with subtle differences to create an organic and believable effect.

Fire FX
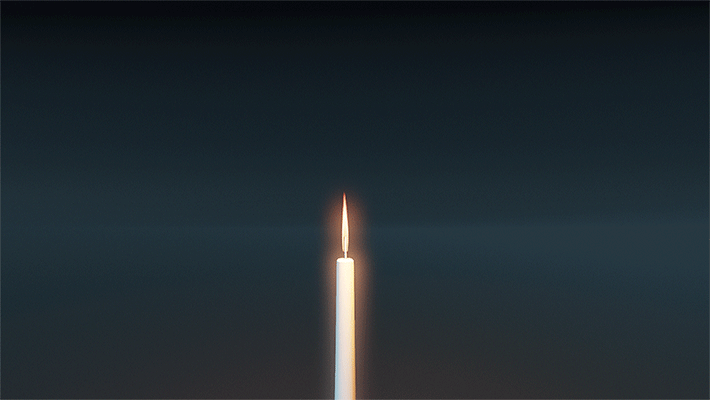
Candle FX
The particle editor itself is kind of self explanatory. Here you can see the settings for the basic “big” fire fx:

Particle Editor
Challenges and Overcoming Them
Caspar:
First of all I’d like to say that this project consisted of a lot challenges over the time. Especially a lot of the actual work inside CryEngine turned out to be a lot more of a challenge than we thought.
One of the problems here was the lack of an up-to-date documentation about CryEngine 5.
Another big challenge was that the complete lighting and all the settings went corrupt on an older engine version. So we had to rebuild everything on the latest version which still had some bugs left. This obviously took a lot of unnecessary time from us.
Another problem for us was the current restriction of twelve lights that can cast shadows at the same time. Otherwise you’ll get flickering artifacts and alike. Since we have quite some light sources in our scene, I had to do some optimizing and try to stay below the twelve lights restriction. But I read that more light sources with shadows is marked on their future roadmap.
Doing the particle work also proved as a challenge to me since I didn’t have any background in this field whatsoever. Since we started this project with the intention to get out of our comfort zones and keep learning, I bought a FumeFX license for this project. Learning the basics and getting justifiable results meant a lot of work, time and testing via trial and error. I watched a ton of tutorials and read many articles about FumeFX with its nearly endless possibilities. At the end it definitely paid off and proved to be a lot of fun to do. The particle editor in the CryEngine is really easy to understand and gives fast and understandable results.

Verena:
The whole purpose of the scene was to face as many challenges as possible. What we didn’t think about back then was that there are not only the technical ones. Working on a collaborative project like this comes with a lot of other challenges as well. Staying motivated over such a long period of time was one of them. In that regard it was crucial to talk as much about the progress as possible, to get positive and negative feedback and to motivate each other by showcasing one’s results. In our case it was most important to be honest with each other, like we told us if the other one was too negative and was pulling the other one down as well. Just speaking about the project in a positive way and keeping a clear vision in mind helped a lot.
We would highly recommend to work on a collaborative project. There’s a lot to learn about proper planning and communication and it’s super motivating when you get to the point that you really feel like team that is heading in the same direction. We expected to be relieved when we finished the scene but to be honest we were kind of sad and added more and more props just to keep going.

Advice and Final Tips
Verena:
It took us so long to finish this scene partly because we made sure to have breaks frequently like holidays or simply when we were not in the right mood for some time. It usually leads to a better result anyway because you tend to focus so much on single aspects of the project or you start to rush just to get things done and therefore the overall scene gets out of balance. It was never a problem to ignore one’s tasks for some weeks if we communicated it properly. As it wasn’t for a commercial purpose we actually enjoyed having this freedom while pushing ourselves at the same time. Working on a collaborative project is a chance to make out one’s weaknesses, to enhance the skills and to solve problems together. So make sure to see each production step as a team effort. Don’t just work on your own task-list just to showcase it in the same scene in the end. Include your partner as much as possible. That leads to much better results and is so much more fun :)

Caspar:
The project you’re working on should also be something you’re really keen on doing as a team. You’ll be putting a lot of your free time into this, so this will help a lot with keeping up your motivation. When we found our reference, we knew that this will be something that we wanted to do alongside our fulltime jobs. The work consisted of a lot of new things we didn’t do in our daily jobs and that was important for us to further train our skills as artists.
Besides a lot of communication and pushing each other, it’s also very important to give 100 percent honest feedback on each asset/question of your team member. Only with good and honest critique you can get ahead!
You should also be totally honest with your ambitions and thoughts about the project itself. It’s about a group project that will take a lot of time to complete and you won’t have the same amount of time with your family and friends as before. So talking honestly about everything will not only make things easier but will unleash more energy to push into the same direction. Take your time and invest it into planning a good amount before starting.
At last, the most important thing: have fun while doing it! :)
CryEngine and Console Commands
The last thing to mention in this breakdown is the importance of console commands (cvars) inside CryEngine. To start things up you can have a look at their documentation.
Following cvars are really coming in handy:
e_terrain 1/0 - turn the terrain on/off
sys_spec_full 1/2/3/4 - 1 low, 4 high (some features will only work within higher settings, such as POM)
sys_spec 1/2/3/4
r_AntialiasingMode 1/2/3/4 - enables different post process base anti-aliasing modes
r_MotionBlur 1/0 - this is very useful when you want to record a video (turn it off)
r_Sharpening # - provides a post process sharpening filter
e_svoTI_SSAOAmount # - adjust the amount of SSAO (SSDO)
For Taking Nice Screenshots
capture_file_format jpg/png/tga - set the output format
capture_frames 1/0 - start taking a screenshot with post processing enabled