

artstation challenge winner - merlin’s cave
Winner of the Artstation Challenge, Lea Kronenberger, did an incredible breakdown of her submission and details some of her techniques and how she approached the planning and creation of Merlin’s Cave.

Introduction
Hi everyone! My name is Lea Kronenberger, I’m 27 years old and a passionate 3D environment artist from Germany. My journey into the world of 3D began about 4 years ago, when I was working as a CAD-draftswoman and discovered my love for 3D art through playing with features in AutoCAD. Around the time I also learned about Blender, which was actually the first proper 3D software I used for a little while! A short time after, I decided to study at SAE Institute Bochum. After trying out a few different fields within my studies, it was clear that I enjoy creating environments and materials the most! I was always 100% into 3D, watched a ton of Youtube tutorials and asked people around me for feedback all the time - which I still do today.
I started picking up small freelance work as a 3D artist early in my studies and then began to work part-time at a local games company (Z-Software) as a 3D Environment Artist, where I worked full-time after graduating last year and stayed until recently. Within my time at the company I worked on several small games.
Beside that I really enjoy working on personal projects, doing game jams and participating in challenges!
Merlin’s Cave: Challenges and Difficulties
I created this Merlin’s Cave environment for the recent Legend of King Arthur ArtStation challenge and won the 1st place with it!
As some of you might know, the concept Merlin’s Cave from Jeremy Paillotin I chose, was a very popular one and many artists chose it for the production part of the challenge.

Concept by Jeremy Paillotin
This was difficult for me at first, because it felt a little weird and way more competitive than usual. But I think my way of thinking has changed pretty fast, because it was really cool to see how others approach the same scene and then somehow it was fun to think about how i could add a personal touch to the concept.
Then there were two other big challenges for me - capturing the mood and creating the trim sheets.

Planning how to approach the mood recreation
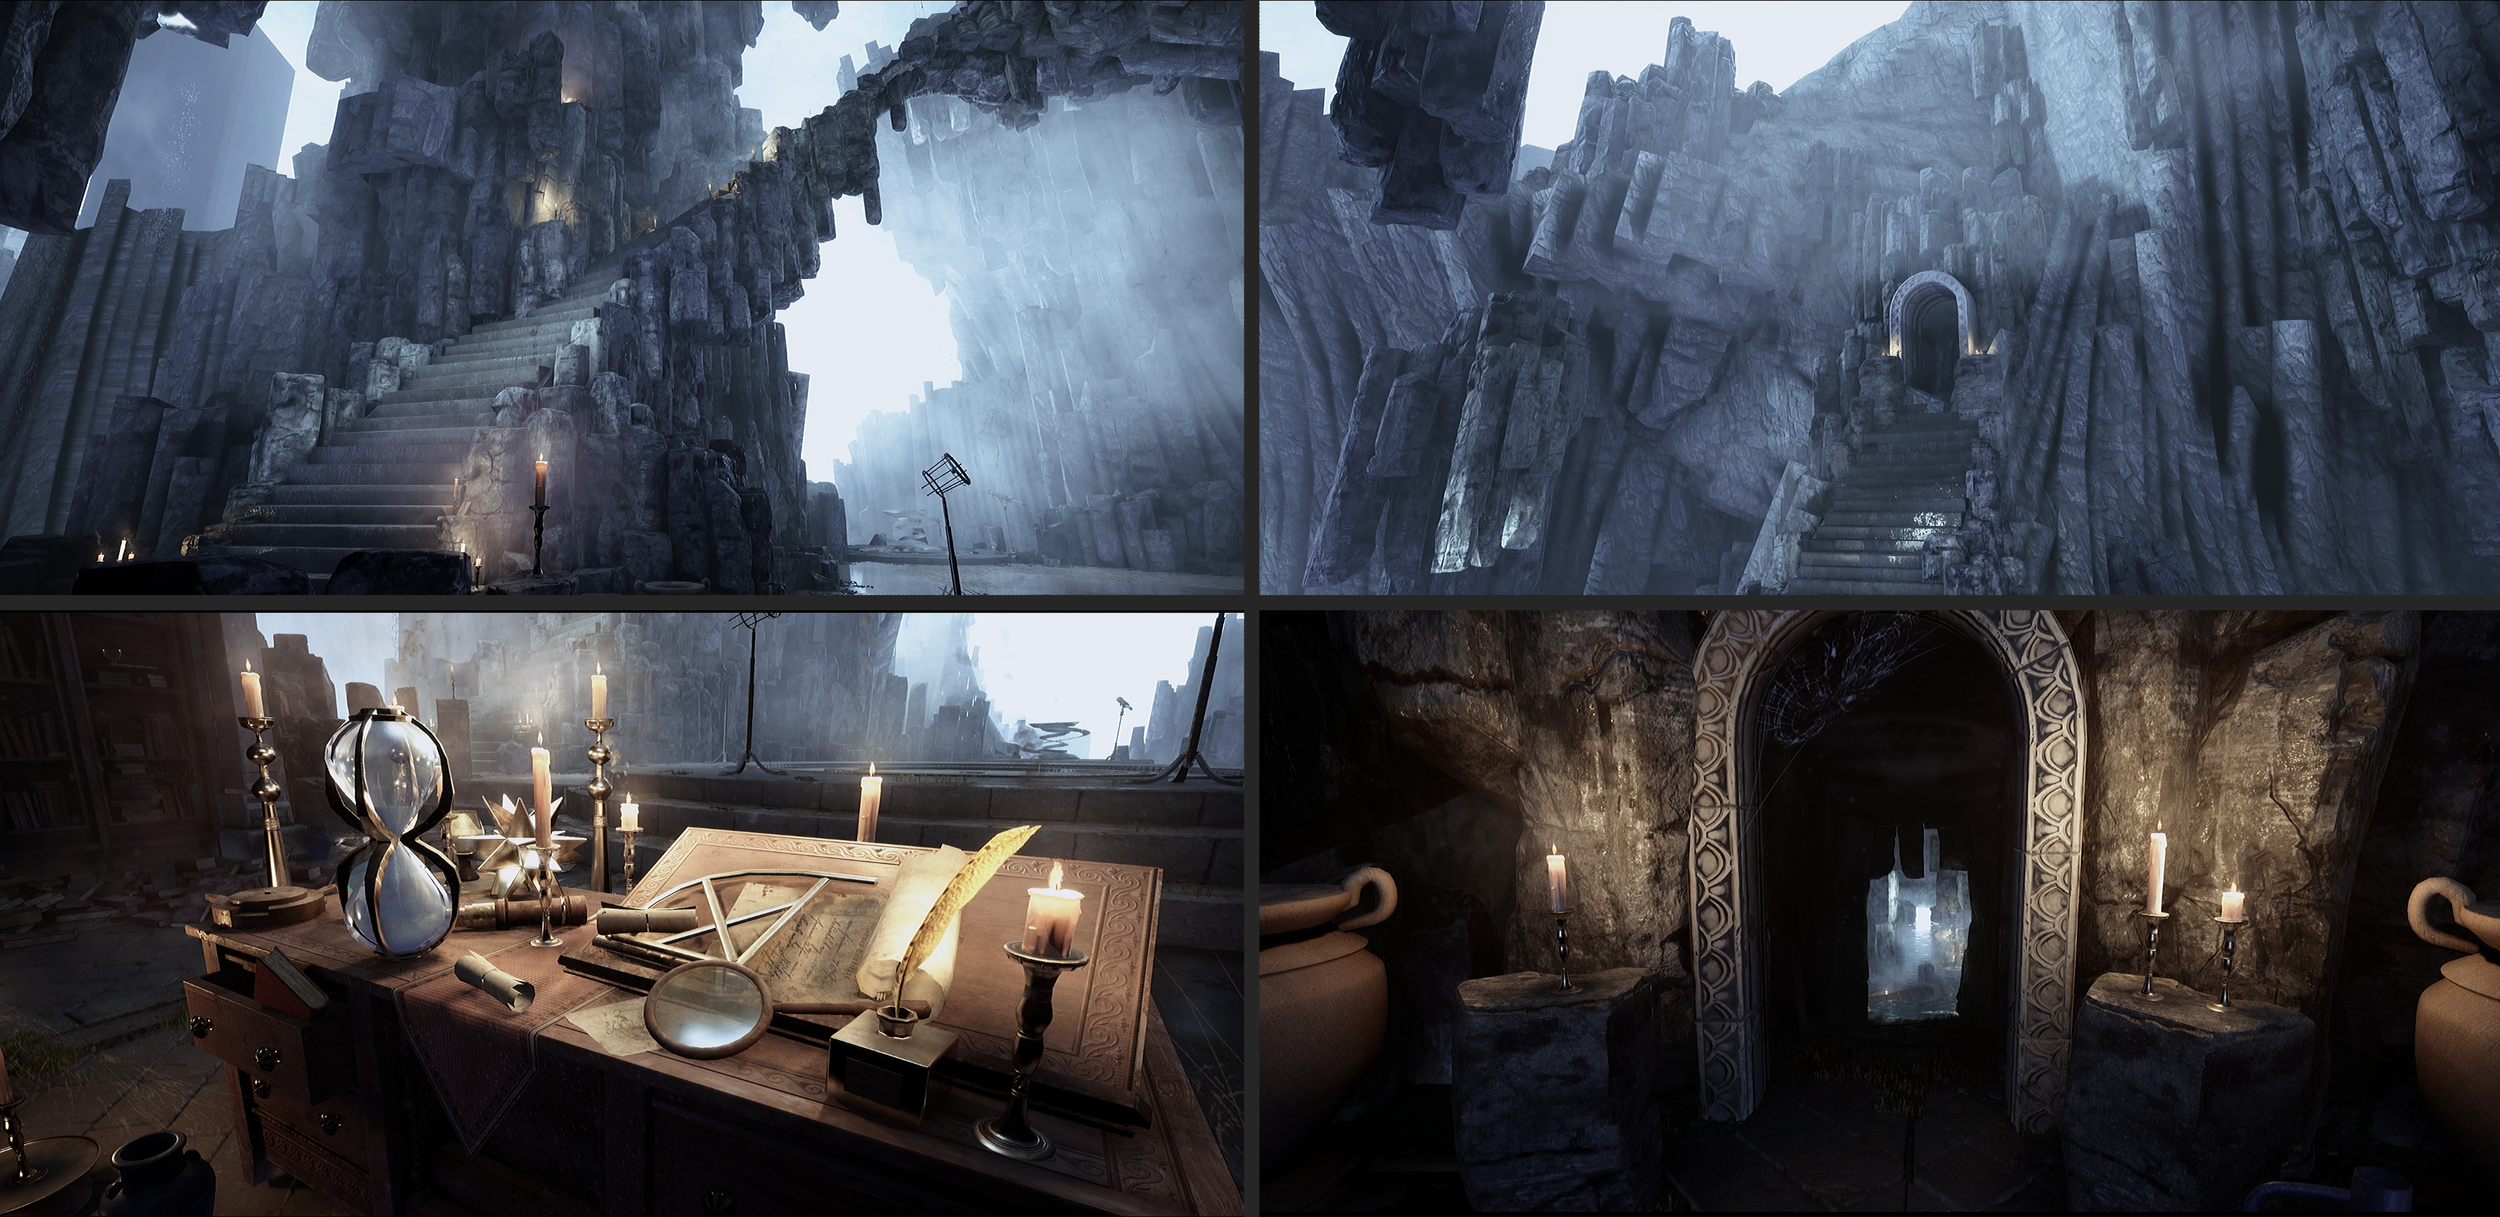
I love lighting scenes, but it is kind of a difficult task to master, because you have to think of so many things throughout the whole production phase. My fear of messing up the mood was mostly due to the fact that I only noticed most of the mistakes in my last works at the very end (like bad base color and roughness values). So I decided to try and tackle this subject at the very beginning this time - which turned out to be a good decision. At first I felt overwhelmed and it took me a few attempts to get it in the right direction. I think the most important thing is to analyze the lighting conditions you want to have. For instance in the Merlin’s Cave concept there is barely any direct light, the sun is very soft and it is completely overcast. The light that brings in contrast is coming from the candles. So the first challenge was to simulate an overcast lighting situation. My initial attempt was to create an overcast skybox and tried to light the scene from there, but as it turned out this wasn’t working too well for this mainly indoor scene and just wasn’t enough, so I ended up using a combination of a soft directional light and a sky light with a custom cubemap, which I later baked from the scene itself with a Scene Capture Cube asset. So all the natural light comes from this setup (+ a few baked fill lights). I tried to create the basic mood of the scene with blueish natural lights colors and a very warm color for the candles, but a great deal of the general atmosphere also comes from the post effects and the fog of course!

Scene depth post material for additional fog
The next very challenging part for me was creating the trim sheets. I had created some trims before this challenge, but it was mostly just packing together premade materials, so I wanted to try something different here: First, creating everything from scratch in Substance Designer (fabric trim) and second, modeling and baking the whole thing (wood and stone trims). After dealing with the first method I was way behind my schedule and decided to use premade models for creating the other trims - still being able to try it out! Creating a lot of different patterns in Designer was really challenging for me at first, but once I finished a few shapes it became easier very fast.

Trim materials I created for this challenge
In general my approach is keep working consistently on a project, don’t spend too much time with things you won’t appreciate after and move on to something else if you feel you are not making any progress. I think it doesn’t matter if everything you create is perfect, as long as it works out for the scene in the end and you can always learn from it to make it better next time.
Of course, there were also challenging things I couldn’t overcome, like for example I haven’t found a solution yet for doing color variation inside the shader for each mesh element of an actor (I wanted to implement this for my premade book groups).
Choice of Concept and Adaptation to 3D
My goal was to create a strong portfolio piece and try out new techniques. I fell in love with Jeremy’s concept the moment I saw it and chose it from my collection of the concepts I liked, because I felt it was the right kind of challenging for me.
To make the concept my own, I drew additional inspiration from the Harry Potter universe and exaggerated the contrast between cold and warm a little by adding rain outside and fabric elements inside.
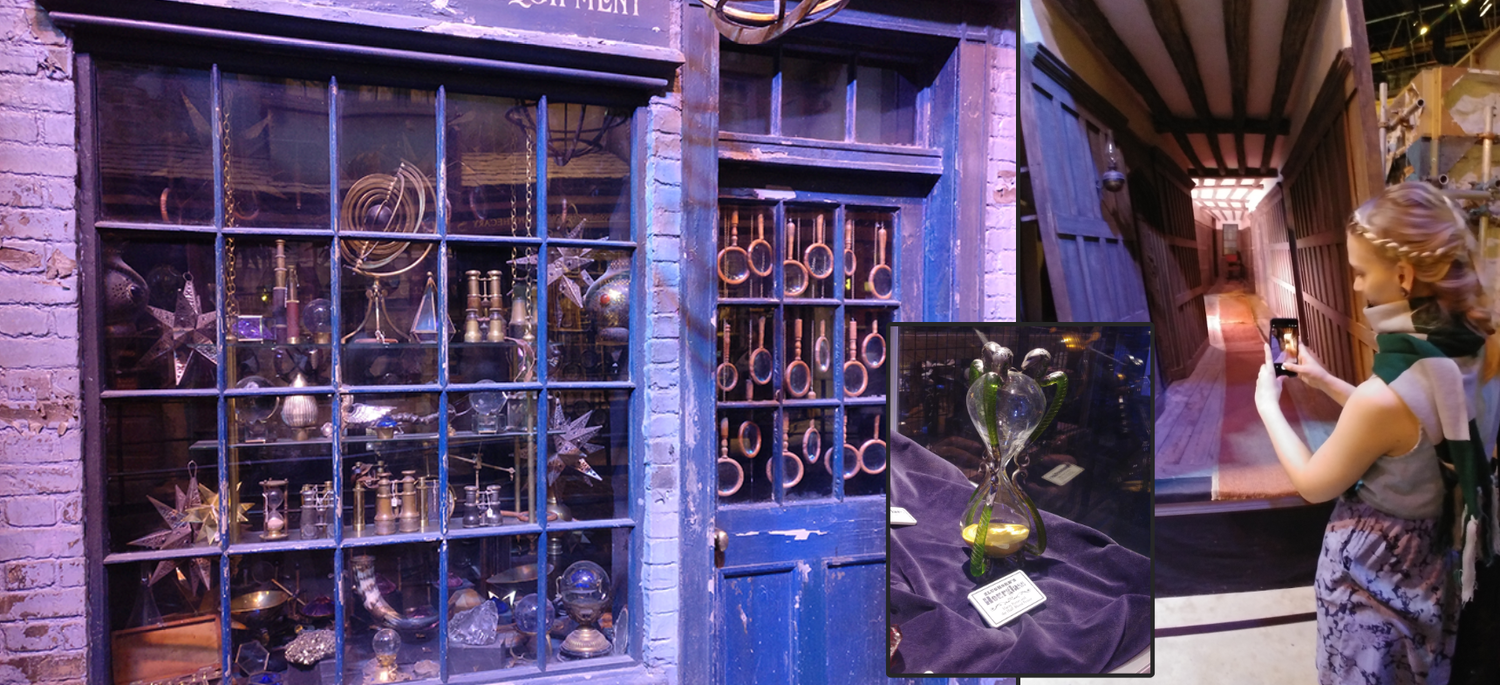
Photographs I took at the Harry Potter studio tour in London last year and used as inspiration
The most important question when working with a concept is “how can I adapt it in 3D as easy as possible?” and I think the simplest answer would be: Plan ahead! Before I even started with anything on the production side I spend quite some time planning the workflow and how to approach everything. It’s important to decide which details can be created with normal maps and which should be modeled to define the silhouette. I wrote down an asset list and divided it into must-have and nice-to-have, then decided which of them can be combined into a set using the same material.
To decide whether an asset is a must-have I usually ask myself 3 main questions:
- Is it important to tell the story?
- Is it necessary to make the composition work?
- Will it contribute to the feel / atmosphere of the scene?
I then planned if and how every asset could be created in a way that it can be reused as much as possible. The lower part of the chair for example is reused as a stool and the basalt columns are specifically designed to look very different from every angle so they can be reused a lot without noticeable repetition. Reusing assets saves a lot of time in the end, meaning you are able to spend more time for other parts.
Another important thing when working with a concept might be to make a closed game environment with a consistent style out of it, even though you can’t see everything in this one concept image. To fill in these blank areas, it helps me to develop a little more background story and think of how the player would get there and from where they would come, how and where they would go after and what meaning the location would have within the whole story.
Adding Lights, Fog and Particles
When it comes to conveying the mood of a scene I think lights and visual effects are equally important, so I decided to add the candle flame, smoke, rain, dust and fog together with my lighting setup right at the beginning of the production part for the challenge.

Capturing the mood this early helped to notice mistakes on other assets early and it felt good not having to worry about it throughout the next production steps. I will definitely continue to use this workflow for future environments, even if just using some placeholder effects in the beginning!
Building the Scene
After blocking out the basic shapes with Unreal prototyping geometry, I created proxy models of the main assets in 3ds Max which I turned into the final models later. Placing proxy meshes early helps to make major changes before it gets too complicated (like with an already optimized mesh and uvs), thus can save a lot of time later on.

All main assets, except for the basalt column, are textured with the trim sheets I made. For the basalt columns I decided to create a shared texture atlas. The reason is that they are organic assets and need to be uniquely baked to look great with a low polycount. The polycount for the basalt columns is way more important than for the chair for example, because the chair will only be used one time (maybe a couple more, but that’s it), while the basalt makes out a big part of the scene.
As mentioned above, I tried to make the silhouettes distinctively different from every angle for easier re-usability! I sculpted 3 base columns in Zbrush, created 3 groups of them in 3ds Max and then textured them in Substance Designer with baking and blending some base materials I made

To fill out the background areas much faster, I decided to also create a big, rough, lowpoly rock model. It was basically created by just randomly placing cylinders and a sphere and then merging and distorting it into a more natural shape.

Background rock formation

Early Testing in Unreal
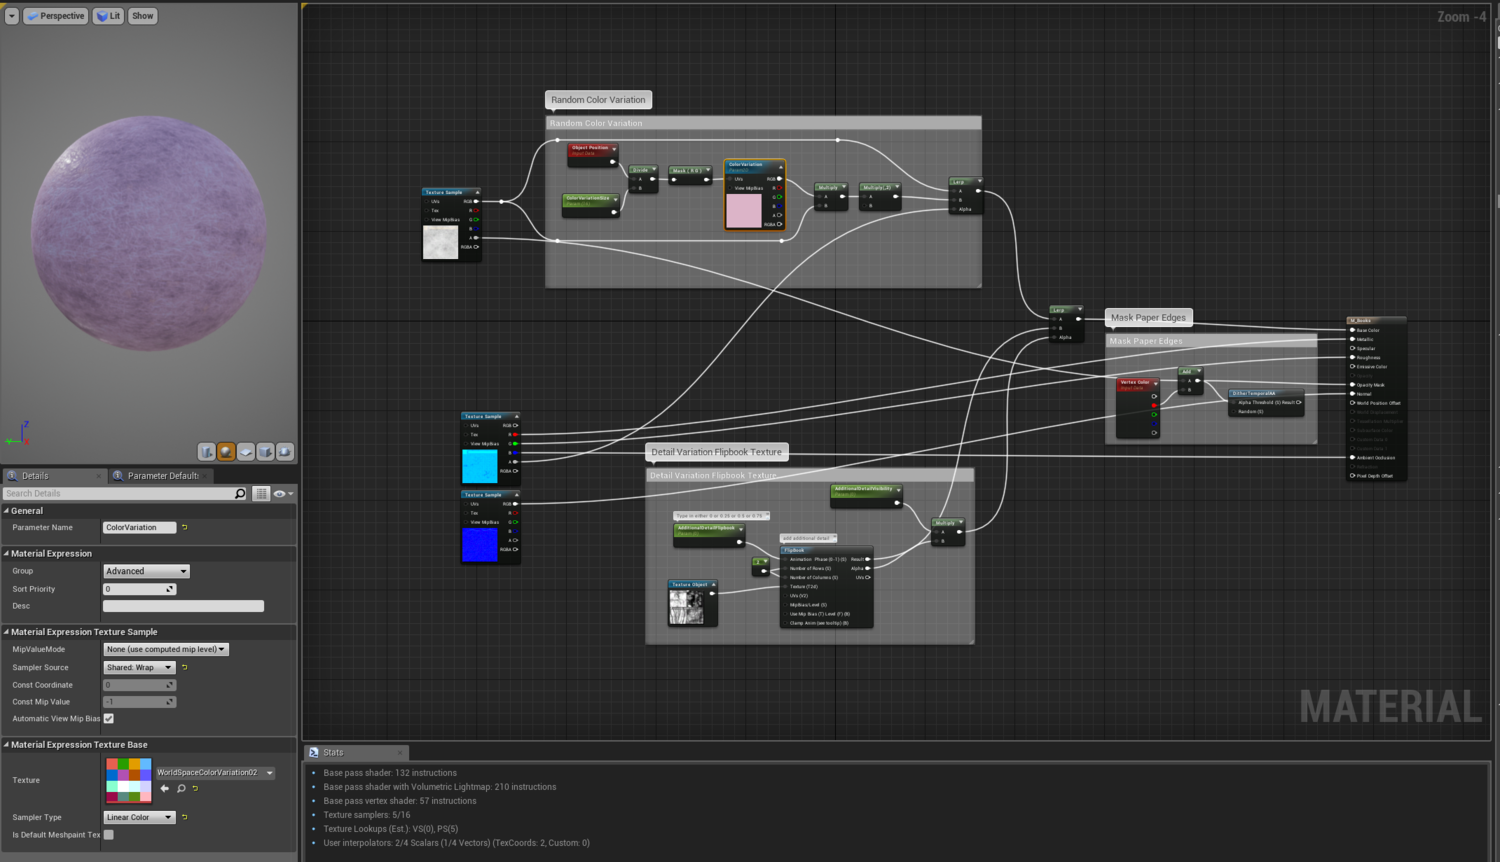
Mostly when working on an environment, I like to create a decent master shader setup very early. The basalt columns were the first assets I finished and with them I also implemented my PBR master shader with a focus on variation and quality. It provides a random color variation, detail texture overlay, easy way to add automatic moss or dust later on, specular cavity and a bent normal.

My Master shader setup
Sure, this will cost more time to think of and implement in the beginning, but afterwards it is easier to make all assets look good and by building it up in a very organized way, you are free to implement other ideas later, which will then be inherited by all assets using the master shader without spending much more work adjusting things!
For the books and scrolls I also created a shared atlas, but those are kind of special assets in my scene and use another shader for extra features.

Callout sheet books
First, the easy placement. After modeling 4 different detailed books and placing the UVs on an atlas, I created different groups, piles and scatters of books in 3ds Max. The piles and scatter were meant to quickly decorate the scene, instead of placing everything unique (and also save performance by merging them into bigger meshes), while the shelf groups were created to populate the shelfs quickly in a thoughtful way. I populated only 3 shelfs in Unreal and then duplicated them and placed them in a different order for each segment.

Books breakdown

Paintable edge wear for the scrolls
Second, the high variety using different techniques:
- Moved the uvs for each book cover randomly into one of the 4 stacks
- Shader with random color variation through a 4x4 px texture (=16 fixed colors)
- 4 Different overlayed detail layouts, controlled by a flipbook texture
- 2 Texture sets for the base color
- Automatic world blended dust
- Dirt decals
- Paintable edge wear effect with vertex colors through opacity mask texture
The variations are assigned with different material instances. A problem I saw then was that the premade groups were seen as one object (naturally) by Unreal so all books in the group would receive the same color. Unfortunately, I didn’t have enough time to tackle this issue, so I worked around it by leaving a bit more color in the base color texture and then adding just a little bit of random color on top of it. This way the whole group would be colored slightly different than the others near it, but they still have variation in every single book.
Book master shader. Dust was added later on
After finishing and placing the main assets I focused on creating more little assets to decorate the scene with.

Callout sheet with all the assets
Building the Trim Sheets
Nearly all assets, beside the above mentioned, are created with the 3 trim sheets I made for the challenge.
The first thing I do is to write down what I need for the scene. I will look through the reference images and think about how many different patterns and elements would be best and where they can be shared. After that I'll think about how big the trim sheet should be. This is most likely fixed by the technical limitation of your project. For the Merlin's Cave I decided to have 2k maps, but used 4k for beauty shots.

First steps of planning the stone and wood trim sheets
Then I usually jump into Affinity Photo (or Photoshop) and create an empty document with this resolution and 128 px grid spacing. I start with the biggest parts and / or generally dividing the trim into different themes. For example it could be that a base wood without details is needed a lot so I will give it a resolution of 512 x 2048 px which leaves only 1536 for everything else on a 2k atlas. Then I'll see how detailed the patterns should be and whether they would need 256, 128 px or even smaller resolution. Lastly I just need to get it working by reducing either the amount of shapes, their resolution, complexity or length. It can be very different what to decide here. After writing down everything and tiling the document into parts it could also be helpful to put in references directly into those parts so you have a single image to work with as a production reference.
Depending on the workflow I would then jump directly into Substance Designer or 3ds Max and work on the planned patterns!
For this challenge I also created the base materials myself in Substance Designer.

Examples of working with trim sheets

Base Materials I created and used to texture my trim sheets
Final Tips and Conclusion
Always have little backup plans!
A perfectly timed schedule is almost never the case in my experience, there are often unexpected things happening like getting sick, having to do overtime at work or other things out of your control. It should be obvious that you plan a little time buffer for your projects, but I think it’s also really nice if you think of backup plans for each big step beforehand, so that you are able to react as soon as possible and try to get to the next step on time. If you have spare time in the end, you could still work on it. For example I really wanted to create all the patterns for the trim sheets myself, but I was running out of time, so I used premade shapes. This little sacrifice has ensured that all the following steps could be continued and I was able to finish the scene. Otherwise I would have spent much more time with the trims and probably not had time left to do as many assets as I have done now.
Do one step at a time and take tiny breaks in between your project to stay healthy and motivated! Overworking on work and personal projects got me really bad a couple of times. It's much more productive in the long run if you learn how to step back from a project to catch your breath.
Always try to implement the feedback you get and interact with other artists! It may seem obvious, but at least it wasn’t always to me, so I just wanted to say it again.
I really enjoyed participating in this Artstation challenge. I met a lot of awesome people and I greatly improved my Substance Designer and lighting skills!
I hope this article is helpful and inspiring for you! If you have any further questions or just want to get in touch, you can always pm me on Artstation! You can also find detailed breakdowns of other parts of my Merlin’s Cave entry there.
Cheers