
station on sea - capturing life in your environments
Kenji Ramirez Shimomura sat down with us to explain how he crafted this incredible scene based on concept and using Dishonored as a visual style guide.


Sea Station
Introduction
I am Kenji Ramirez Shimomura, a Spanish Environment Artist with the problem of starving for knowledge. I’ve been playing video games since I can remember and wondering how they were made was a big question for me. When I was 18 years old, I didn’t even know what to study at University. Then one day at a Universities Fair, there was a degree on Design and Development of Video Games with a solid offer of subjects.
My first steps in the 3D World were like any other person that just started, doing basic models that weren’t appealing at all, full of mistakes and a huge list of unknown things. Having an overwhelming amount of different subjects such as Programming, Mathematics, 2D/3D Rigging and Animation, Physics, etc... weren’t helping me at all to focus on 3D. My life goal of becoming at 3D Artist slowly started to fade everytime I I opened a game or browsed the work of other artists.
The valley of the artist, hitting rock bottom and taking time to realize which was my real vocation gave me the strength to make time to dedicate exclusively to modelling. I left University in the last year to take a 1 year course of Modelling for the AAA Game Industry, where I was taught the solid foundation that allowed me to grow. During that course I was hired as an intern at Tantalo Games. I learnt how to work on a variety of different tasks in the pipeline, from blocking, sculpting and QA on assets or props from other seniors, accepting criticism, managing time and working under pressure. This is when I knew once and for all that Environment Art for Video Games was what I enjoyed the most. And from time to time getting my ass kicked for the better. After that, I retook my studies at University having a hard but awesome outcome of this, working in the morning for Tantalo, University in the evening and working on my assignments at night. I learnt how to be disciplined with my own time in order to not get burnt out. But the bad news came when the project didn’t get enough financial support and they had to close the studio. After that I worked as freelance for an animation Kickstarter project, Proyecto Nirvana for six months, but it became an illustrated novel long after I left. The panorama in Spain for getting a proper job was something that pushed me to emigrate after a year and a half without getting any positive response from a scarce Video Game Industry. So I checked worldwide for well established schools that I could use to catapult myself into the Industry, finding that Canada was the country with the biggest number of people working in games and having a renowned school, Think Tank Training Centre. They requested a solid portfolio before joining the Mentorship Program in which I was working for almost a year.

Sea Station


Preparation and Planning
Before creating a single polygon you need to have a crystal clear idea what you want to do, estimate and plan how much time you are going to spend on each asset and how many of them are reusable. The first step is finding a concept, a real image or a 2D concept, it doesn’t matter as long as it’s clear and readable. But it has to be something deep down you know you want to work on. You will spend a lot of time looking at the same environment and you don’t want to risk feeling detached from it. Having the main picture already defined you have to do a breakdown of your concept, take notes and draw over it in Photoshop to visualise which assets are modular, share the same or similar materials, isolate unique assets, trimsheets and figuring out the non-visible parts of the scene. If you are not working for a client or a company you can always make changes to the original to fit your necessities. Now it’s time to start the phase of gathering references, normally I prefer real elements and if its 2D with a neat and clear work on the lines. I use PureRef as my image board and divided the references in to categories such as materials, structures, organic, foliage and props.

Sea Station: Reference Board
Blockout
After breaking down our main piece we can start the blocking out the scene. This is mandatory. It doesn’t matter which software you use, Maya, 3DMax, Blender etc. Always work with basic shapes and avoid adding detail. We need to see the big masses silhouetted clearly in the negative space.
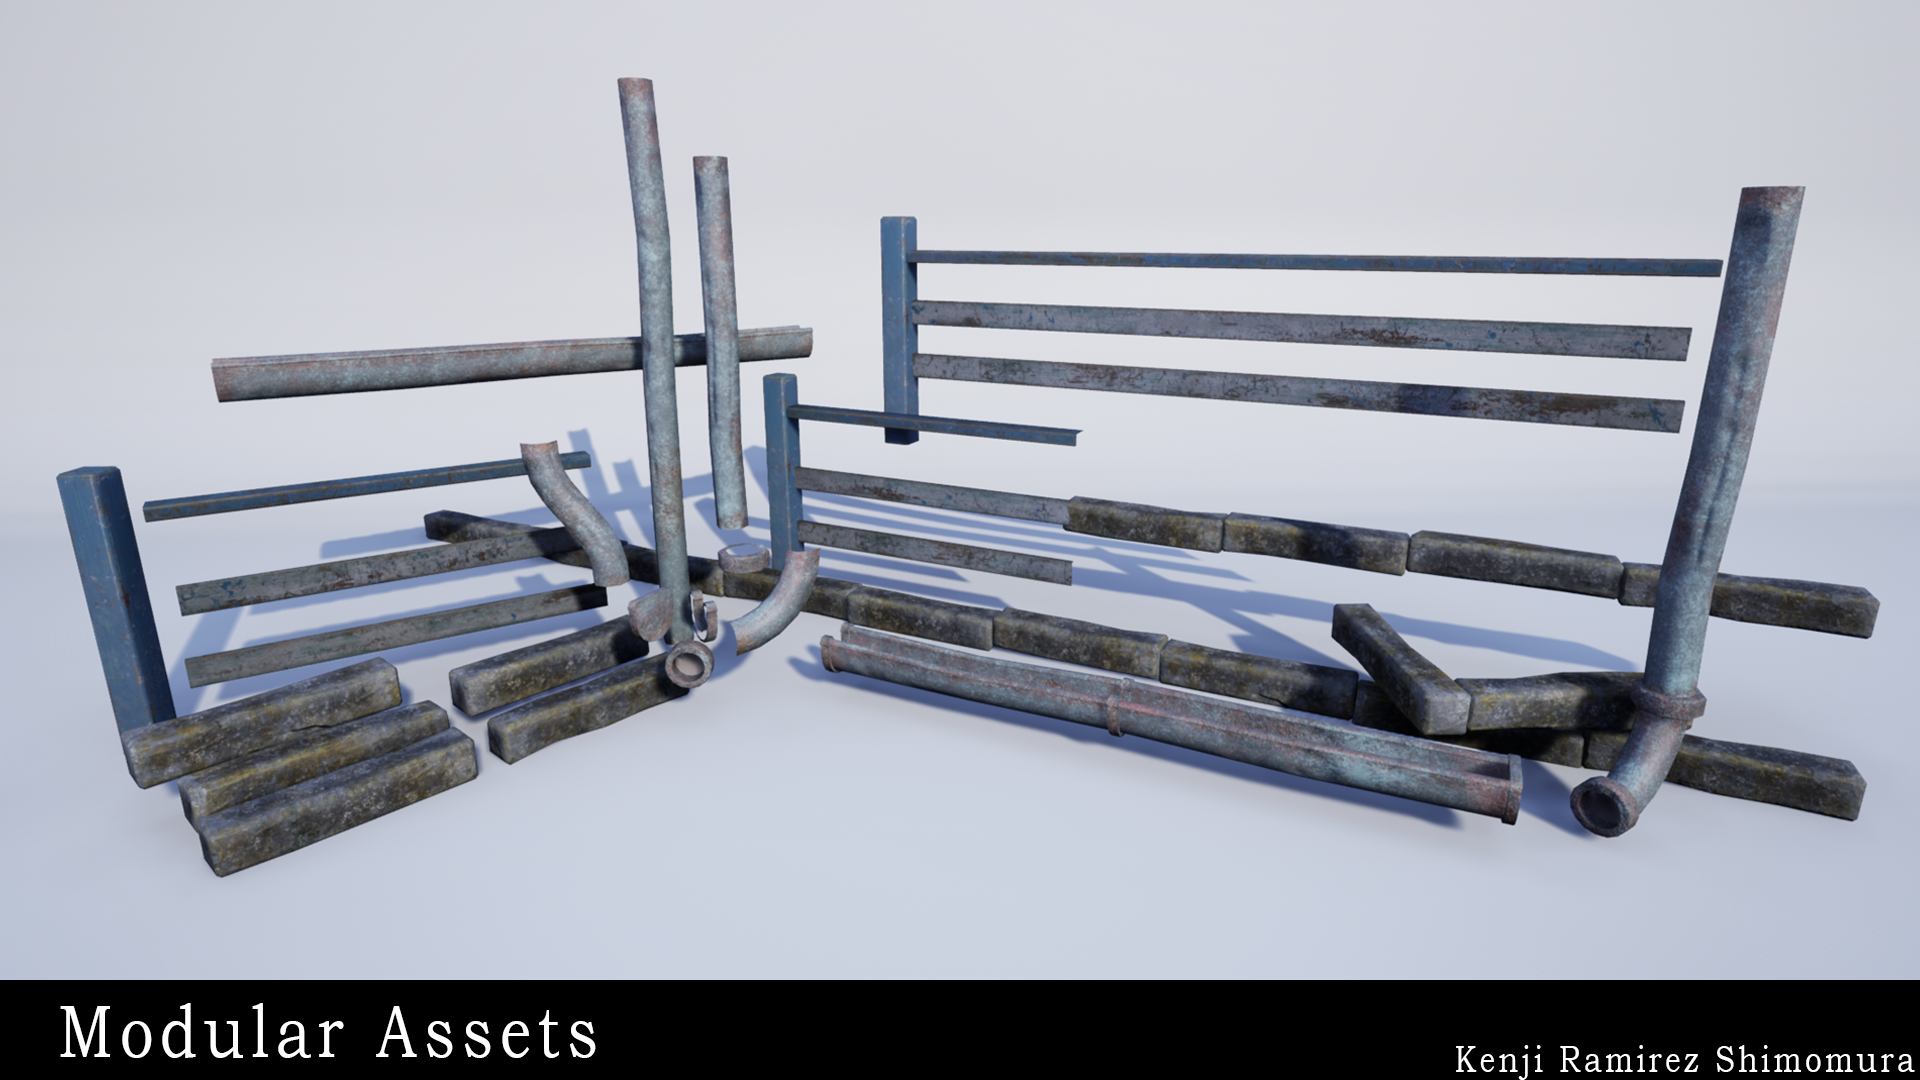
The next step is to start placing basic colours on the masses, so you are obtaining an early visual reference on how the materials will work amongst each other and break your major shapes. Once we have them in place, we start to take a more technical approach, establishing the unit and measurements we will work with, normally matching the units of the engine: Unity, Unreal Engine 4 or others. I like for example taking a 1 meter as the core unit, so I can build segments of 4-2-1 with dividing geometry as a column or a pole. Here it’s important to decide where the pivots should be placed, and every single one of these unit pieces are exported to the engine. And now all we have to do is build the scene by placing these pieces in their correct spot and because we are using common units throughout all of our models, the grid of the engine will make the task easier. In addition, I like to place the pieces in a basic state, bring other pieces that complete them and convert them to Blueprints. This way I can create different variations of the same assets with subtle modifications. And because the pivot placement is the same for all pieces, we can swap the place holder asset with our new variations.
Sea Station: Modular Assets


Creating Iconic Landmarks
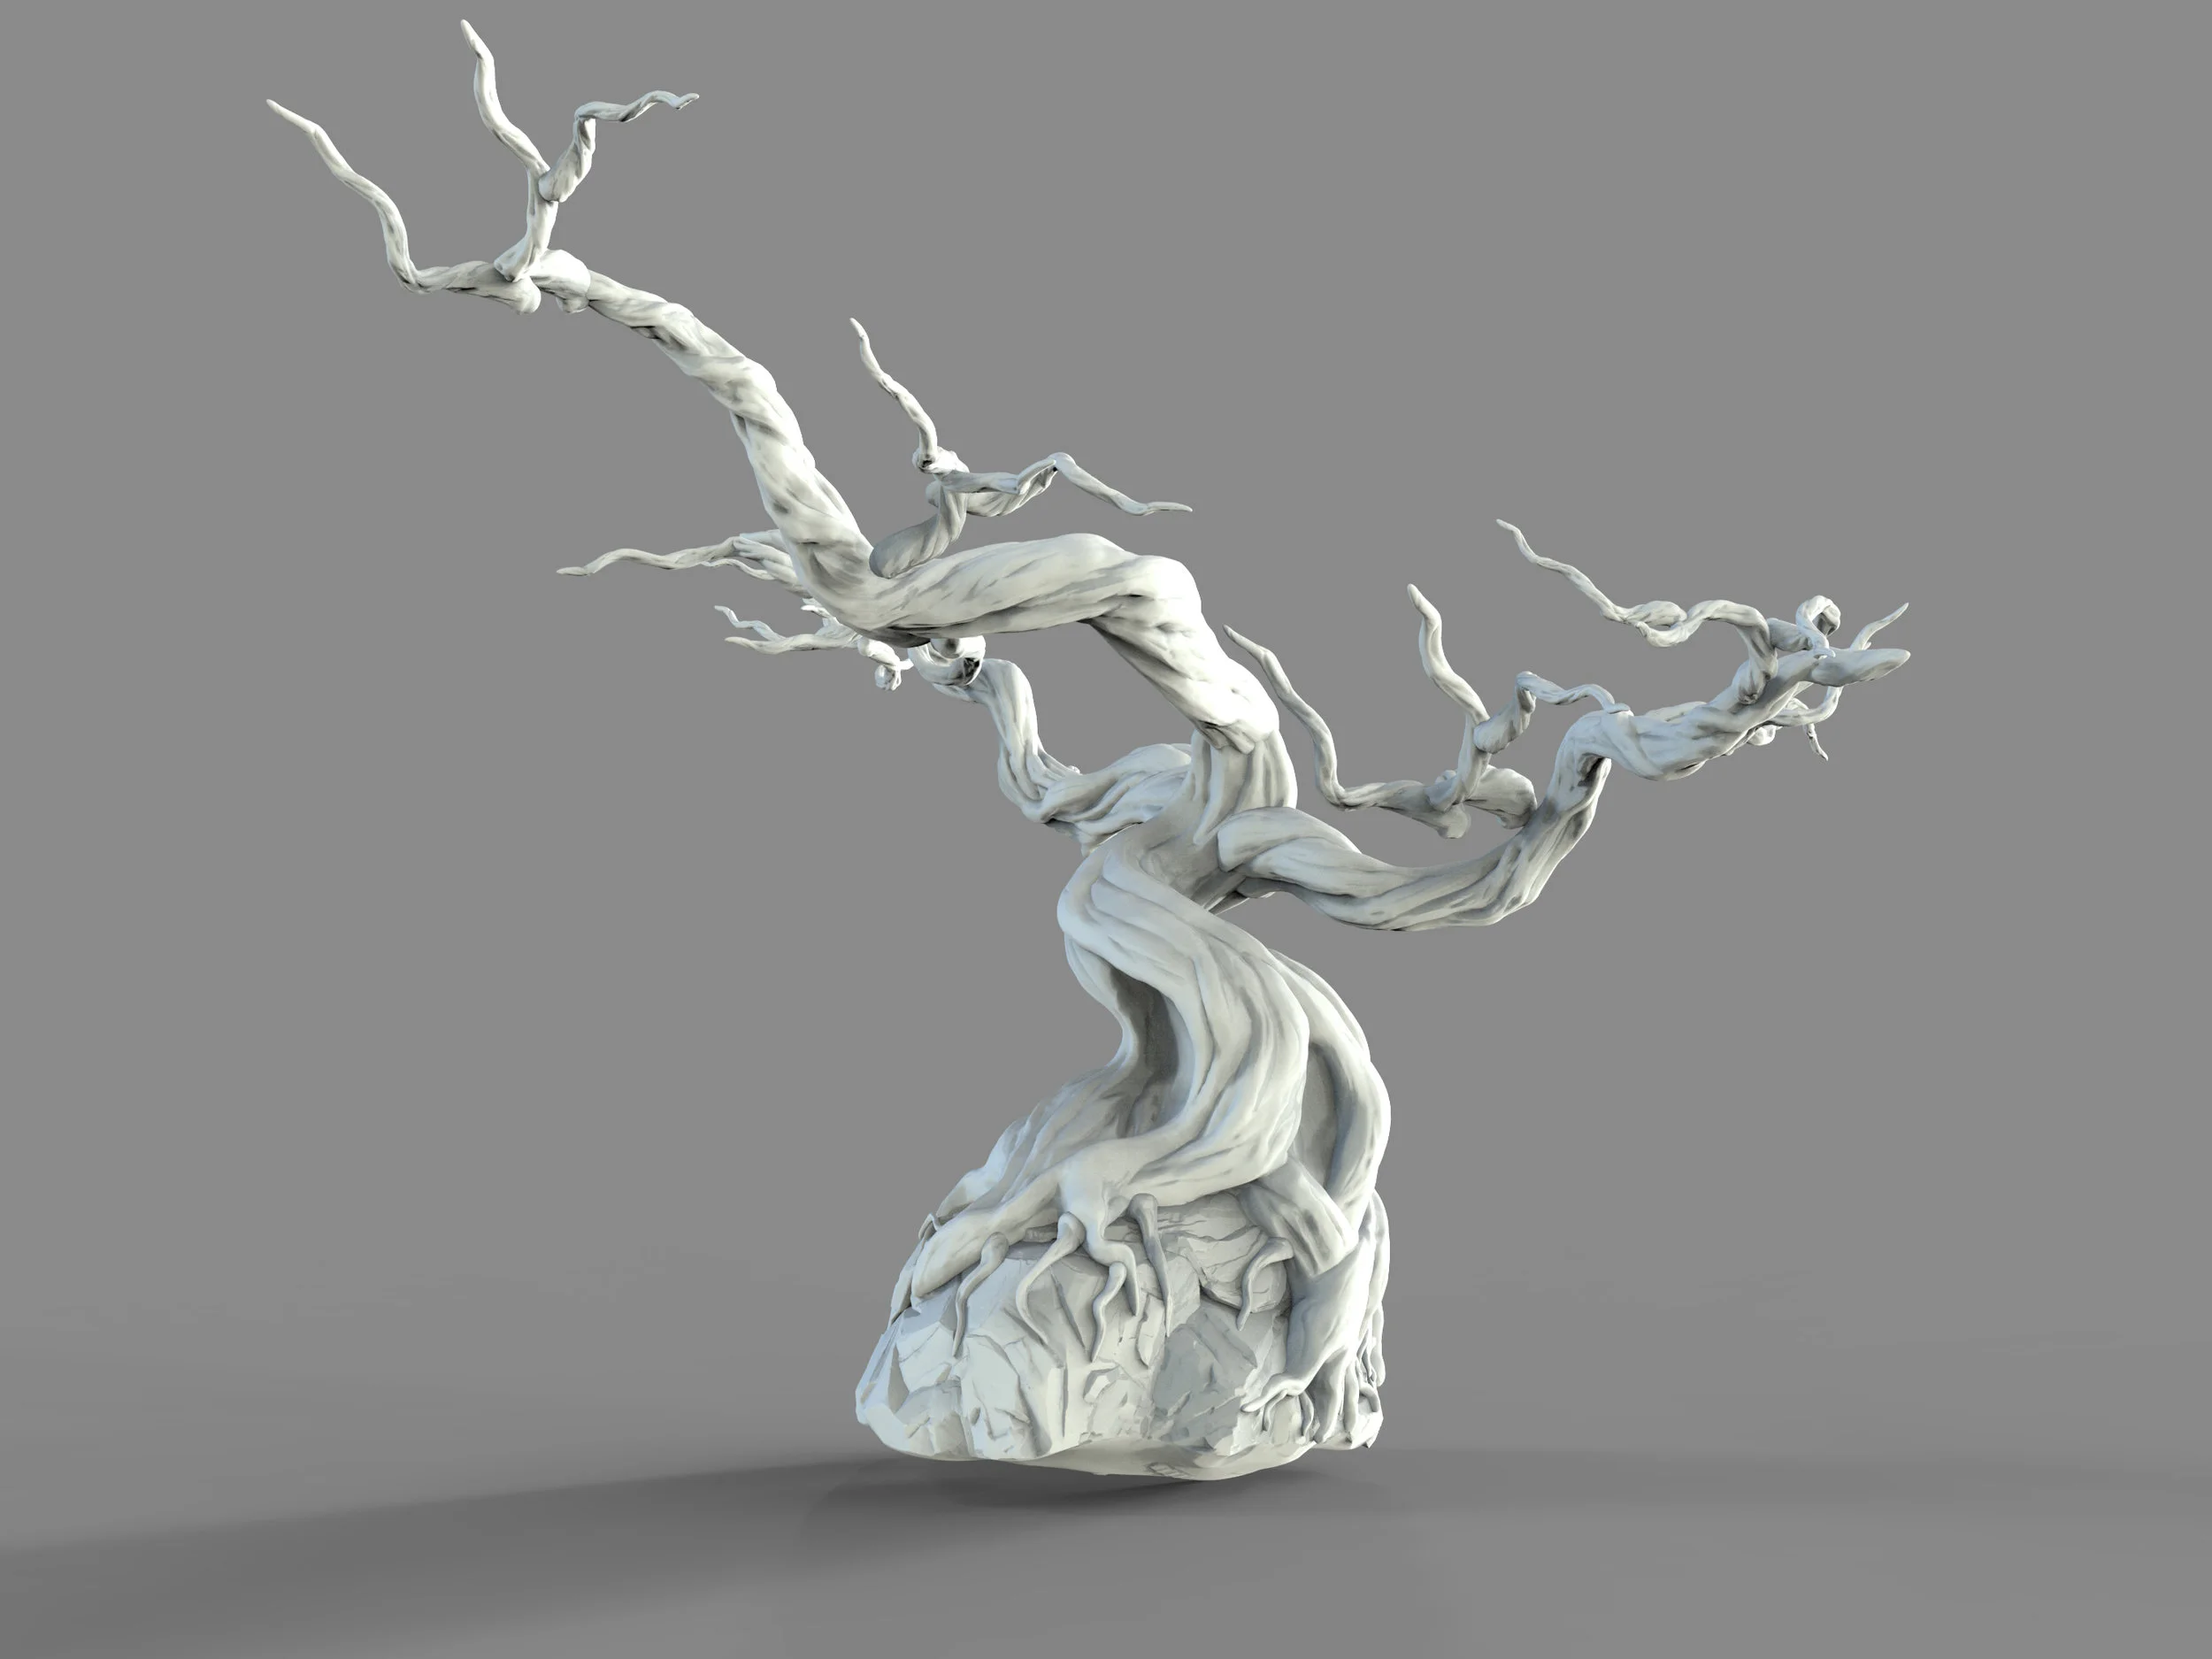
The tree was a hard bone to crack. I had to change the one given by the concept, that was just a beautiful but weak bonsai tree growing on a rock, to something that was meaningful, a reason to build a station there. Because it was a very unique the tree I had in mind, SpeedTree was discarded as an option. So I did the main trunk and huge branches in Zbrush, and the Rock.

Sea Station: Tree Landmark
The fun part was doing the breakdown of the shapes of the trunk and roots in order to do a proper retopology, and cut the UVs and fitting them to a straight line without causing stretches. For the material of the tree, I decided to create two materials in Substance Designer, one for tree bark and another for the wood underneath. After that, I baked in Marmoset Toolbag and sent all the maps required by Substance Painter for texturing it. Even if having a 4k map was enough for holding the quality in close ups of the tree, I decided to add a detail normal extracted from the bark texture tiling over it in the shader of UE4.
Landmark Tree Sculpt:


When creating the tree cards for the leaves, after finishing make sure to create a sphere, scale it to fit the shape of all the clusters and transfer the vertex normal to them from the sphere. This will create correct shading among the leaves, instead of cards intersecting each other. The same leaves are duplicated in the UE4 and set to Static in order to get the inner volume, and the visible leaf version to Movable to get the moving shadows without disrupting with the baked shadowing.
Lighting and Shaders
First of all was finding the shader for the sea. It’s a main filler of the screen and it’s giving us the information of the location, so I couldn’t risk creating a shader by myself. I decided to use a free UE4 Community Sea Shader. It contains every single parameter I was looking for and it allowed me to configure it to meet the necessities I wanted.
The sky is another main piece on the screen, this also needed to fit the lighting I wanted to achieve. I explored many different websites with free HDRIs and downloaded as many as I thought I would need for running my tests. The HDRI has to be taken seriously, it’s going to affect the colour information bouncing in the shadows and can dramatically impact the vibe in your scene. After trying several HDRI images, I chose the one that worked best for me.
For the lighting, I set the Directional Light to movable and adjusted the shadow cascade for the best results. The Skylight is set to Static and will generate smooth shadows that we try to get on the Static Meshes throughout the scene, and affecting the the lights that are set to Static and Stationary.

Sea Station: Detail Lighting

Sea Station: Detail Lighting
The secondary lights are mainly Spot Lights, they are easy to configure and the results are really good with the customization of their cones, setting their Indirect Lighting Intensity for nice light bounces and increasing the source radius for achieving softer shadows. Just a few of them are stationary so that they can interact the Volumetric Scattering in order to create soft volumetric lighting on the fog.

Sea Station: Spotlight

Sea Station: Spotlight Settings
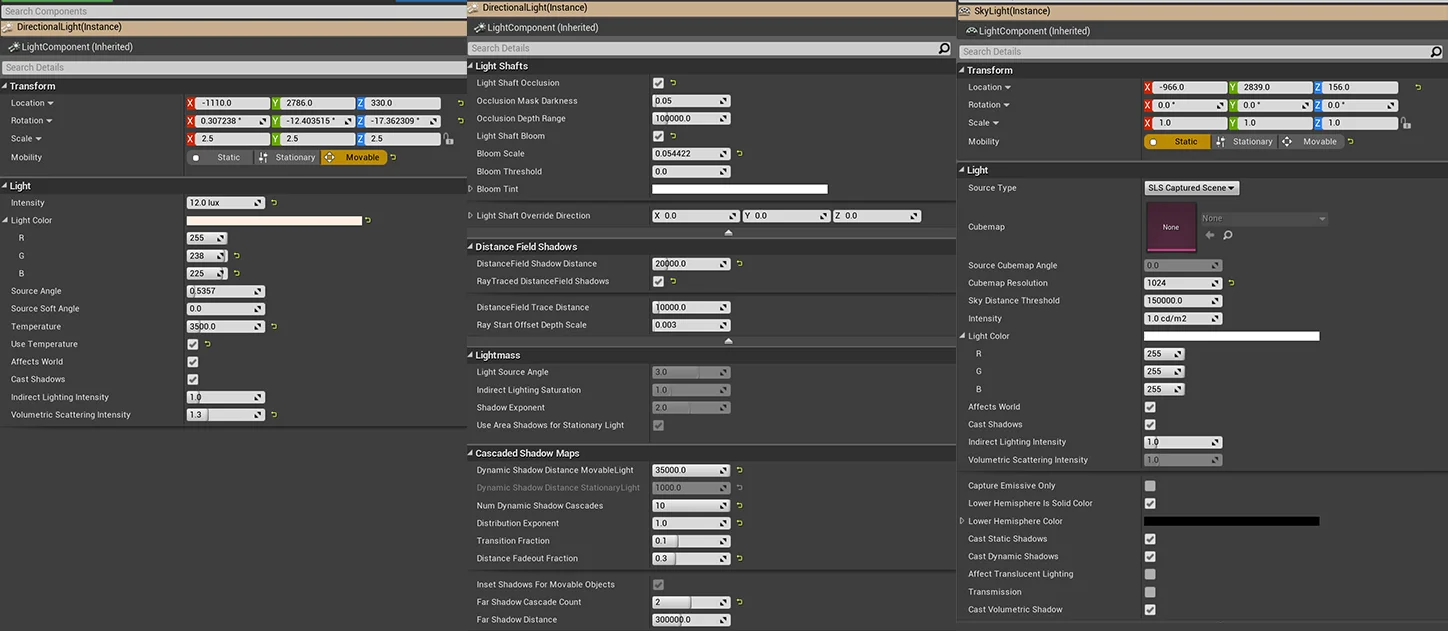
Sea Station: Global Light Settings
This time I decided to use caustics, and I found out that they were pretty simple to do and configure. All I needed was create a Material Light Function with panners I could control separately.

Sea Station: Caustics
Essential Skills - Colour Theory, Consistency and Storytelling
Having a wide range of knowledge and being organized is going to save you time and help you avoid finding yourself in the middle of a rat-trap you created for yourself. This is like a city builder game, we work from the largest elements to the smallest. Find which tools are being used by industry professionals and try to achieve a decent level of skill with a vartiety of different software, such as Substance Designer, Substance Painter, 3DMax, Maya, Speedtree, Zbrush, and others.
Things that you have to tackle besides knowing the software that might be required will involve:
Colour Theory and Composition. It's better to play safe with unsaturated colours that you can change or enhance later. If you can do a palette of colours that you want to work with, even better.
Positioning of objects is crucial to make people comprehend your environment. Place main structures or shapes, place a few cameras at points of interest and polish them up.
Understand and make cohesion of the different art you are putting on your scene. You cannot place something cartoonish in a realistic scene, or doing cross over of art styles that don’t work together nicely. You can always experiment if you have the time, but if you are adding a piece that looks unusual, you should ensure that piece has a reason to be there.
I highly encourage you to bake in Marmoset Toolbag, it’s the fastest baker in the market, has up to x64 samples, multiple channel outputs, you can explode the mesh inside, create UDIMs or Texture Sets, and becomes a very handy tool in order to create my trimsheets baking geometry with ID Maps, fixing the skew and the offset of the cage, and more features. Only advantages, and a lot of AAA video game industry companies has it on their workflow.
Sea Station: Various Props


Challenges
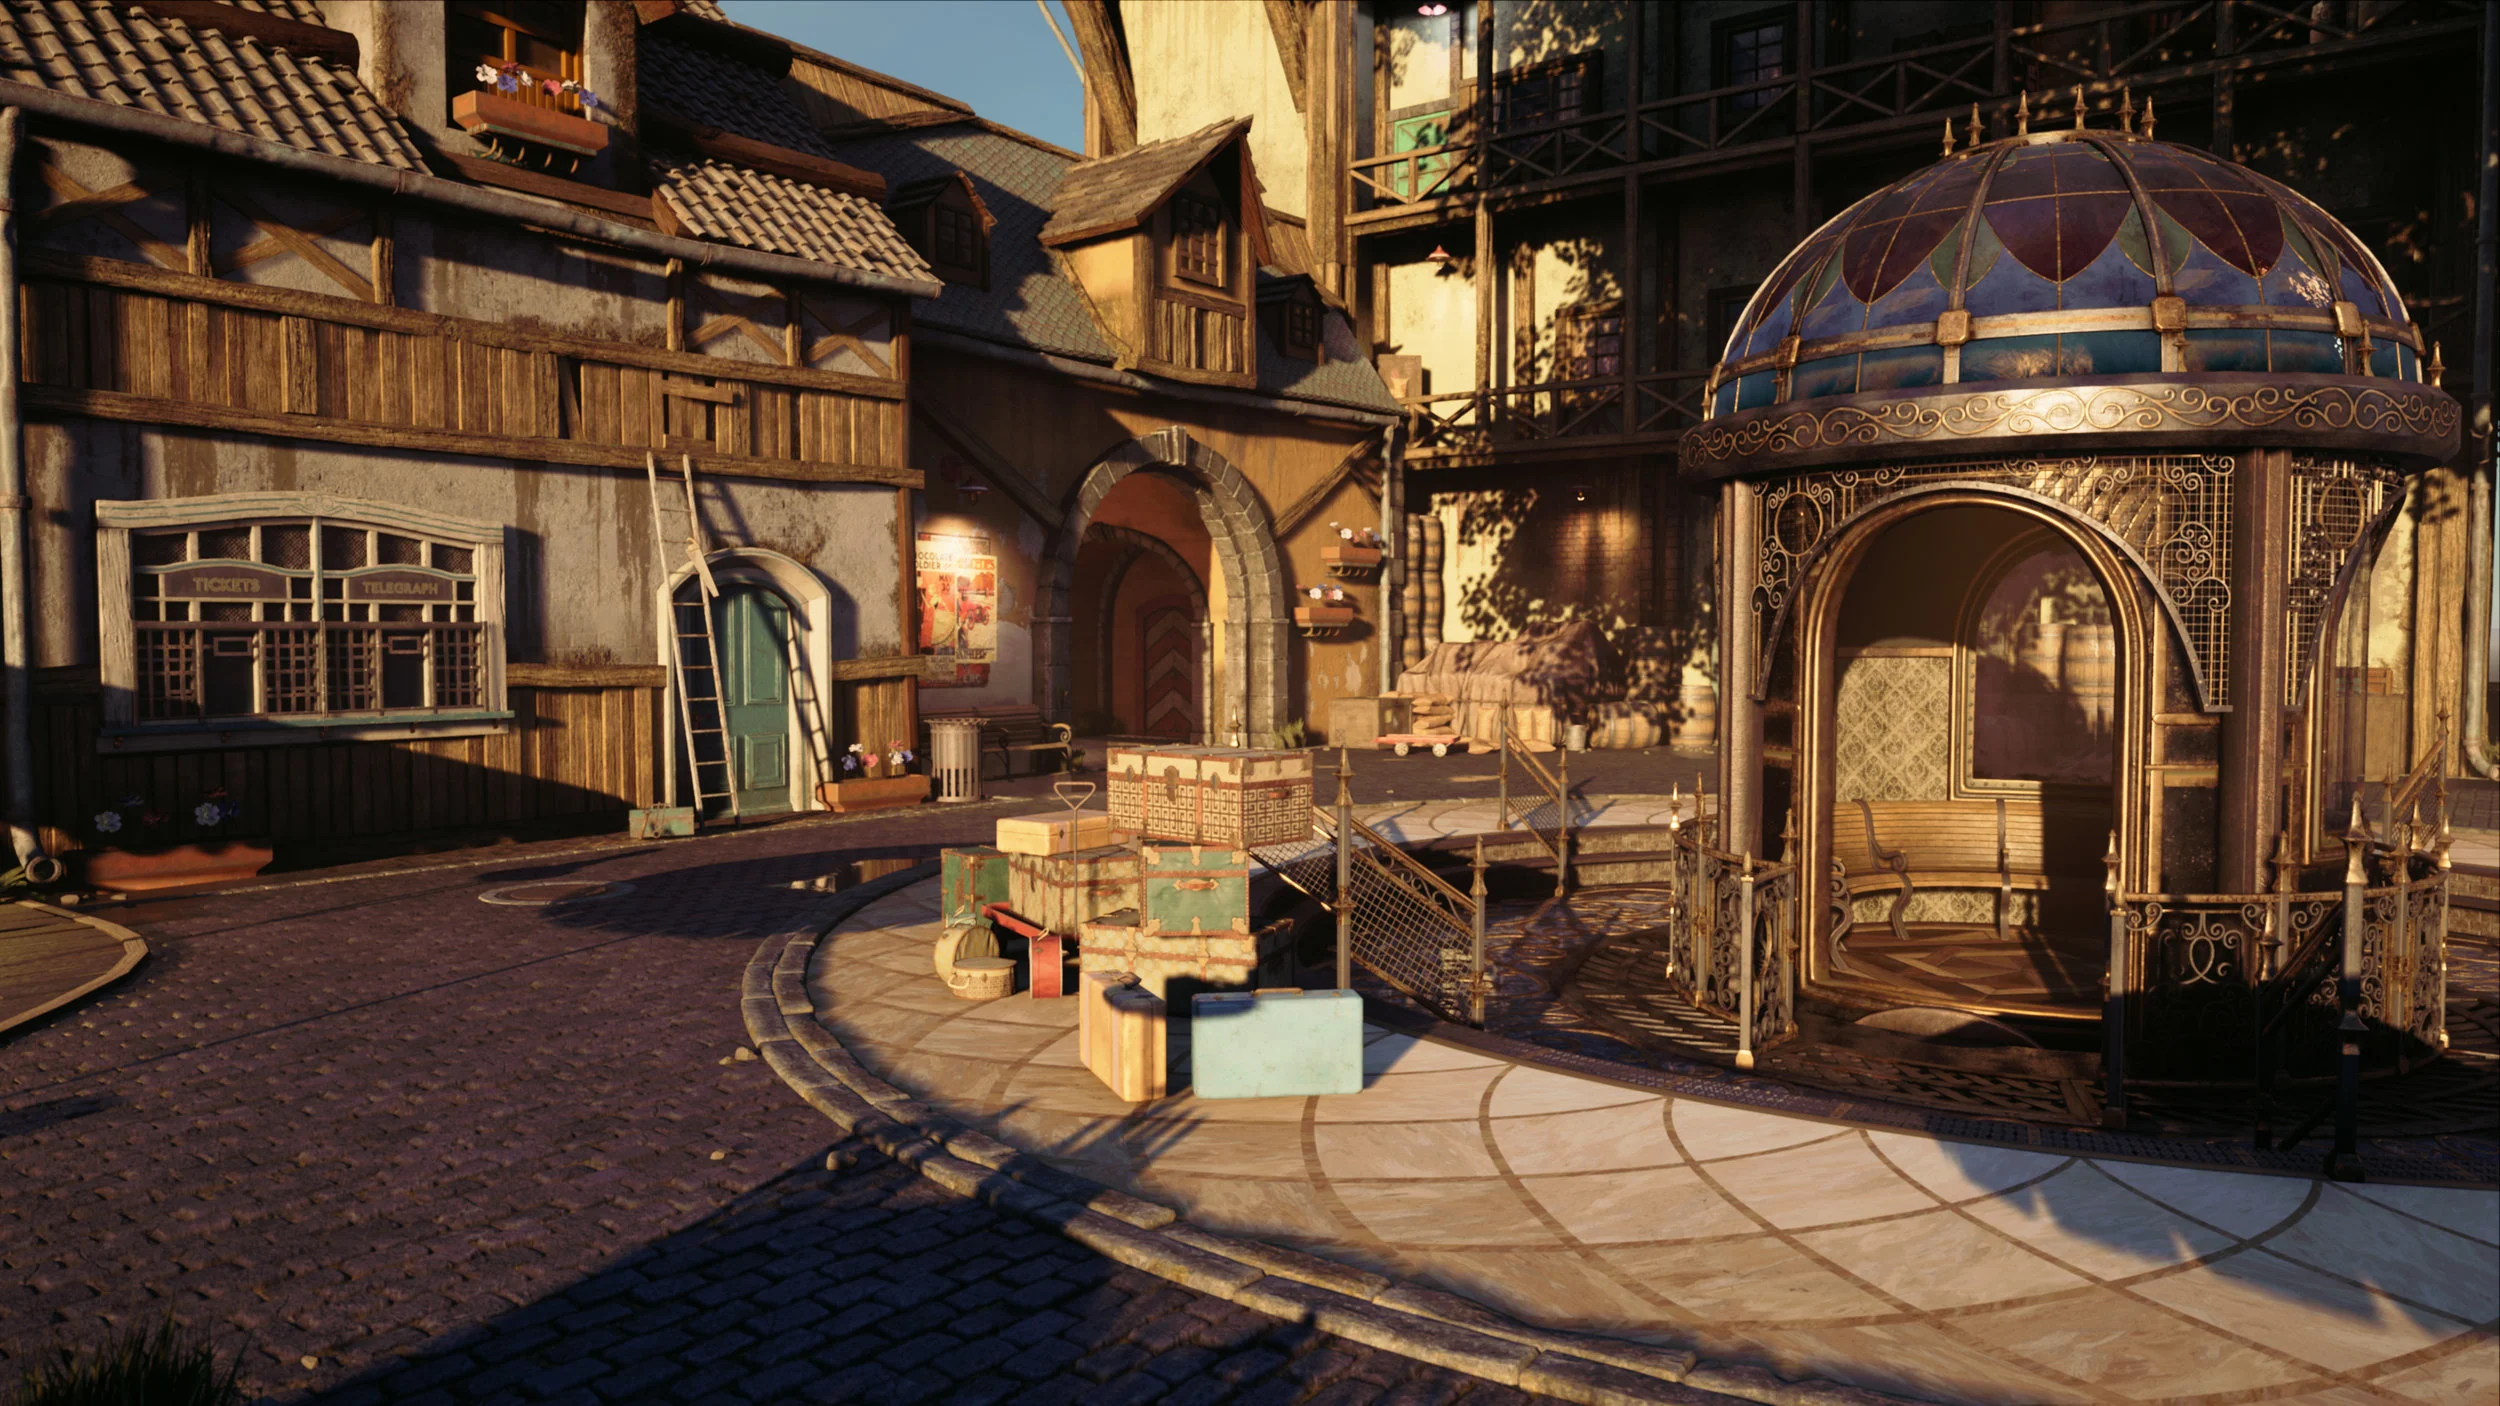
The biggest challenge on this scene without a doubt was building up all the hidden areas of the concept. Because I cannot see it I had to figure out to design those areas. Sometimes perspective of 2D concepts can mislead you, that’s why it’s that important to blockout the big shapes first. I didn’t want to create another fountain in the middle of a plaza and because it was a fantasy scene, I decided to run wild and place a bathysphere-elevator, inspired by Bioshock. For the surface materials, I was inspired by Dishonored, even if the concept had a Studio Ghibli style to it.
Sea Station: Elevator

Then the tree, I had lots of fun creating it and solving technical issues along the way.
And last, the shaders and blueprint configurations. It’s incredible what one can do with them. A tough one was the Parallax Occlusion Material for the 3 different materials I created.

Sea Station: POM Material
Advice & Tips
Work hard and if you don’t know how to do something, learn or ask. Focus your resources and content on being reusable, you don’t want to create content indefinitely. You have to analyze and take your time to estimate the amount of elements you are going to need.
Breaking up the shapes with small props, changing parameters in the shader, vertex painting, trimsheets and creating variations from the same mesh are your tools. Use them wisely. You want the people seeing your work to not detect the repetition of elements. There is tons of documentation available online and lots of developers willing to help if you ask, don’t request them to do the job for you but follow their advice.
The Video Game Industry is changing everyday with every new project. Every piece and every project we create makes us a better artist. A good environment artist has to be in the middle of art and tech with the ability to balance tasks and the attitude to learn new things.

Sea Station: Progress