
Raytracing WITH SNOW, ICE AND THE cold air
Finn Meinert Matthiesen has worked on some of the largest titles from Crytek and talks to us about his latest project. Explore the breakdown of his Snow & Ice environment as he talks about how he focused on the big picture over smaller assets, his implementation of RTX, advice on realtime environments and also discusses the differences between CryEngine and Unreal Engine 4.
Introduction
Hey folks! My name is Finn Meinert Matthiesen and I'm a 3D Environment Artist from Germany. I have been working in the games industry for almost ten years, currently employed as Lead 3D Artist for Cosmoscope, which is also my first indie dev roller coaster experience as well *sighs*.
Before that, I have been Principal Environment Artist at Crytek, working on various AAA and AA titles like Ryse, Warface, Robinson on The Climb. I started there as a young 3D Artist in my mid 20s, just after my graduation in traditional communications and graphics design.
Even as a kid, I already had a passion for art and games, so I somehow got into 3D quite early, respectively into creating creative content for games. It began by creating custom maps for games like Doom, Duke Nukem 3D or Quake and ended up more seriously when modding became really big after the release of games like Unreal and Halflife. Since I mainly used 3D editors like Hammer or UnrealEd, it took some years until I created first assets with software such as 3DsMax or ZBrush. That's why I also studied traditional graphics design instead of game design back then. Fortunately, after releasing some screenshots for a fantasy scene I did in CryEngine2 during my diploma, I received a job offer from Crytek - and that's how I eventually became an artist in the games biz.
So in this article, I'd like to talk a bit about my approach on an Unreal Engine 4 scene that I just published on ArtStation. Here is the original post and another one including a video and an asset breakdown.


Snow and Ice Study #1 - Workflow and Target
So why did I decide to create this study?
Well, it was quite a spontaneous decision. I love to work on quick sketches like 3D studies, especially since they are great practice when it comes to composition and mood, and after the recent release of our first indie game "Morphies Law" I badly needed some variety from that art style - plus I hadn’t created any personal artwork for ages.
I always had a passion for nature and natural environments, as you can see a lot in my previous works, but there are of course a few other, way more practical aspects that led to the decision to work on a winter themed scene. Short amount of time was definitely the biggest one, as I just wanted to only spend a few evenings on the project.
My agenda for the study was to keep the amount of work as simple as possible and to focus on the big picture rather than on small assets or effects (that's why the river is a bit simple in that study), using assets and materials that I created for earlier projects or that I had laying around (without harming any copyrights of course). And because creating a huge set of quality plants and vegetation takes a lot of time, even with great tools like Speedtree, I finally went for a scene where I was able to express my ideas without the need for such a big initial workload.
Another, more technical, reason was, that I wanted to explore the new RTX features in Unreal Engine 4.23 as well. Unfortunately, there are a lot of materials and shaders that are still not optimized for raytracing, for example the two sided foliage shader, which would have caused a massive headache when going for foliage heavy environments. There are some great nature artists, who already tamed those features, like Constantine Chesire ), but I didn't want to spend too much time on figuring out those issues in my Unreal Engine build.

Inspiration & Planning
So once I identified the circumstances and evaluated the risks and possibilities, I kinda brought myself into the mood of the scene by gathering reference material and concept art. I knew that I wanted to explore a setting with the use of snow and ice materials, respectively a typical winter mood. Games like Red Dead Redemption 2 or God of War 4 already showed how awesome such environments can look like, and even at Crytek I already created a vista for the arctic levels of our VR game The Climb, so I was kinda hooked by that theme.

I've to admit that there wasn't a big master plan of how the scene should look like in the end or that it should be close to a real photo motive or concept. During my career, I previsualized and white boxed a lot of environments in 3D, so the process of arranging chunks for a specific composition became quite intuitive at some point. Still, I heavily rely on reference material to get into the right mood, especially when it comes to lighting and materials.
For quick studies like this one, I usually start with just combining assets and creating small test compositions that even include some details. The overall process includes a lot of iteration and evaluation and always evolves in a very organic way. The background for example, which puts the entire scene into a Northern American environment, was improvised quite late. Half of the assets I used are my own assets, but I've to admit that I also used a lot of the free kite demo assets provided by Epic. Most of their rocks have a very specific pattern, common for Northern American landscapes, so at some point I decided to develop the study towards such an environment, even though I was experimenting with a more European alpine panorama in the first place.

Composition Overpaint
The same approach goes for the shape composition. Since such a scene usually evolves and expands quite fast, you need to verify the shapes and check them against each other quite frequently. Sometimes this means, that you also have to break or erase chunks that looked fine in earlier stages of development. I guess that a lot of artists struggle with this, including my person of course. You start with something that you are fine with at first, but it falls apart or conflicts with the later progress of the scene; which is also the reason why I tend to block out the later expanses of a scene with primary shapes (once I'm done with the small composition tests from the beginning) before going into overall detailing.

Material, Lighting & Difficulties
Of course, even though things went surprisingly smooth this time, I ran into some issues, especially due to the short time frame. Since I didn't want to spend too much time with baked lights or setting assets up for baked lighting, I decided to rely on full dynamic realtime lighting, especially since I wanted to get more into the new RTX raytracing features of UE 4.23.

RTX & SSGI Disabled/Enabled
I already created some earlier lighting tests with afternoon lighting, so I was able to adapt those for this scene as well - of course with some tweaks in post-processing and final color grading. The main issue I had with raytracing in Unreal was with masked materials. Due to the logic of raytracing, two sided and masked materials are still glitchy, causing artifacts on their backfaces. Fortunately, certain raytrace effects are optional, so I only used raytracing for indirect lighting and global illumination. I even avoided raytrace reflections because they looked odd compared to the screen space ones somehow. However, a very important feature, especially for the lighting in snow and ice areas, is Unreal Engines SSGI. It kinda overwrites the RTX ambient occlusion setup, but in my case it was absolutely crucial. Without the screen space global illumination, most of the snow assets and materials would look way more like concrete or plaster without the typical shimmering bounce light effect.


Regarding materials and textures, there's no real voodoo in there. As a matter of fact, I even didn't create specific snow shader work, which is also another reason why I mixed it up with areas and assets that are not covered by snow. Most of the snow and ice chunks are based on my photogrammetry rock assets, just with a different material setup. As mentioned above, SSGI allowed me to keep snow and ice materials quite simple in the scene. They use an almost complete white albedo, combined with the original rock normal and a noised up roughness to create the "snow-ice" look.

To avoid some of the RTX backlight issues and to trick a bit with distant vegetation, I also spent quite some time with tinting a lot of areas with large decals. This is a common technique that I used in Crytek game vistas quite a lot (The Climb for example). Smaller and medium sized decals were used for typical embedding situations, like snow and ground transition or for the river bank. Speaking of the river. It's obviously the weakest part of the study, since I just used a plane with some floating wave decals to create distorted reflections. Originally I wanted to give it a bit more love, but since RTX reflections and transparency caused troubles, I skipped detailing it for this particular scene. Maybe I'll spend more time with that in one of my next studies. Lazy me.
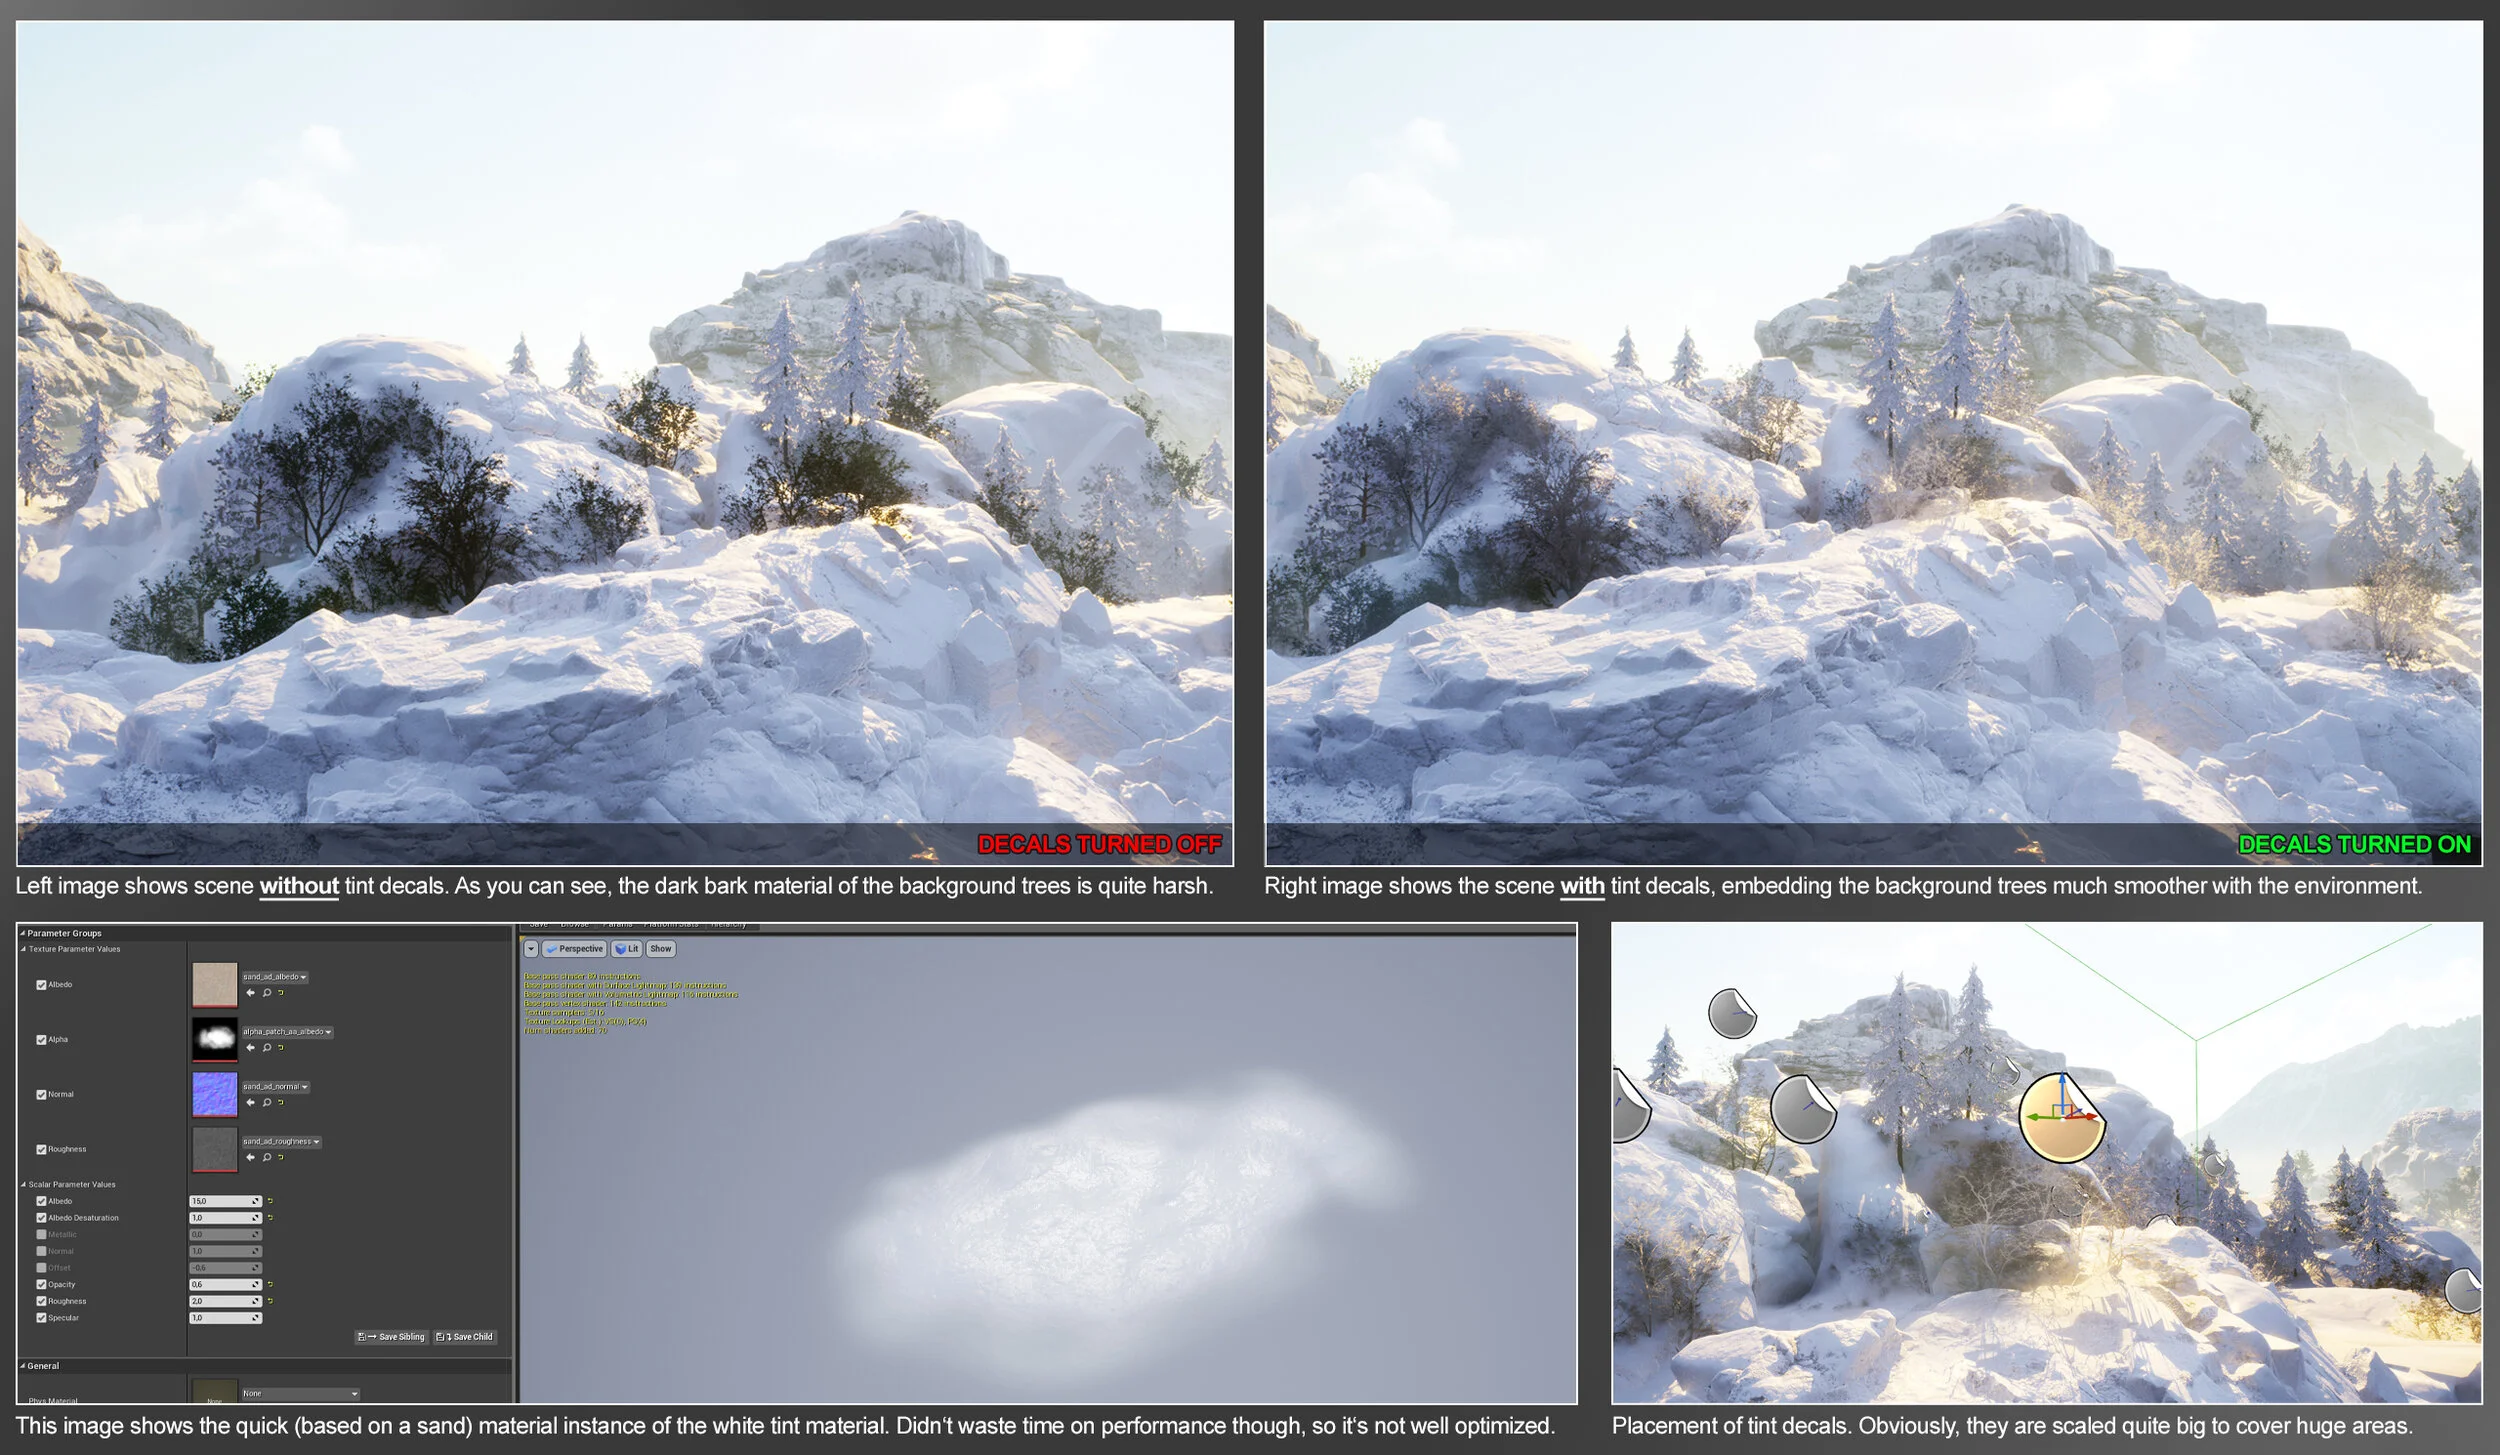
Decals Disabled/Enabled

Several Issues with RTX

CryEngine vs Unreal
To be honest, I didn't use CryEngine for a while since I left Crytek (in a good relation of course), even though it's a great engine for sure. So I might not be up to date feature wise, but in my opinion, both engines have their pros and cons. CryEngine is still very strong when it comes to nature focused environments and Hunt even showed off some great new asset embedding features as well. Its voxel based global illumination (SVOGI) is impressive while being very performant at the same time. It's a fantastic feature for dense foliage and natural scenes and as you can see, games like Hunt or Kingdom Come look absolutely stunning in CE.
However, Unreal seems to be more flexible and approachable. It's very strong when it comes to baked lighting solutions and full realtime lighting situations. The material editor is, once you get the hang of it, way more powerful and with blueprints you can produce prototypes or even games or visual presentations in no time. Especially realtime archviz scenes look amazing in Unreal and its documentation is really great as well. So for people, who want to dig into all the game dev stuff, I still recommend Unreal Engine in this case - but this doesn't mean that you shouldn't check out CryEngine as well.
General Advice on Realtime Scenes
So when creating realistic scenes in realtime, the first thing people should understand is the engine they are using. Assets and materials often look and behave completely different in other engines, especially when it comes to lighting. I strongly recommend comprehending the features of a specific engine before starting with asset production. For example, it's a reasonable step to take a look at existing scenes that were made for the engine of your choice.
Unreal and Unity offer a lot of free (or affordable) scenes in their stores for example, so dissecting them should be the way to go. I did the same when CryEngine introduced their SVOGI feature a few years ago. I did a first lighting study with solely using their provided test map. Just grab an existing scene and try play around with lighting and post-processing features until you are happy with the results.
This way, you also become more familiar with the material and texture setup as well and how those behave in the specific engine. In addition, photo references also help a lot on the way to achieve a realistic look. Once you managed to create a mood that you feel good about, try to use that scene as a base for your further steps. Slowly populate it with your own 3d assets and check them against the remaining assets of the scene.
Apart from lighting, materials and textures, scene composition is another key when it comes to realistic scenes, but since you need to start somewhere, my initial advice is to take a look at scene examples within the engine and use those as your reference and starting point for your lighting mood first.
I hope that this insight was at least a bit helpful and interesting for you, so thanks a lot for reading and all the best with your creative projects!