
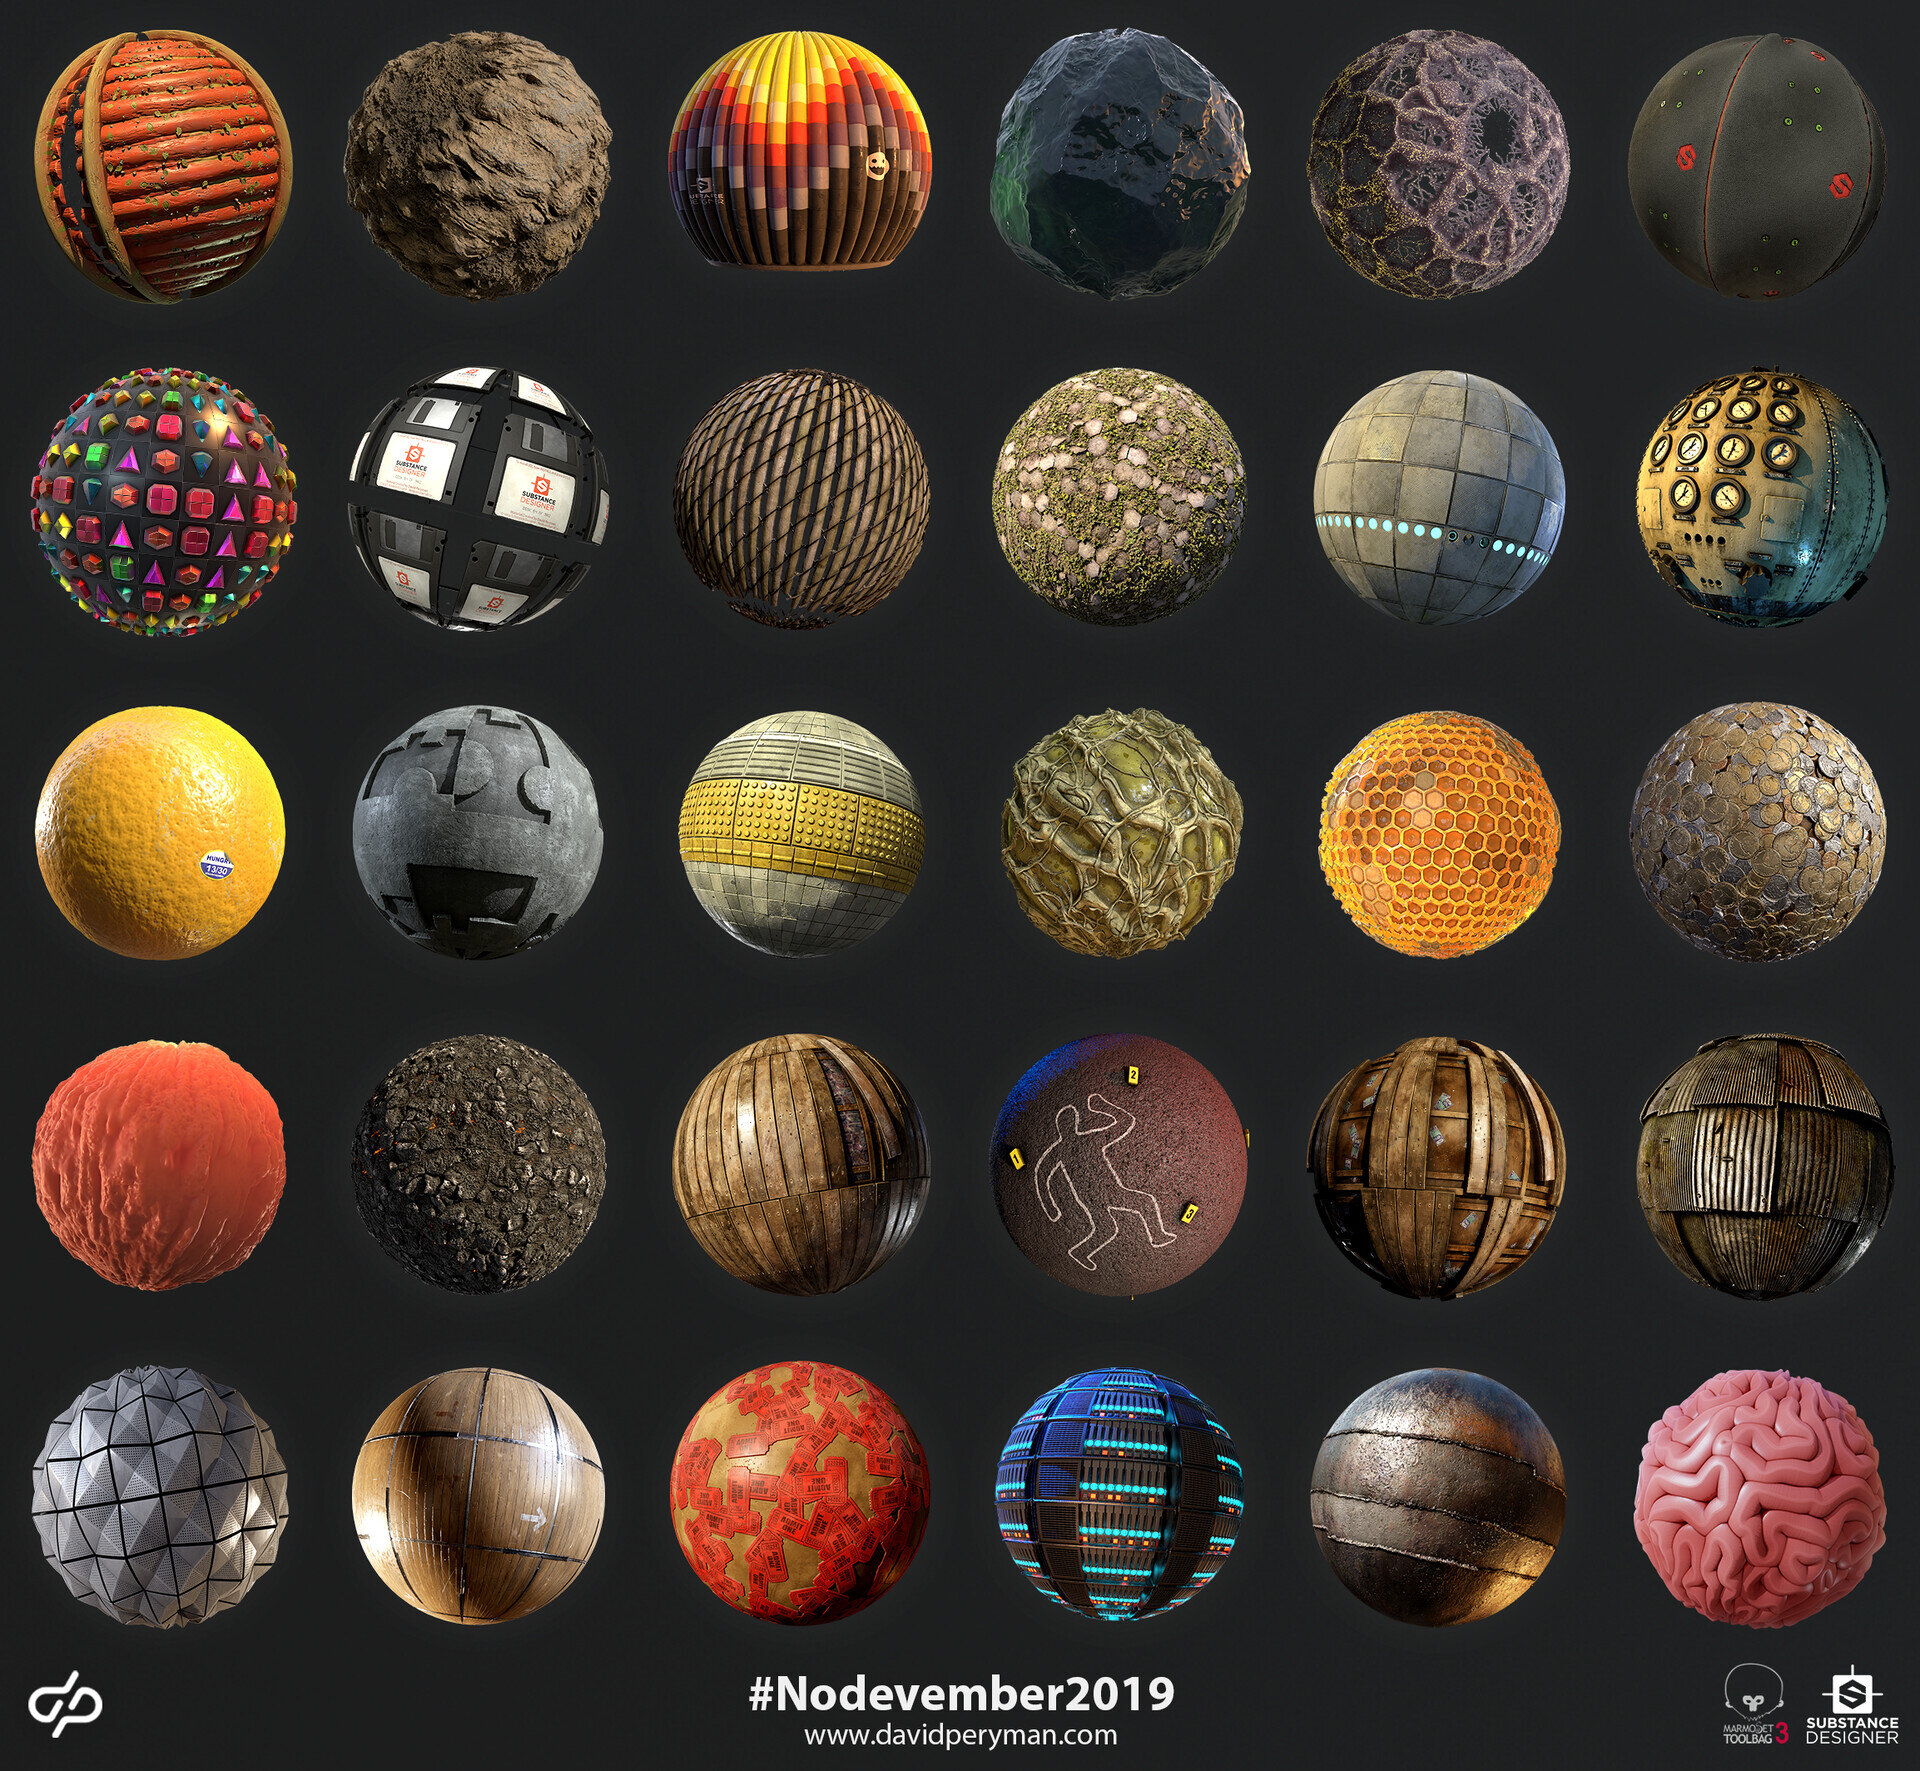
NODEVEMBER 2019 WITH DAVID PERYMAN
Many join in, but not many finish. David Peryman completed Nodevember 2019 and created all 30 materials. We sit down and discuss with him the impact it had, his approach to each material, how he stay motivated as well as what he personally learnt from the experience.
Introduction
Hi! My name is David Peryman and I am currently a Junior Environment artist at A44 Games in Wellington, New Zealand. I have a passion for 3D art and the creation of video games which started when I was young after my Dad installed a few games on our family computer for me. I loved any game that had any sort of level editor in it and I would spend hours making skateparks in the Tony Hawk Pro Skater games or playing around, trying and failing to navigate the Unreal editor for Unreal Tournament and random game maker software. This interest stayed with me throughout school and eventually led me to Media Design School where I completed a Game Art Bachelors Degree. During my studies I stumbled upon some Substance Designer work on Polycount and I downloaded the software and started playing around with it. It quickly became my favourite software by far!
Nodevember 2019
For Nodevember I just tried to take the prompt and figure out a way I can communicate that prompt in the least expected way. I didn’t do this with all of them but it was definitely a part of the thought process.
Honestly, I didn’t really try to give myself any time restrictions for Nodevember, which is actually a bit unhealthy I think because I would get home from work and just work on the daily material until I was happy with it. This was usually between 1-2 hours but a few times up to 5 hours... It was very tiresome, especially on top of a full time job & freelance work. One way that I started taking the edge off was by getting started on my height map during my lunch break at work, then come home and refine it and work on the roughness and albedo.

Portal Material
So with the Portal material, I really wanted to tie in those blue light fixtures into the tiles more realistically, as if they are actually little lamps built into the tiles. I also cracked some of the glass to show the bulbs underneath to really drive this home. Other than that I just looked at screenshots of them and tried to up-res it while keeping the same level of visual noise and the same look to them in-game as much as possible! I would have loved to take this material a little further and add some small clovers between the tiles like in the overgrown areas of the game, but I ran out of time.


Inside Substance Designer
Some cool tricks to speed up the workflow were using parameters, something I have actually only recently starting doing. I really utilized this on the Dashboard material for Day 12 and on my Rock Climbing Wall for the hand holds. To get variation in the dials, I created a graph of just the dial, and exposed the parameters for the dial hand rotation and an input to control the text on the metal plaque below it, I could have also added more for the info inside the dial but I felt like this amount of detail wasn’t necessary for this, but knowing that's a possibility is very powerful!


Planning Nodevember
I would often look at the prompts throughout the days and brainstorm some ideas of what I would want to do for each, so when the time came to it I could just jump in and grab my reference and get to work. Time management-wise I had a structure that I followed for each, which was to just focus on the heightmap, ambient occlusion and normal first. Daniel Thiger’s ‘DeteBaseSetup’ was my go to template for this, it allows you to work on all 3 at once, so I would just work on those channels exclusively to get the forms down, then start moving onto Roughness/Metallic, Albedo and Emissive if necessary and eventually detailing and polish.
I can’t recommend enough doing this process, and to also just focus on the large forms first and don’t get caught up in the small details too early on! I would always just try to get the main idea across first in the most simple way, then if I had time go and add some extra fine details, but a lot of the time I had to ignore some smaller details that I otherwise would have loved to add.


The parameters I expose usually just pop up naturally throughout the creation of the material when I realise I can be saving a lot of time and keeping my graph cleaner by utilising them.
Substance Designer Tips
I think if there was something that I wish I knew when I started, it would be really understanding height maps and how to blend them correctly. This helped me in nailing down my base forms a lot faster, whereas early on I was just dragging around sliders endlessly until something sort of worked without really understanding the logic behind their blending.
Also knowing to stick to the workflow of Height/AO/Normal -> Roughness -> Albedo, I would always start on my Albedo far too early when I started, I always try to hold off on the Albedo as long as possible now! It really helps a lot.

New Materials
I think the first thing I look for when searching for reference is something that stands out a bit from the norm. I didn’t do this much before but I really tried to do this with Nodevember, I really wanted to create some materials that put a smile on peoples faces when they saw it, like the Bejeweled material, Floppy Disk and RIP were quite light hearted and don’t take themselves too seriously.

But usually I think for more common materials, just trying to find some unique little flare that you can add to your material that will be memorable from all the other similar materials out there. I find I see this a lot walking the streets and looking at real world reference, I often find really unique and interesting details and accents to materials that I feel like you don’t find as often online.

Progress GIF of Dashboard
Here is a gif of the Dashboard material. Keep in mind it is very rough and quick, some of the Albedo darkness values are slightly breaking PBR and the noise is relying a lot on just basic grunges. But the goal of this exercise wasn’t to get absolutely perfect materials done everyday, but just to push my skills and work on getting something created everyday!
Lighting in Marmoset
For my renders I pretty much just had 1 main master marmoset file, I had 2 cameras, one pointed at a bunch of planes for the wall and floor shots and one that was locked to a sphere, I would just switch between these to take the renders.
Lighting wise, I just click around the different HDRi’s until I found a base lighting colour scheme that I felt would fit the theme of the material. I then created 3 different lights around the HDRi to light the ball. My approach is usually just the classic 3 point lighting setup of one Key Light, a Back Light and a Fill Light.

3 Point Lighting Setup

Here is an example of trying to theme the lighting to fit the material.
This is all pretty subjective stuff and it’s just what works for me! I also created a Photoshop template where I could drag my renders in, change up the background and save it out in minutes, I looked for any way to streamline the process!
Feedback
I didn’t seek out as much feedback as I usually do for a proper piece because of the short time frames but when I got quite stuck or something about the material just wasn't feeling right to me, I often asked for some tips in the Experience Points Discord, or my own little Discord I have with some friends from work. It’s super important to get those fresh eyes on your work as you go!
Shout out to everybody who helped me with feedback along the way!

Future Work
I’m currently doing a Materials Mentorship with Josh Lynch through the mentorcoalition, which I highly recommend! I’m also working on a few small personal projects that I am looking to wrap up in the coming months. Other than that I will just be continuing to practice making materials, probably taking a bit more time on each than Nodevember!
Advice and Tips
One piece of advice I would like to give is to not be afraid of getting more eyes on your work, there are a ton of great Discords where you can get feedback and chat with some awesome people who are all on the same trajectory as you. It is really easy to work in your own bubble but I just think there are so many benefits to getting eyes on your work as you go.

Outro
Thanks so much for taking the time to read this if you made it this far, keep in mind I’m no expert and this is just stuff that worked for me personally. This was by no means an easy task and I definitely put a lot of pressure on myself so thank you to everyone who left a like, retweet, comment or any form of support throughout! The positive reception was a huge motivator for me to keep pushing myself everyday. Thanks to the awesome Experience Points team for the opportunity for this write up. Hope you enjoyed it!