
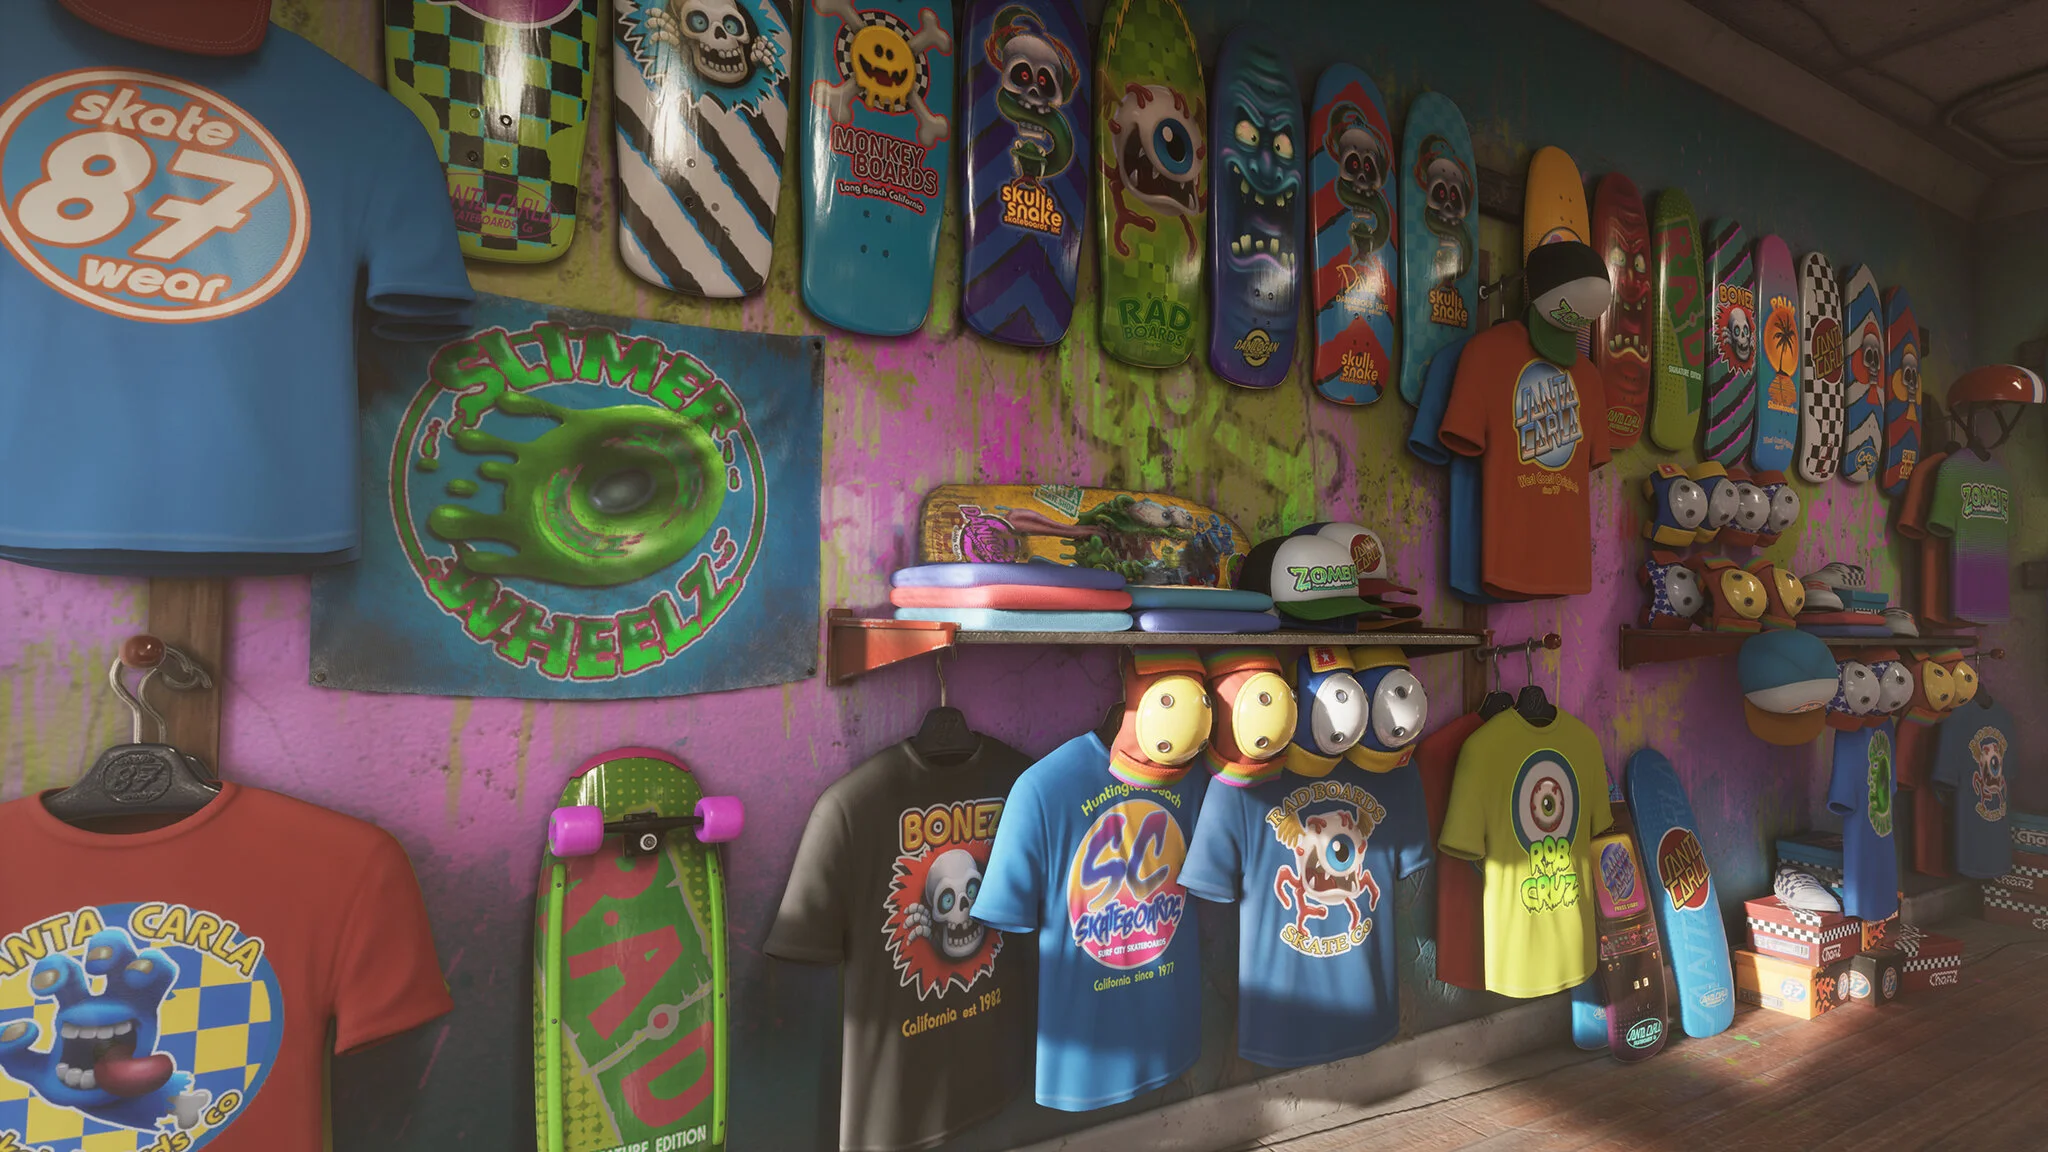
Santa Carla Skateshop
Join us for this totally rad article with film and TV industry veteran, Andy Proctor, as we take a trip to Santa Carla Skateshop! Andy talks to us about his experiences learning UE4, combining 2D and 3D mediums with his childhood passion of skateboarding. We learn how he created story and character with composition, colour and lighting, crafted enough prop variations to fill a whole shop and much more!
Intro
Hello, my name is Andy Proctor and I am a professional artist originally from England but now living in California with my wife and our dog. From a young age, I have loved designing characters and creating worlds for them to inhabit. Fortunately, I have been able to turn that passion into a career!
Having started in the games industry creating environments for point and click adventures, I pursued my love for animation and joined the BBC and then Aardman Animations in the UK, working on TV series, commercials and animated features. For the past 11 years, I have worked for Industrial Light & Magic as an Environment Supervisor, creating visual effects for movies such as Star Wars, Transformers and Jurassic World among others.
In my spare time I enjoy working on more stylized projects- creating 2D illustrations, 3D sculpts and now with my skateshop and real-time environments!
Composition
The Santa Carla Skateshop was born out of a desire to learn the Unreal Engine 4 editor. I became interested in real-time workflows and techniques and I wanted to produce something that would allow me to explore creating low resolution models with normal mapped detail, PBR shading as well as use light baking, atmospherics and post production/screen space techniques. The goal was to create an immersive, atmospheric environment in an art directed style that lives in the same world as my 2D illustrations and 3D character sculpts.
I originally chose to create a skateshop as it would allow me to heavily re-use a few modular assets and produce a workable environment relatively quickly - since the main aim was to learn the software. However, the skateshop quickly became a passion project where I created dozens of bespoke assets, 2D graphic elements and over fifty unique skateboard designs.
The first step was to create rough sketches that would help me form ideas for the environment. These sketches explored practicalities such as the general layout of the shop, specific details and vignettes. I also drew characters in various situations as well - customers browsing the arrays of new decks and accessories or getting their skateboards repaired, and the people who worked there going about the daily business of running a laid back Californian skateshop. Although I knew the finished Unreal piece would be just the static environment, it was important to think about the characters in this world and how they would shape the look and feel of the skateshop.
Sketches
Once I had designs in mind, I took assets I'd built for previous projects and optimized their geometry for a real time application. I also created a list of elements that would need to be created - from the structural elements of the store itself, the fixtures and fittings all the way down to the merchandise and small signs of life (such as dog-eared magazines and half eaten donuts.)
All the models were built in ZBrush using the ZModeller brush. I created rough block out geometry for the walls, floor and main furniture components first, then scouted the layout to ensure the space felt believable in terms of scale and that I could also get some interesting camera angles. I also used Keyshot to see how sunlight streaming through the windows might affect where to place elements within the store, knowing I wanted to highlight certain focal points in the scene.
Once I had enough models to create the basic environment, I UV'd them and then painted them in Substance Painter. My original plan was to texture and shade the walls, floor and ceiling within Unreal's material editor using tileable maps. However, as the style of the piece developed I started to see these flat structural elements as canvases that could be used to add a lot of bespoke detail and personality to the store. So I painted these structures in Substance Painter also and included haphazard painting of the walls, lots of graffiti and name tagging as well as cracks, scratches, grime and wear and tear.
Most of the merchandise assets were designed to be variants. In almost all cases, I only wanted to change the base colour maps for the assets and keep the normal, roughness, metallic and ambient occlusion maps the same. This way, I could set up master materials in UE4 and easily create lots of variation, whilst keeping my texture map use efficient. For the skateboard decks alone I created 56 variants, but also created variant texture sets for the shoes, T-shirts, knee pads and helmets as well as skateboard components like wheels and trucks.
Material Instances
Having a combination of modular and bespoke assets allowed me to create a lot of visual interest and targeted areas of detail. The next challenge was to get all this detail to work well together and feel like a believable, cohesive environment that felt overall busy and interesting, but no single element was too distracting. To achieve this I knew I needed to get the lighting and atmosphere just right!
Colour and Light
The lighting of the store interior was the most important element to get right. Because the environment is essentially static, I needed the light and atmosphere to invoke a sense of life within the scene. I wanted the key light to provide accented areas of interest whilst also motivating plenty of indirect bounce light to give an airy feeling. The atmosphere had to be subtle enough to feel natural, but have enough presence to create depth and push back some of the details of the environment as they stacked up in shot.
Interior Composition Breakdown
My original plan was to have a late afternoon, golden hour feel to the lighting. But as I started to develop the scene it felt more interesting to set things in the early morning - just before the store is about to open and another busy day begins. To do this, I first established the Directional Light key light position and temperature. I set the colour to 4500k which retains a little warmth, but is neutral enough to feel like bright morning light. I also set the Light Source Angle slightly smaller than the default value of 1.0 with area shadows turned on. This gave a nice softness to the shadows as they attenuated, but retained enough definition to feel like crisp early sunshine. The key position became critical and was refined with small rotations here and there until it emphasized the areas I wanted to highlight, such as the workbench surface area, folded T-shirts on the shelves and the skateboards on the display rack.
Next, I established the bounce lighting. Because the sun was going to be the dominant light source, but the exposure was set for an interior, I had to be careful not to let the direct light burn out and dominate the scene. So, once I'd set the primary ray intensity I played up how it affected the ambient light by boosting the Indirect Lighting Intensity parameter. This gave a nice luminosity to the scene and also a soft warmth to all the skateboards and props which really allowed their colours to pop. I also used a Lightmass Important Volume and Lightmass Portal actors around the window and door openings to keep the bounce light calculations within the shop interior and focus the indirect rays.
Interior Lighting Breakdown
Once I had the key lighting and indirect lighting established, I added Exponential Height Fog with Volumetric Fog activated to create light shafts from the windows and haze the shadowed areas a little. Finally, the two ceiling strips lights were represented with Rect lights. I was mostly looking for a spec contribution from these lights to add some polish and shaping to the various shiny curved surfaces dotted around, so I kept their intensities low.
Once the lighting was sorted out, I added Reflection Sphere Actors to create the overall reflection setup for the environment. I placed spheres in each corner and the center of the store at head height to create a good foundation. As I locked down each camera move for the cinematic, I further refined the reflection scheme by carefully adding spheres with limited influences around key views and objects. Some of the views have two or three smaller spheres to really make certain props look glossy and believable. For each shot in the cinematic I also tweaked the screen space reflection settings to add an extra level of believability.
The lighting for the opening exterior shot followed much the same scheme but was augmented with a few soft bounce lights to add some additional illumination into the skateshop's window and some off camera shadow casting palm leaves to create a gobo effect. Adding these helped to to draw the viewer's eye to our destination - the Santa Carla Skateshop!
Exterior Lighting Setup
Cinematic
I had some of the shots in mind before I even started assembling the set in Unreal. For example, the dolly shot close up of the decks on the wall and shots highlighting details such as the donuts and coffee by the skateboard being repaired. I wanted to show vignettes such as this to explore micro details and hint at life within the shop.
However, the rest of the sequence came about by first scouting the environment with a cinematic camera actor and bookmarking views that I liked. I wanted a variety of wide shots to show context, dolly shots to help create depth and close ups to show details and areas of interest. I took these book marked views and made thumbnail sketch versions of them on post it notes which I then used to create a storyboard. Using post its meant I could easily move shots around or swap them out. The goal was to have each shot transition naturally into the next without breaking the steady pace. I wanted the camera to feel like a customer lazily browsing around the store.
Close Up Shots
Some of the close up shots I had in mind ahead of time, so I created assets with sufficient detail accordingly. However, others came about after scouting the environment. For example, the shot of the folded T-shirts and baseball caps was found through scouting. The T-shirts themselves were very low detail but, I found that by tweaking the normal maps a little and adding some low frequency cloth bump mapping I was able to get them to hold up to closer scrutiny. Using a shallow depth of field and subtle vignetting also helped to hide areas where texture resolution wasn't quite holding up and guide the viewer's eye where I wanted focus.
By default, the skateboards had a good amount of detail as I knew I'd always put the camera close to them. However, other props are very simple geometrically, such as the desktop computer and Hi-Fi unit. For these, I decided to use texture and normal map detail as much as possible, and not let the camera linger on them for too long! Overall, I wanted the style of the shop to be believable as a 3D space, but not painstakingly photoreal. So, having lots of complex geometry detail became less important than adding implied detail through painted textures.
Hi-Fi
Skateboard Designs
I started out by emulating designs created by my art heroes Jim Phillips and Vernon Courtlandt Johnson. Those guys have created dozens of iconic skateboard designs over the years and I wanted to pay homage to them by doing versions of their signature decks in my own style. From there, I drew inspiration from books such as The Disposable Skateboard Bible by Sean Cliver and created my own designs for both deck graphics and company logos that matched the look and feel of that period.
Deck designs created with Copic markers
Many of the deck designs were sketched out in pencil and either coloured with Copic markers or using Procreate on my iPad Pro. These designs were then used in Substance Painter and combined with logos and graphic design elements created in Photoshop. Each unique design would usually by used to create two or three variants, with the variation coming from changing colours and/or patterns and decals.
Inside Unreal, I used a master material for the skateboard deck which had the PBR and normal maps set up, and then each deck variant used a material instance with a different base diffuse map.
Skateboard Deck Maps
Influences
I used to love skateboarding and skate culture as a kid. Not only were skateboards an easy and fun way to get around the neighbourhood, each deck was an individual work of art - a canvas filled with cool artwork that you could personalize with crazy stickers. I loved the Rob Roskopp signature boards and graphics such as the Santa Cruz screaming hand! They really helped to fire my imagination.
As an adult, I came to appreciate skateboard graphics even more as I learned more about the artists who not only did the designs, but were major influences on art and pop culture during that time.
I no longer skateboard, but I remain a huge fan of artists such as Jim Phillips and others of that period. The Santa Carla Skateshop is really an elaborate piece of fan art!
DaVinci Resolve
I used Resolve to do the final edit and colour grading of the cinematic, as well as add sound clips. I wanted to keep as much of the post processing in Unreal as possible, but I also wanted an easy way to add ambient sound, do any final edit tweaks and add end cards to the piece. Resolve is perfect for this job.
In terms of final colour grading, I kept it to a minimal outside of Unreal. In the end all I had to do was slightly desaturate overall and then tweak the gamma of a few shots to ensure they cut together nicely.
The sound FX were sourced from various stock websites and blended together. I experimented with having rock music blaring from the Hi-Fi speakers, but it always felt jarring against the slow and steady camera movement. So, I opted for a gentler sound backdrop that had distant crashing waves and the dull hum of traffic, plus ambient interior sounds such as the ceiling fan whirring away.
Stickers
The stickers are part of the base textures for each asset. If I were to do it again, I would use UE4 Decals, at least for some of the stickers, as this would provide an extra level of control that would help the art direction, especially for the close up shots.
Sticker Sheet
I created the individual stickers in Photoshop as graphic elements. These were then combined into "sticker sheets" which were then used as fill layers in Substance Painter. Each fill layer was black masked and then painted white where I wanted the stickers to appear. I used the chalk brush to give a torn edge to each sticker and then the scratch brushes to add wear and tear.
Skateboard Texturing Process
Custom Shaders/Materials
I didn’t use any custom shaders/materials but I experimented with Parallax Occlusion Mapping for the brick wall material but it didn't have a big enough effect for me to use it. I kept the look development within Substance Painter and used UE4's material editor to tweak a few maps here and there with multiply nodes.
Inspiration
I work in the film industry and am surrounded by craftspeople who not only do amazing things as part of their day job, but also work on a plethora of personal projects that show off their creative passion and skill. So, I don't need to look far to be inspired by somebody and their work. Working with such talented people makes me constantly strive to do better, and that was the catalyst for doing the Skateshop. I wanted to learn something new and create something I'd be proud to show my peers.
In addition, I love pop culture, particularly from my youth. I draw a lot of inspiration from the movies and video games I used to obsess over as a kid and am constantly trying to tap into those feelings of awe and excitement they'd invoke.

I also love collecting art books, in particular those featuring low brow artists such as Todd Schorr and Donny Gillies. I love their use of detail and their beautiful, rich rendering style. I pour over these books and let my brain soak in the visuals, hoping they'll plant seeds for my next illustration or 3D project.
Feedback
I really like Artstation. It has become my go-to for visual inspiration and to share my work (both professional and personal.) I love seeing what other people have been creating and I always value any feedback I get from that community.
I'm also fortunate to work with artists who are masters of their craft. So, I share my work with my work friends and get their input, as well as a wider network of colleagues and artists on LinkedIn.
Advice and Tips
I've been lucky to have a career in this industry that has spanned over 20 years. However, it is only in the past few years I've come to realise just how important personal projects are. As a working artist, it's easy to forget what got us into this business in the first place. Most of us followed a passion - our dreams. But those are easily dulled by the hard work we put into each commercial project.
My advice is to keep that inner, personal, creative spark alive as much as you can. The skateshop ended up being an elaborate, involved piece that I worked on for almost a year. But not every personal project need be a mammoth endeavour. Taking some photos at the weekend, or a daily sketching session with coffee - or even just taking time to look at art books or websites that inspire you. It doesn't take much to feed your inner passion and the rewards are huge. The joys they bring can spill over into other areas of your life and make you a happier person.
I've never felt more inspired by the Computer Graphics industry and excited to have a place in it. That is in part because of my professional work, but I credit much of it with my passion for creating personal work too.
Future Works
Right now, I have two illustrations that I'm working to complete in the next few weeks. One is a 2D Procreate illustration set in the same world and visual style as the Skateshop and the other is a sci-fi illustration for my friend Neil Blevins' next book. Both are very different stylistically which is good for the creative brain. It keeps it on its toes! Once I'm done with my illustrations, I'll turn my sights back to Unreal Engine and start my next environment. Maybe the video store we see in the opening shot would make for a fun night time environment study?!
Outro
Thank you for asking such inspiring questions. It felt good to reflect on the creative and technical choices I made when approaching and executing this project. I hope people reading this found it useful and interesting. If anyone wants to know more about me, has any questions, or just wants to say hello, please check out my website where you'll find more about my professional work and also my contact details.
Cheers!
Andy