
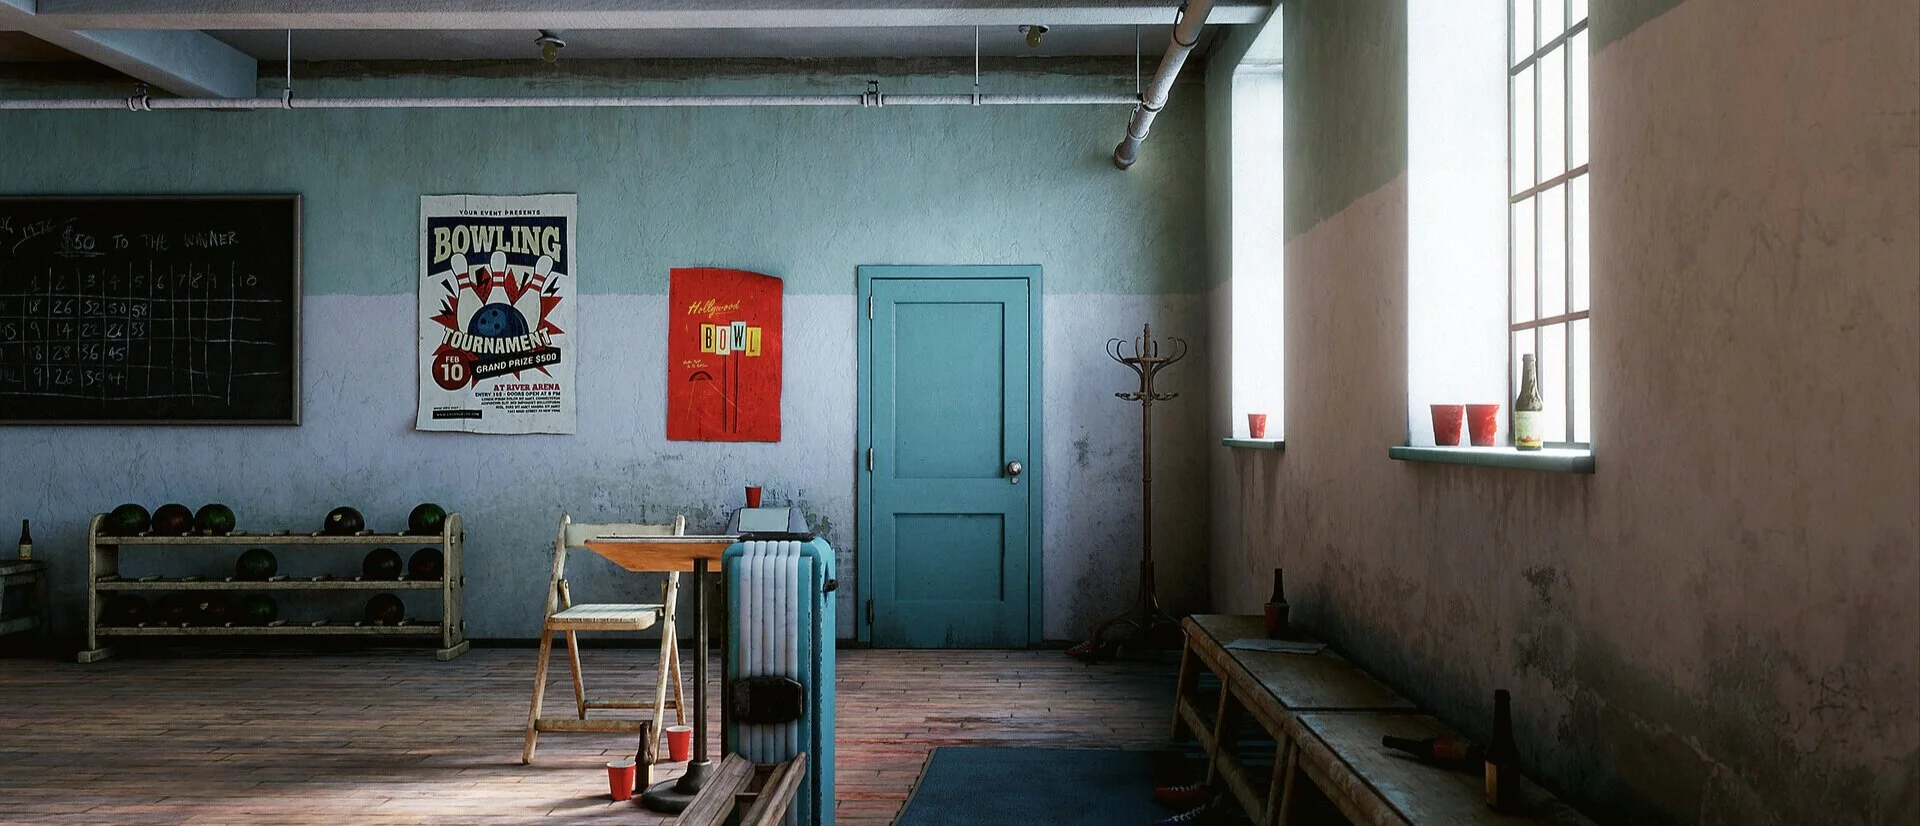
BOWLING ALLEY - BOWLING A STRIKE
Enter the Bowling Alley for this masterclass breakdown by Adam Tinning as he explains and showcases many of the industry standard workflows such as material layering, vertex blending, decals as well as an absolute gem of a workflow setup for blocking out scenes.
Introduction
Hi, my name is Adam Tinning. I’m an Environment/Lighting Artist currently working at Rebellion in Oxford. I previously worked at Playground Games on Forza Horizon 4 and the Fortune Island DLC and before that I worked in the VFX industry at Mikros Image for 4 years as a Generalist, doing the entire pipeline from modelling and texturing to 2D compositing and cleanup in Nuke. I studied Visual Effects at The University of Hertfordshire, which was a really great experience and I’d definitely recommend it if you’re looking for a University for Game Art, VFX or 3D art in general.

Planning and Inspiration
At the time I started the Bowling Alley I was still working in VFX and looking to add work to my portfolio in order to make the switch and start applying for games jobs. I wanted a scene I could practice realism in a real-time environment so I was staying away from anything too game-y. This also allowed me to focus on the art and not have to worry too much about coming up with designs. The Old Basketball Gym by Joshua Williams was what first inspired me. It’s a great example of how you can make a pretty ordinary and mundane location look interesting with good lighting, materials and composition.

I have no idea how I ended up deciding to make a bowling alley, but I started looking for inspiration and reference on Pinterest. The hard part was resisting making a decayed, post-apocalyptic or over the top futuristic bowling alley and keeping it grounded and real. I compromised and went with a 60/70’s style bowling alley but with a good amount of wear and mold with a slightly abandoned feel.

Final Shot compared to the Reference Image
Once I found the main photo the scene is based on, I started looking for individual prop reference for everything in the scene, as well as other props that weren’t in the photograph but fit the style and time period. I created a PureRef board of all my references which helped me come up with ideas of what could be behind the camera and what other compositions I could make. I didn’t want to over scope the project so I kept the scene not much bigger than the original photo, as I wanted the original photo ref to be the main shot and everything else just extra.

PureRef Board
Blockout
For all my scenes I always start by creating the blockout in Maya. In cases like this where I’m using a reference photo, I start by lining up the camera, finding the right focal length then proceeding with the modelling. The main focus of this step is to make sure everything is the correct scale (always have a human scale reference in the scene) and working out what you can make modular and what needs to be unique. Any time it’s possible, I’ll Google an object or something similar, such as a chair or a bowling ball and find measurements to use. This gives me solid reference points throughout the scene I can trust to be the correct scale and base other props on. This step is also really helpful for judging the scope of your project as you’re able to break down the scene and count exactly how many assets and materials you need to create.

I’d recommend always doing this blockout step first rather than going asset by asset and piecing it all together as you go, as you might find an asset you spent a week on is barely visible in the final shot or worst case scenario, doesn’t work in the scene and is scrapped altogether.

Blockout in Maya

Blockout in Maya
Above is the blockout in Maya - at this stage everything is super low res, made from primitives and simple extrusions.
Once the blockout is in good shape and you have all of your props blocked out, I start breaking the scene down. I save the scene and version up, then start deleting all duplicate assets (as you’re only gonna need to make one) and move everything to 0,0,0, set the pivot to where I want, then export to separate FBX files. For this scene I broke the walls, floors and ceiling into modular pieces as I wanted to practice modular workflows more at the time, but in retrospect they could have been exported as whole meshes or even made with BSP/environment mesh as they’re relatively simple meshes with tiling materials.

Export Files
Now you’ll have a folder with all the assets you need to build which is great to have early in the project as it takes a lot of the mental stress away. When you’re working on your project after a hard day at work, you just need to look at your list of props and get to work without having to think too much about what you need to do next!

Progression of the Environment
As you can see in the process GIF, not a lot of new props are added or moved, the main bulk of the work is just iterating on everything I already have in place from the blockout. Nailing the composition at the start will save you time as you will only need to work on the things that are important and take up screen space.
After breaking down the blockout and exporting, I make a new project in UE4 and import all the exported models. It is possible to export your entire blockout scene from Maya in a single FBX (keeping all the props in place) but I prefer to do this step myself to keep everything clean and organised. Once I have everything in UE4, I then do what I just said I don’t do and export the entire scene from Maya as one FBX. I use this as reference for where I need to place things. After that I delete it from the scene and asset browser to keep things tidy. From this point I only use Maya to build the assets and keep all the prop positioning and camera work inside of UE4.
Once I have the scene set up inside UE4 I try to find a bunch of camera compositions I want to focus on throughout production. Obviously these could change as the scene progresses but having these helps to focus on the assets and materials that matter and make the scene work as a whole environment and not just a single shot. I make separate cameras for all of these shots and regularly save out screenshots from all angles to evaluate my scene as I go. It’s also helpful to save these camera angles as bookmarks so you can use hotkeys to quickly switch between them as you work.

Different Camera Shots
Layered Materials
I wanted to use layered materials on this project where possible as they’re becoming more common place in the industry and they’re also a great way to speed up workflow and have much higher texel density on your props while keeping textures to a minimum. There are many different ways to set these up inside UE4 but I went with using materials functions as this allows you to essentially layer materials, instead of layering texture by texture or having a giant node network with a lot of repetition.

Layered Material
So for example, I was able to create a paint material function and one for metal and rubber. I could then use these on many assets in the scene and use RGB masks to tell the material where each function should appear. Another advantage of using material functions is that any custom inputs I make will be accessible in the layered material instance, so I can change the colour of the wood or alter the roughness, UV tiling or normal strength uniquely per asset, without needing more textures or materials.
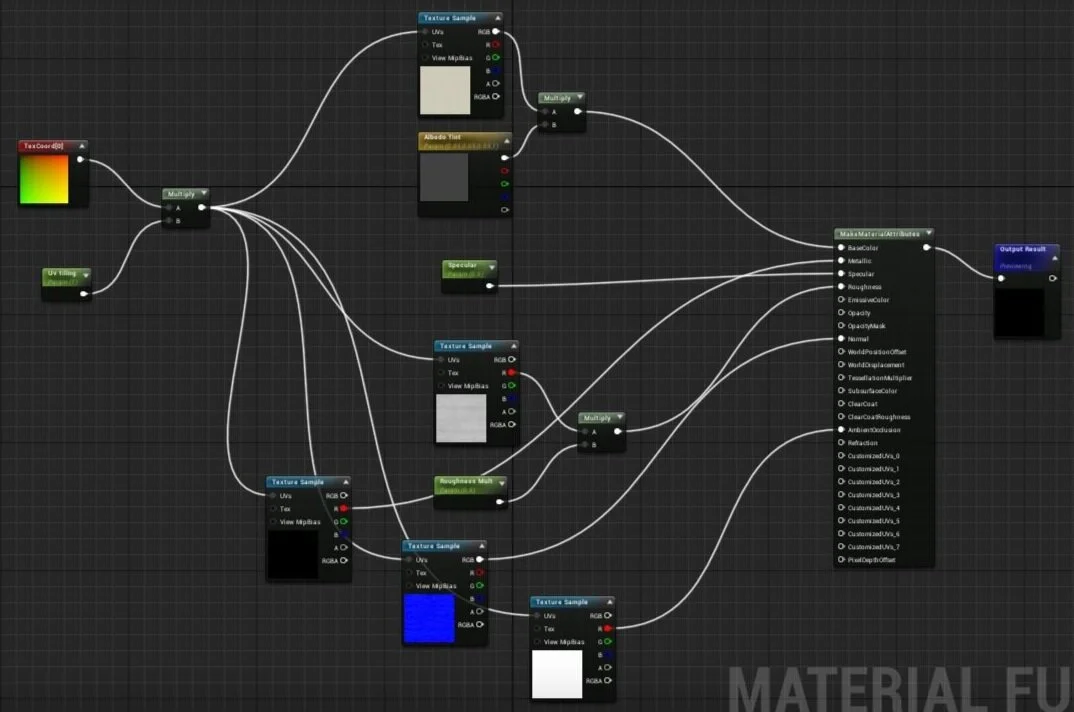
Material Layer Function
For the more standard props in the scene that were textured uniquely in Substance Painter, I had a master material with any custom parameters I needed, then created material instances per asset.

Unique Prop Master Material
I’d recommend everyone to look into layered materials if you haven’t already as they allow you to have much more detail and control over your materials while reducing the amount of textures needed and overall speeding up your workflow. At any point in production, I was able to change the colour of the paint as well as the texture tiling and wear amount without having to re-texture.

Modelling and Texturing
For this project I had a pretty standard workflow for all the props and textures. I worked through my list of props, adding detail to the blockout meshes in Maya. Then depending on the prop, I’d take it into Substance Painter for texturing or to create an ID map for my layered materials. As for the tileable materials in the scene like the wall paint or wood floor, I used Substance Designer. Since the props are relatively simple, most of them were modelled to a ‘medium-poly’ res, as creating a high-poly wasn’t necessary in most cases and I could always add more normal detail in Painter. Since this is a portfolio piece, optimisation wasn’t a priority. I wasn’t worried about poly-counts or LODs, so I made sure everything had bevelled edges. I think the only prop I took into ZBrush were the bowling shoes, to add a bit of distortion to the mesh and then use decimation master to create the low poly.

Bowling Shoes Decimated to High Poly
Since I had all the blockout work done at the start of the project, modelling and detailing up props was fairly straight forward. That said, I always kept reference open to make sure proportions were looking correct and it was usually necessary to find multiple angles of props to model it accurately. I think as Environment Artists we want every prop we make to be noticed so we can sometimes oversize the smaller props in a scene which can instantly break the feeling of realism, so it’s important to not get attached to individual props.

Set dressing and Story
I wanted to keep the scene as close to the reference as possible so I didn’t plan on adding too much storytelling elements. I tried to imagine how the space would be used and as it’s a bowling alley I was pretty limited. I had an idea to dress the scene as if there had been some kind of tournament or party. You can see in the progress GIF I added a banner at one point but the problem with that idea is it started to draw too much attention and take away from the sombre, abandoned feeling the original concept had. So I pulled it back and went with a few cups, beer bottles, trophies, etc. just so it felt lived in.


As the base environment is made up of tileable materials, it’s always a good idea to break up the repetition with decals and vertex painting. I searched for cracks, stains and leakages I could potentially use for decals. Textures.com have a bunch with alpha masks ready to use. I also Googled any images I could use that I’d then have to create my own alpha mask for. Once I had my diffuse decals with alpha mask, I took them all into Substance Designer where I made a really simple setup that allowed me to plug in my diffuse texture and it would generate a normal and roughness map for every decal bringing an extra level of detail. Below you can see a few areas of the scene with and without decals, and see how much difference they can make.

Without Decals

With Decals

Without Decals

With Decals
As well as decals, I used vertex painting on the wooden floor to break up the tiling and add wear. I found in references that you would get areas of wood floor where the varnish had worn off so that’s what I was aiming for. This just involved creating an alternate version of the floor textures which is really easy in Designer. Then in the material, add custom parameters to edit the roughness and albedo and add the ability to use vertex painting. As you can see below.

Without Vertex Painting

With Vertex Painting

Vertex Paint Visualization
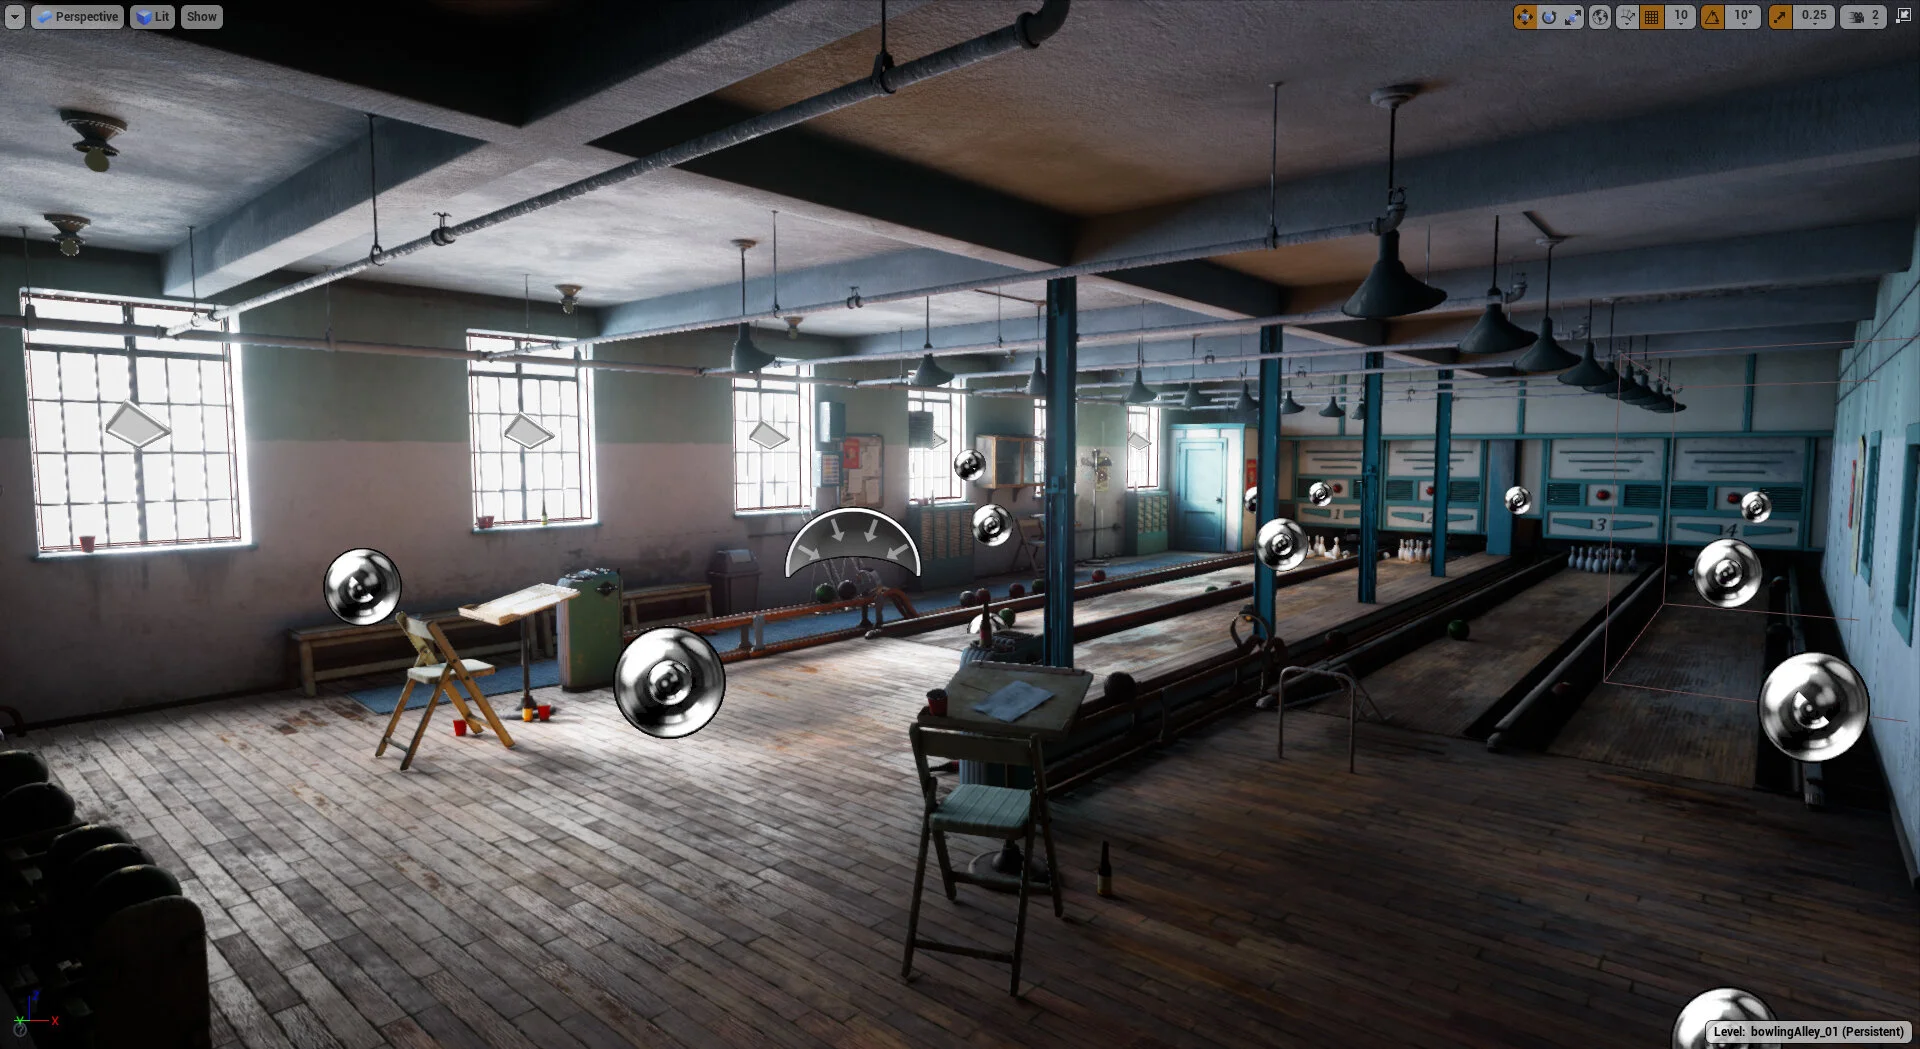
Lighting
The lighting in the scene was top of my priority list and something I wanted to spend as long as it took to get right. I wanted to match the lighting in the reference as closely as possible and also keep the lighting setup realistic so the only lights in the scene are the directional light outside the window to emulate the sun and the bulb spotlights above the cashier desk. To get this to work, it meant I had to up the number of light bounces and also increase the brightness of the outside sun until you’re getting enough light. I also had lightmass portals on each of the windows, which just helps to guide the light into interior spaces and improve the quality of the lighting. You can find more info about them here.

Lighting Setup Showing Spotlights
Lighting Setup Showing Lightmass Portals
The Lightmass settings are what make this setup possible, allowing the light to bounce around the scene and give me enough light and detail. I tweaked the settings here and re-baked the lighting many times until I got it looking how I wanted. I always like to refer to this guide by Tom Looman, as I find it really helpful to visually see what each setting is doing. That said, it’s always best to try them yourself and do a few bakes to understand what’s happening when you change a setting. Once I found the settings that I think worked I baked at preview quality while working to see updates, which took around 20-40 minutes on my laptop. I used medium quality when I was posting a WIP update on my Artstation blog and for the final scene I baked at production quality which I believe took around 2 hours. So when your baking is taking a long time, don’t worry, it’s normal! (normal if you’re using an old Dell laptop like me, haha…)

Lightmass Settings
Lightmaps are super important too in getting the quality in your baked lighting. I made sure that everything had sufficient lightmap density, using lower resolution lightmaps for smaller objects or objects that didn’t need the resolution and higher for larger objects and areas where I wanted to capture high quality baked shadows. Again, I wasn’t worried about optimisation so I cranked the settings to exactly what I needed.

Detail Lighting Viewmode

Detail Lighting Viewmode
As well as the lights in the scene, I had a number of sphere reflections probes to get accurate reflections in the scene. I also used planar reflections which helped me achieve the accurate reflections in the windows. Planar reflections are very expensive though as it basically has to render your scene again but at a lower resolution. As I’ve mentioned already, my main goal was quality, so the amount of reflection probes I used is definitely not optimal or what would be used in production.

Example without Planar Reflections

Example with Planar Reflections
Speeding up your Workflow
Throughout the process of working on my scene there were a number of things that really helped to speed up my workflow. As explained before, once I had set up the layered materials, it made it really quick to bring in new assets and throw a layered material on it and it would already look 90% there. For anyone unfamiliar with the Unreal Engine material editor, I’d also recommend adding custom parameters to every slot in your material and use these to get a visual demonstration of what each input is doing as well as make changes to your materials in the viewport and really dial in the look you’re going for without having to go back to re-texturing.

Having a blockout to build up from and iterate on is a great way to speed up your workflow and prevent you from spending time working on insignificant assets as you can see your scene as a whole at all times. Working towards your minimum viable product (MVP) is a good way to not get too lost in details and only spend time on what’s going to add to your scene. For example, in the bowling alley you might have noticed that the bowling ball ramps just have a basic metal material, no textures! That is partly down to laziness but primarily, as an MVP they look fine and spending time texturing them wouldn’t have added much, if anything to the scene and I could spend that time elsewhere. Of course if you plan to show off assets from your scene in a breakdown, I wouldn’t show un-textured assets haha… so keep in mind the end product and purpose.

Final Tips
Iteration! It’s easy to get tired and unmotivated when working on your own stuff, but I think one of the best ways of avoiding that is always being able to see your scene progress. If you’re spending a lot of time on a single asset and you’re seeing no change to the scene, you can quickly become unmotivated. But if you go through your assets and give them a quick material and wear pass just to get them in your scene, you have the advantage of seeing your whole scene come together quicker and also evaluate how much more work an asset really needs. From this point you may realise you can call an asset finished way sooner and you can easily jump between assets giving them another pass if you’re getting bored of another.

Finally, when it comes to taking your final screenshots, fly around your scene taking as many shots as you can that have potential. The hard part is being able to objectively go through them all and delete any that look too gamey (low res or unrealistic camera angles), don’t fit with the vibe or theme that you want to convey or just generally show off your work in a bad light. The assets in my bowling alley were made to a third person/mid-range resolution, so I’ve not got any close up shots as the assets don’t support it and it’d only lower the overall perception of the scene. Quality over quantity is always best!
I hope you’ve found this helpful in some way, and thank you for taking the time to read it! :)
If you have any questions, feel free to message me over on Artstation.
Thanks again!
Adam Tinning.