
Stylized ART - FROM UNIVERSITY TO SQUARE-ENIX
Jasmin Habezai-Fekri has made a name for herself with her stylized art, so much so that she won the Artstation Challenge and recently finished an internship at Square-Enix. This breakdown goes through her King Arthur submission and explores various topics including her workflow, important pillars of stylized art, building a presence online and having studios reach out to you.
Introduction
Hey everyone! I am Jasmin Habezai-Fekri, a 3D Environment and Prop Artist from Cologne, Germany. I previously interned at Square Enix Montréal and have freelanced for games such as Slime Rancher by Monomi Park and VR projects by Firefox. I am also a Sketchfab Master, which includes hosting and judging challenges and co-hosting the Women On Sketchfab Series. Besides that, I am pursuing my bachelors degree in Game Development with a focus on Game Art.


Stylized Art
I have a huge passion for hand-painted textures and fantasy worlds, which I mostly focus my 3D works on. I have had an interest in video games since my early childhood when I would play games such as Animal Crossing, The Sims or World of Warcraft, which left a big impact on me ever since. They kindled my curiosity for how the colourful visuals and details of these world were created. These experiences played a big role in my journey of becoming a 3D Artist. In 2017, before I started university, I began researching game development and found my passion for 3D modelling and environment art. 3D was the art form that clicked with me right away. YouTube was and still is the biggest resource for me to expand my skill set besides getting constant feedback in different Discord and Twitter art communities.

During my early learning phase, I experimented a lot with different art styles trying to figure out what I am most passionate about. I quickly realised that I strongly gravitated towards stylized concepts and 3D work, which is also connected to my love for illustration and graphic novels. I did try to dabble a bit in realism but I would catch myself being a lot less receptive or motivated creating it.
Stylized Assets from Concept - Important Pillars
Use the Concept as a Blueprint
When modelling stylized assets from concepts, it’s best to start modelling from the initial angle of the concept. It makes it easier to capture the main shapes and proportions of the object, while seeing if they work in the 3D space from different angles. This way, it becomes apparent, which shapes worked better in 2D and need adjusting in 3D. Make sure to think further than the concept, especially when it’s about the details and non-visible parts.Break down the Asset
When dealing with several pieces within a prop, break down the concept into manageable chunks and elements which you can focus on individually. Once you have each piece blocked out, you can piece it all together into one big picture. Doing so, it will become apparent what needs further improvement and gives a starting point instead of focusing on too many objects at the same time.Keep the Realism origin of the Asset in mind
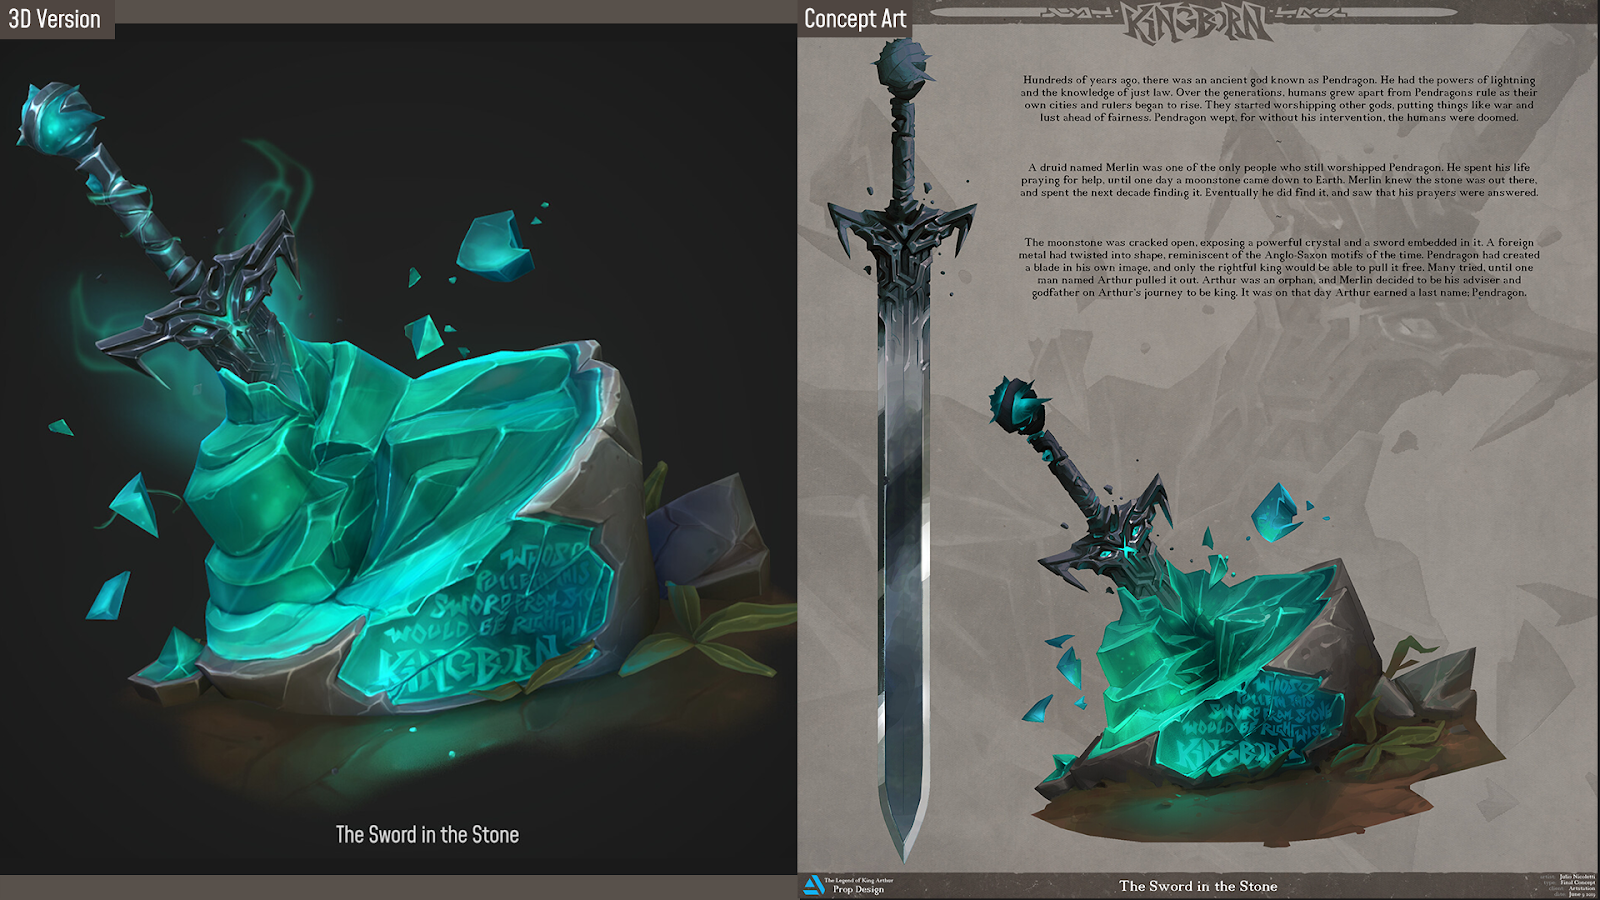
Keep analysing the shape language and stylization of the asset by comparing it to its “real life” inspirations, references and possible origin. In my case, I was very lucky to have an amazing concept sheet provided by Julio Nicoletti, which specified the materials with their references found in nature, the prop’s backstory and different angles of it. His work is a great example for concept art which works extremely well in 3D production.

Creating The Sword in The Stone
Blockout
For the Sword in the Stone, I started with a very rough blockout inside Blender, which I took into ZBrush. ZBrush is great for the early phases of a model when you want to get a feeling for the shapes and proportions without worrying about the topology. Especially for organic models such as rocks, I find it a lot easier to start entirely inside Zbrush. When importing the model from Blender, I keep swapping between dynamesh and ZRemesh to keep the mesh fairly clean for sculpting.
Progression GIF
Detailing
For the written engravings on the Stone, I created alphas based on Julio’s concepts inside Photoshop. As visible in the progress GIF, especially the sword top went through strong iterations. At first I wanted to build up the details by masking the details out and edit the parts inside the deformation tab. This didn’t give me the desired clean results, so I decided to model the parts in ZModeler, which gave them a much crisper look.

The main brushes I used during the sculpting phase were HPolish, Orb Cracks, Trim Dynamic and Dam Standard. Before moving onto the baking phase, I used a default setting clay polish on all of the assets to give it an even crisper look.

Brushes

First Pass with assembled Maps
Once I retopoed the meshes inside Blender, I baked the Cavity, Worldspace Normal and Ambient Occlusion inside Marmoset. Within Photoshop, I assembled all the different maps together to create a base for hand-painting the textures. This speeds up the painting process a lot, since you get a lot of the lighting information with the baked maps.

Texture Process
Next, I start painting the textures inside Blender with the help of its texture painting set up, which lets me paint straight onto the model. During this phase, I mostly emphasise the lighting further and focus on the material definition/differentiation. The biggest advice I have for anyone working with bakes for their hand-painted textures: Don’t be afraid to paint over your bakes to make the details pop more! It is very visible when a hand-painted model is heavily relying on the baked maps when actually they are merely a base for speeding up the painting process.
I paid special attention to the crystal first and then moved onto the sword to compliment it. I always go into the big details first and then work myself up into the small ones. A good technique is always checking your work from a far distance or scaling it down to see how the colours, light and details read overall on a small scale.

Reaching the last phases of polishing, I experimented with additional VFX to create a fitting mood to the backstory of the props. Environmental storytelling is important, even with a single prop. I did several iterations on the VFX until I settled for a smoky effect, that reflects the mysterious aura of the sword.

VFX Aura
For the crystal effect, I made use of the SSS shader inside Marmoset to give the material a feeling of translucency. It’s slightly see through and reveals the shape of the sword, which adds to the believability of the crystal while it is still highly stylized. This is achieved by using the cavity map to control the scatter depth. I tinted everything, including the emissive maps, slightly teal and blue to emphasise the depth of the crystal and adding different hues to it.

Lighting
I rendered all the assets inside Marmoset, which gives a great control over the lighting. Since I hand painted most of the light information, I had to be cautious about the way I was going to light the models while still enhancing some parts. Therefore I turned the shadows off on all my light sources except for one, which emulates the real shadows. Here it is important to avoid harsh black shadows, which could break the stylized and illustrative feel of the model. Specifically for the Sword in the Stone prop setup, I only used one directional light with the shadows turned on and several point lights in front of the sword. Especially around the parts where the sword connects to the crystal, I added several omni lights to deepen the already painted shadows. It also helped to soften the shadows from the directional light and fake coloured shadows. Adding emission maps to the crystal and VFX also helped to make the lighting pop.
Lighting Setup - Unlit and Lit
Maintaining Consistency with Stylized Art
Stylized assets are a healthy mix of photorealistic and cartoony models. It’s right in the middle of both and draws points from each category. An important factor is the use of colour, shapes and details. It is basically a very focused and surface-level summary of reality. When creating stylized pieces, artists should know when they’ve created enough details to represent the main characteristics of a material. This means not getting lost in micro detailing. Working from big to small without being tempted to jump into the detail work already helps to keep the textures consistent. Having a solid foundation for the colours and lighting is more important to take care of than the small scratches and dents on an object. Those are the things the viewer will pick up on the second glance. They don’t make up the first impression of the asset. What helps is inspecting the model frequently from far away. This way it becomes apparent if the textures are too busy, the model too detailed or the hues and values too similar.
To some degree, the concept has to show a level of stylization. After all, a concept is a blueprint for 3D, however not a 100% guideline that you have to follow. There are exceptions of course, where it is required to follow it one to one. When starting a project, I always start with following the concept closely, having the orthographics open inside Blender. Once the main shapes are put down and I’m getting closer to the production phase, I begin to iterate on the blockout, and try to find out what works best inside 3D without referencing the concept constantly. A lot of times, a design looks great in 2D but doesn’t seem to work as well in the 3D space. Part of this is the fact that with 3D Props, you most likely will see them from several different angles. Therefore it is important to not only make the Model look great from the main angle that the concept provides but from any point of view. Try to think beyond the concept and give it your own artistic touch.


Working at Square-Enix
Early on, it was clear to me that I want to pursue 3D art with a focus on environments and props. At first I was torn if I should focus on stylized art, since realism is very much in demand in the industry. However, if you create work that you genuinely are passionate about, people will notice that right away. Having a goal in mind and building a portfolio based on that helps a lot to get the attention of studios and individuals, who will eventually hire you for your skills.
This applies universally to finding freelance work and internships. The main tip I have for anyone who creates digital art is creating art regularly and showcasing your work online, especially if you are still at university and have the time to build a portfolio before graduating. Having an online presence and being active in art communities on Twitter and Discord helped me immensely to learn quicker, get freelance gigs and an internship eventually. Make use of the different hashtags that appear monthly, such as #PortfolioDay or #ArtVsArtist, if you want new eyes on your work.I was very lucky to be reached out to by Square Enix Montréal when I was on the search for an internship during my first year at university. They discovered my work through Twitter and enjoyed the projects I was creating.
I feel very fortunate to have had my first in-studio experience at Square Enix. It was amazing to be part of such a talented team and being able to work with other artists who feel just as passionate about their craft as you do. Having that experience and being able to learn from other artists in the industry before graduating from university is absolutely essential. Thanks to my internship and mentors at Square Enix, I feel even more motivated and excited to continue working in the Game Industry.
Outro
The Artstation Challenge was a great opportunity to get outside of my comfort zone by trying out new workflows. It was my first time taking part in a competition, which made it intimidating at the start. However, I learnt a lot of new things in the process and having a whole community working towards the same goal is a great motivation.
Thank you to Experience Points for inviting me to talk about my process. If you have any questions, feel free to DM me on Twitter , Artstation or just drop me an email! I’m always happy to share insights.