
CinemaTIC Lighting in UE4
Kemal Günel sat down with us to detail how he became a Lighting Artist. In this extensive article, he explains how he started out in films and cinema to see how they approached lighting, and then ultimately worked his way to Starbreeze Studios.
Introduction
Hello! My name is Kemal Günel, I am 30 years old and I am from Istanbul, Turkey. One year ago I moved to Stockholm, Sweden where I am living and working as a Lighting Artist at Starbreeze Studios. I also create lighting tutorials with Unreal Engine 4 on my Youtube channel.
I worked in the industry for 13 years, yes I started very early. I have worked on many projects in the field of cinema and video games over the years including: Overkill’s The Walking Dead, the main game and DLCs excluding one, Tartarus, Roots of Insanity, Voidrunner are some of the video game projects that I’ve worked on and The Abyss; my short Scifi film done in Unreal Engine 4 and was granted the Unreal Dev Grant in Film/Cinema category.

Before I became a lighting artist, I worked as a concept artist, 3D artist even as an animator from time to time. Switching between professions... Maybe it’s not the best thing to do; but if you don’t have any other option, you have to deal with it! You have to earn your money to stay alive right? I tried a lot, I got frustrated a lot and I failed a lot. Failure hurts. But even if it fails, you still have the experience which is more valuable than money in young ages. Because you learned “what not to do” for the next project.
My first meeting with 3D was an accident I can say. I can’t remember clearly but I found a demo version of 3D Studio Max. It must have been around 2004 or 2005, it's been a long time. I installed it and started to play with. It was so interesting to create objects in 3D, you can actually rotate them :) My first job in the industry was 3D modeling. I was working for a small company as a “wanna be artist” not even a junior. I was responsible to create digital copies of real products for marketing purposes. Again, I was using 3DS Max in that time.
How i got into the lighting… I would like to write the whole story but I will try to keep it short. When I was in University, I found a lot of time to know more about myself. What is my true passion, what am I gonna do after I finish the University? I studied graphic design at Marmara University Faculty of Fine Arts (I quit). What if I don't like the job that have? These kinds of questions were always on my mind like a rusty nail. I don’t want to waste my life to work on things that I hate or are not fun.”Fun.” That was the key. I knew I love cinema and video games. I am a huge sci-fi fan. I still remember the days that I watched the Alien (1979) and Terminator 2.

Terminator 2

Alien (1979)
I was a kid at that time and those movies left a great impression on me, I guess. Many years after seeing those movies, I started to look at how they are doing that kind of cool stuff. The more I looked the more I understood. It was the lights. A way to make things look cool! I want that! Sometimes even in a scene without actors, you can easily say “Something is about to happen”. I started to study lighting at home. I bought a really cheap but great book. It was about the light fixtures they use in Hollywood, their technical properties and their history. There were so many things in that book, then I understood I need to learn by seeing it, not just reading. It wasn't enough. I started to think about how is that possible, where can i see it? It was impossible to enter movie or TV series sets if you are not from the crew.
First, I became an infiltrator. So, I registered to a casting agency. They took some photos and a video. I really want to see that audition tape. Probably one of the weird moments of my life. I didn’t expect them to call for something because I am not an actor and I don't have any education about it. But I tried as hard as I can to do what they said to me. And one day, they called. I got in! I went to set with a little notebook. It was a cinema movie set and I was a figurant of course. I managed to get a good spot to see almost everything. Where they put the camera, where they put the lights, how they are doing it and why they are doing in that way? I took my notes. I was so happy when I got home.

I kept doing the same thing as much as I can, I mean catching the sets and observing it. No matter what, I learned a lot just by watching. But it’s a rare thing you know. You can’t go to sets every day. It is not a school. Then I asked one of my friends, he was studying Radio & Television at that time, if it is possible to find me a job in the film industry. He said forget about it but I insisted. One day he gave me an address for a small studio. I went there without any experience but I said “I want to learn and I can work for cheap.” The gentlemen who gave me the job was a bit suspicious about me but at the end I got what I wanted. While working there for one year as a lighting assistant, I learned how to use the tools, how to setup lights, filters, practical lighting, in short almost everything that I need. But there was an extra. The cameras, lenses and their relationship with lights… The how and why again.
Unfortunately I had to quit the job. After some time I found a 3D artist position in another small studio. They were using LightWave 3D. After learning the new software, I bought a license for myself too. To study digital lighting at home. It was the time to do something other than playing video games. So I carried all experiences that I had before to digital and it helped a lot. How to set lights, what type of lights I have, relationship between light, shape and materials. I worked, worked, and worked. I was trying to mimic the lighting setups that we do in real sets.
After some time, I had the opportunities to work on some indie video games. I always wanted to work on video games. I grew up with them. They were using Unreal Engine 4 so I learned Unreal Engine 4. I was doing 3D modeling again but my main goal was lighting. Again, I combined both practical and digital lighting experiences that I had before and tried to apply them in real-time engine. At first it was a bit hard to understand and adapt. It was like relearning everything. After finishing the projects that I worked on for a small company, we did our own game with my friends. I was the only artist for that!
Even now I can not believe how we manage to finish that! Doing modeling, texturing, lighting, level design, set dressing… It was really hard for all of us. Four guys are working for almost 24/7 to reach their goal. All of us learned so much. I can say that “game” made me a lighting artist. 1 year after our game, I applied for lighting artist positions out of the country to learn and produce more. Yes, I got into film industry to learn lighting and carried those experiences to be able to work on video games. Now I am working with the people who made the games that I am amazed by.
Like Battlefield, GTA, Deus Ex etc. So the answer for the question “Did you study anywhere?” Yes, I studied on the battlefield. I got my wounds but I survived.
Fundamental Skills for a Lighting Artist
Being an artist on different projects and different areas helps more than you can imagine. I was working as a concept artist, then you need to know color theory, composition. The psychology behind the colors to push desired feeling to your audience or client. I was doing 3D modeling, then you need to know how to open UVs, how to texture your model, how to open lightmaps and the why of everything related with them. I was a lighting assistant on sets, then I need to know about framing, movement, placement, shadow control. So yes, there is fundamentals of lighting and fundamental skills of lighting artist. If we need to summarize all of these I can say.
Knowledge of color theory.
Knowledge of composition.
Material, geometry and light relationship.
Before all of these, I also believe that you need strong feelings and imagination. Without imagination and feelings; no matter what, you are not an artist. You are just an operator who has knowledge about tools and rules. Of course this is my opinion.
Inspiration for ‘The Alley’

The Alley
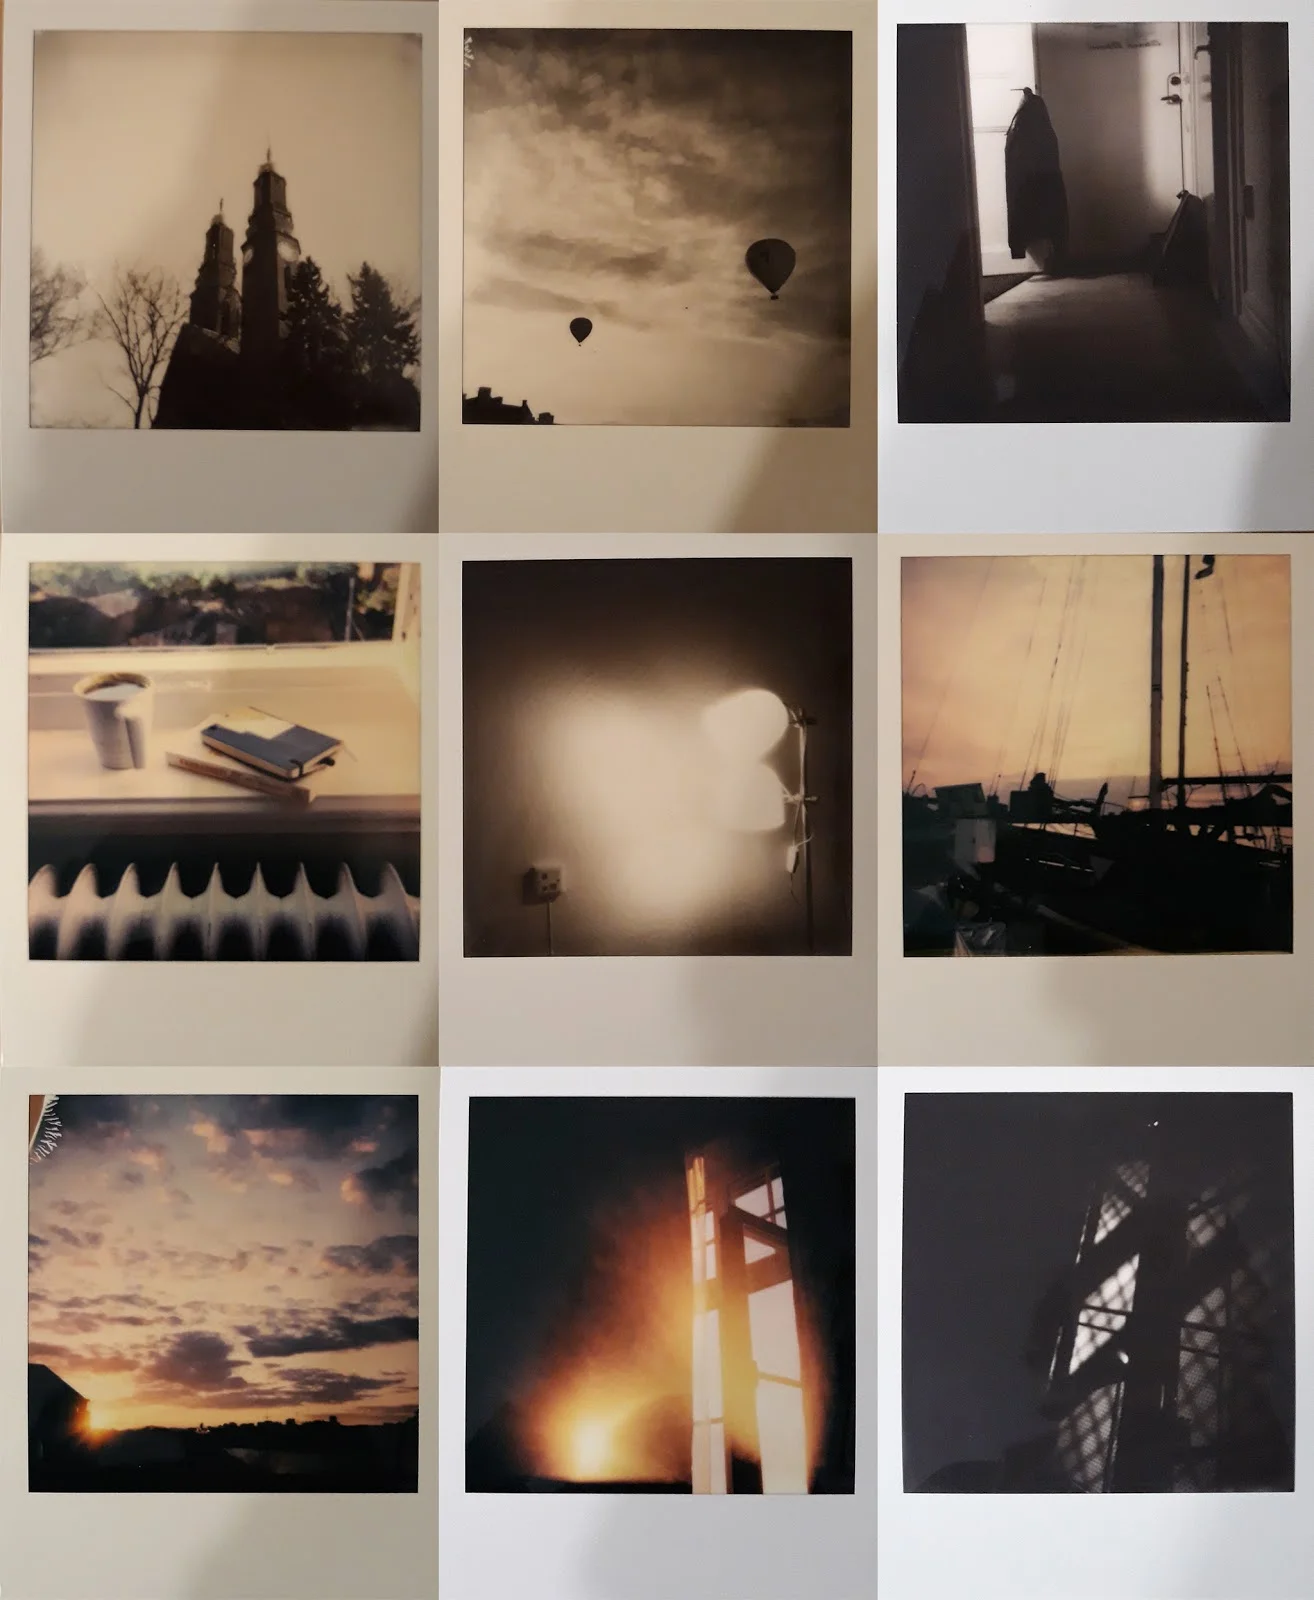
Polaroids
The inspiration came from the city I am living in. It was winter time and if you are in Stockholm, you learn it can be super foggy and dark. I was at the terrace of studio and right in front of us, there was a construction site. The spots from the cranes were creating amazing effects with that thick fog. It was almost like a spaceship hovering on top of us. Down the street, giant LED billboards were creating every color, flashing, going dark and coming back again. Traffic lights were changing colors and interacting with fog. Bright red stop lamps from the cars… Then my mind went to Blade Runner 2049 instantly and I got a shot with my phone. I wanted to do something like that but you know it’s hard to find free time to do your own stuff, sometimes it’s even harder if you are working full time. After months I found some time.
Yes, I used pre-made assets. I didn’t want to model and texture everything. I also wanted to support the creator of the City Pack that I used. They made it permanently free, I have huge respect for that. I believe everybody has different ways to get inspiration. I am saying this again, it’s the city, it’s the people and taking long walks at night. I mean walking for hours. You can't imagine how much detail you can see and hear when there is nothing to distract you. Stockholm is very, very quiet and empty at night during the winter. Watching people is a great source. Sitting at a park or just standing near a building and looking to people. Trying to imagine what kind of life or stories they have. Just by looking to their faces and body language. Sad, happy, crying, in a rush… Maybe she left her boyfriend or the opposite or it’s just a song. Maybe lost the job? The guy near metro station, looks like he is in his 60’s. Long bearded. His mustache and part of his beard a bit yellowish brownish, maybe he is a smoker? He is carrying plastic bags, shaking sound tells me there are tin cans in it but what’s in the other one? Sometimes I’m reviewing my Polaroids. Polaroids have a unique feeling and I love it. Trying different things can show you the way that you are looking for.
All these things that I have seen on the streets are the parts of my scenes. I can not create everything 100% accurately to represent a moment that I had but I can place small things to remind me of it. For me the directions of my scenes are always the same. Do something to make one wonder and do something to remind. It can be you, me, anyone we can think of.
Lighting Preparation
The approach has two steps. This is for my personal project so I don’t have any restrictions. But doing lighting for actual production is different. You have to collaborate with other artists and the battle between performance and quality :) Most of the time you are limited with rendering budget. People are trying to get stable 60fps right? This is another story for another article maybe :) Here are the steps for personal projects.
Gathering references or going blind(sometimes it’s a good thing to try).
Breakdown the references and rearrangement.
These two steps can tell you almost everything. But what does it mean? Let’s try to understand one by one.
Gathering references or going blind: Collecting visual, auditory data as much as possible which you think matches with your idea. Photos, stills from movies, screenshots from games, maybe an album cover, maybe a soundtrack? Yes, a track or a record from an amateur guy. I might sound like a madman but it works for me. But what is “going blind” ? That is the auditory data. Sometimes i just listen to the same song for hours and hours but it doesn’t bother me because that is the source. I am just letting dark cellos or synths tell me the colors and composition. I listen to artists like Loscil, Lustmord. I love their art.
Breakdown the references and rearrangement: The answer for What and Where and of course the Mood. Trash on ground… Ok, but what are those? Plastic bottles, newspapers, plastic bags, soda cans, cigarettes… From big pieces to small pieces and unique items(let’s say a teddy bear in a trash bin). Unique pieces can be placed only once. Then trying to understand where they are. It needs to look natural. For example rain drainage collects more stuff. I am trying to catch those kind of details and trying to keep it consistent/balanced around the scene. This step is like a map. Then i will know what i need to place and where to place.

References
Lighting the Scene

The settings! Everybody asking about the settings :) Every scene has different requirements. I don’t have so many generic settings to put for every scene but there are some. For example, setting the exposure values to 1; to get fixed exposure in every area. Then tweak it later if it’s needed.

Most of the time my scenes have a Directional light, a Sky Light and Post-Process Volume (set to Unbound). If you check Unbound setting, you are applying Post-Process settings to entire Unreal World. Your camera or viewport camera doesn’t has to be inside of that volume.
Then I set my Directional Light and Sky Light as Movable. This only happens (setting them as movable) if the scene is going to be fully dynamic.
For the Alley scene, I don’t have Directional light source. But i had the Directional light at the beginning, just to make my life easier while dressing the scene. Then i deleted the Directional light. At the end, the whole scene was lit by Sky Light, point lights and spot lights. They are also movable.

In the Alley scene, I have volumetric fog. For that, we need to place Exponential Height Fog into our scene first. Then we need to check “Volumetric Fog” to enable it. We can see the difference just by playing with that setting. Disabled on first image and enabled on second image.

Volumetric Fog: Off

Volumetric Fog: On
But we will probably have another problem after making our fog volumetric.
Most of the time I need to tweak my Sky Light. Sky Light can light the exponential height fog and it can be super dense. It can wash out entire scene. So I am controlling the influence of Sky Light on Exponential Height Fog by tweaking the Volumetric Scattering Intensity value.

We can see the difference between two images with the settings 1(First) and 0.1 (Second)

Volumetric Fog: Scattering Intensity 1.0

Volumetric Fog: Scattering Intensity 0.1
You might think this looks like enabling/disabling volumetric fog. Yes, it looks like that but the effect is different. If we disable volumetric fog, we can’t create any volume effects from our other lights. And using volumetric lighting for this scene was important to create humid, stuffy, dirty look. Also to support depth feeling. Depth feeling? Yes, depth feeling. Even in 3D you need to separate your scenes to create more 3D space, you can separate it with lights and meshes. Foreground, midground and background. You remember those things right? The more we add between two areas, the more separation and depth we create. Let me close the lights for the background and enable them back again for we can compare.
“We are trying to separate between the whitest and darkest.”


What is happening here? Basically I am separating the areas by using different colors with lights and volumetric fog. More area/space for eyes to read. These are the major colors.

Let’s check our reference one more time. The major colors from our reference matching well enough.

Colour Palette


Do not be afraid to set your light a bit brighter than normal. Sometimes burning the surfaces with lights can give good results. I also want to talk about analyzing the scene, how I read the scene even if it’s designed by someone else. Let’s say I open the scene for the first time and I just need to light it, nothing else. Below, we are seeing our scene in Unlit mode. It starts like this.

Let’s see what we have.

Neon sign (Open source) - Can create strong fog around the source.
Some other signs (Close Source) - Can create wide soft fog around source.
LED or Small bulb looking light (Colored with yellowish emissive)
Classic light bulb (Tungsten or Variated) Very bright source, Useful for lens flares.
Fluorescent Tubes (Cold blue or white)
Windows with different colors as fake interiors - Mostly warm and cold blue colors.
Without placing any light into our scene, I knew every colors and variations that i will use. This information also coming from our reference. Let’s look at that one more time.

Volumetric Fog & Lighting
What i want to say is, look at your scene and try to create a list for every potential source. Everything can be a light source. A TV, a computer screen, a modem. Look for what you can use. It’s not about placing points or spot lights only and trying to find a good place for them. It’s about making it natural. It’s about making it supportive for your story. If it’s a game, it’s about making it useful, a guide for player. Or a memorable area, maybe a moment, a tool to terrify them or make them happy. Let’s continue to the settings.
For example the spot light that I am using for this sign. It’s supporting the bright emissive surface. Sometimes you need to adjust your emissives to match with your lights or vice versa.
The volumetric scattering intensity is set to 0.1 I didn’t want to create very strong fog for this light. Also Use Inverse Squared Falloff is “Unchecked” so I have control on the fade without changing the attenuation radius.
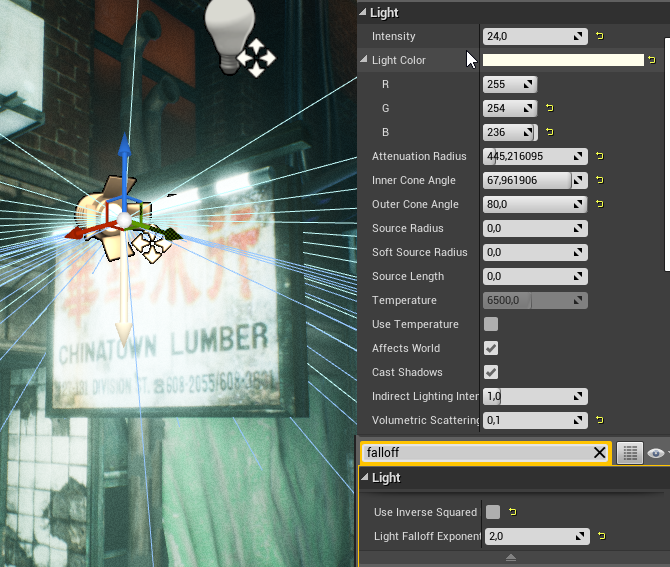
Spotlight Settings
What are those point lights then? Let’s look at them too.

Point Light Settings
Those point lights are faking the GI, they are just bounce lights to support our spotlight. We can see the difference when we turn them off. They also have the same setting for the falloff.
The differences are the shadows(No shadows) and Volumetric Scattering Intensity is set to 0.
All the lights that I placed into the scene have the same settings more or less with little differences like colors and intensity. There is one more thing that we need to think about. The transition between areas and colors. Look at the next example.

Light Transition Across the Scene
From left to right, we are going from green to white. What is happening there? We are separating two sides of the building in a smooth way. Same thing for the following image too.

Creating transition between areas is an important thing to remember. Not only with colors, keep that in mind that we can do it with the brightness/intensity too. Then it turns into dark and bright control. In short, shadow control. So shadow control is not only playing with cast shadow option under lights.
The last thing that I would like to talk about is the Post-Process settings that I used. Not so complicated but it has a great effect on the final look.
Post Process Settings

Bloom : Set to 8 / Default 0,675

Exposure : Set to 1 / 1 - Default 0.03 / 2.00

Chromatic Aberration : Set to 0.3 / Default 0 (Notice the blue shift on the left)
Grain Jitter & Intensity : Set to 0.25 / 25 - Default 0 / 0 (Notice noise on mid area at left)

Grain Jitter & Intensity : Set to 0.25 / 25 - Default 0 / 0 (Notice noise on mid area at left)

Temp & Tint : Set to 5300 / -0.35 - Default 6500 / 0.0

SSAO (Screen Space Ambient Occlusion) : Set to 1 / 50 - Default 0.5 / 200
These were the Post-Process Setting that i applied.
Lighting Advice & Tips
Gather your references as much as you can at the beginning.
Analyze them and lock them.
Lock your desired mood, try not to change your mind in the middle of the project. Finish the current one first if you want to try something else.
There will be obstacles, technical problems. Try to understand them and fix them. Do not push them under the carpet.
Set your “Base lighting” as close as possible to your references. Then apply color grading if needed. Do not try to change light colors by going extreme values in color grading because you will also change the general look of the scene which can end up with a completely different result.
Do not rush to finish it quick. Work on different days if it’s needed and come back. This might guide you to better results.
Try to get some feedback and ideas from other artists if you feel stuck.
Common Mistakes in Lighting
One of the general mistakes that I see a lot is “darkness”. The props are good, materials are good but not enough light. I don’t know why, but maybe people are afraid to show some stuff in their scenes. Don’t afraid. Why you are publishing and sharing your art with other people if you don’t want to show the whole thing. Sometimes it’s okay to hide something partially to support the mood and story but going pitch black on half of the scene is wrong if there is no reason. Also as in colors, there is no pure black, never do that. Even in the darkest conditions try to lift the shadows a bit.
Super sharp edged pure black shadows. Especially in dynamic scenes. You need to support and soften that shadows by using additional lights. What about skylight? You have that for free, use it.
Overloaded scenes. Too many shadow casting lights creating weird shadows everywhere. It’s distracting. No problem with using too many lights, but you will have some problems if you can’t control them.
Too much volumetric fog. Volumetric lighting is cool and have huge impact on realism. I see a lot of artists over using that. For example there is a window and sun is coming inside from that window, creating shafts. But man, you can’t see anything behind it. It’s glowing like somebody exploded thousands of nukes outside! In short, balance mistakes. We can go extreme values sometimes but there must be a reason for that.
Wrong reflection probe placement or completely forgetting that. Then the scene looks weird since there is nothing to support reflections. Even with “perfect” (there is none) lighting, it will look bad/weird.
Unmatching emissive, light color and intensity. Let’s say we have white fluorescent light material, people going with warm colors like tungsten color for that. Sometimes emissives are too strong but the intensity of the light is too low. We need to match those three things to create more believable/correct results.
Forgetting to support perspective. We are trying to create depth and compositions in same place right? Imagine a forest with two different times of day, one is sunset and the other one is midday, sun from the top where there is less shadow. Which one is more dramatic and interesting? Sunset right? But why is that? Because shadows are longer and angled, there is more color variations. It’s more warm, feels more safe. Pleasant for our eyes. And lastly, more natural separation with shadows and light shafts between trees which supports depth feeling. What I want to say is, we need to think about the angle of our main sources to show some shadows.
Forgetting the fog. There is no natural dust in 3D world of Unreal. You need to create it, otherwise your scene will look too clean/flat like there is no air.
Applying Post-Process effects too early. For that, you need to set your lights first. Then you can apply other effects and settings. Playing with LUTs and grading cool but not the first thing to get into. It doesn’t help the final look alone. These are the common mistakes i can see.
Important Skills to Posses
Having knowledge about how light is acting in different conditions are very important. But it can be everything right? The possibilities are almost infinite! Yes, and that is why you should go out and observe. Not only the Sun and Moon, artificial lights too. On a foggy day, at night, on rain, interior, exterior, as much as you can. Even with your simple desk lamp, there is so many things happening when you switch it on. Try to see how it creates shadows, how the light bounce between the surfaces. It might sound easy. But creating that simple lamp in digital can be so hard if you are looking for realism. Understanding the relationship between lights and materials are also important. Try to see those details. You don’t need anything special. Just grab your external disk and look at the plastic cover under your room light for example. Do this for everything as much as possible. Look at the objects that you can see around you every day. It’s free observation.
The concept art. The ability to read concept art as references is very helpful. These are going to shape your scene. Try to get a look as much as like in the concept art.
The ability to create scenes in different styles is very important. You should be able to work from cartoon style to extremely realistic scenes. You may need to leave your safe zone to do this. Don’t be afraid. I think these three things I wrote above are the most important skills a lighting artist should have.
Challenges with The Alley
Deciding to use Dynamic or Baked solution for lighting. It was a bit hard. Because I knew the scene will be tight, closed area with a couple of lights with different colors. I knew I could easily get nice colors from GI if I bake it. But when you go with the Baked solution, you have to bake time to time to see the affect of lights. Tweak them and rebake to see if it’s fixed. Again, and again. And baked lighting is more performative after bake. Also I like to have some flexibility. With dynamic solution, you have your results instantly. But you need to fake the GI and you lose some performance. There is no dynamic GI in Unreal if you are not using Light Propagation Volumes or RTX. Raytracing GI is so heavy, believe me :) It was also an exercise to me. I mean using dynamic solution for this scene.
It may sound strange, but the hardest part was the material arrangement. But why? Because every asset that I used for the scene made by different artists. They all have right textures for Engine but values were different. Some of them look wet, some of them too dry so i had to match the look of every asset manually by tweaking the materials. Also, I kept the mood that I want to achieve on my mind. There might be some mistakes but at the end it looked alright to me. I was happy with the result.

Trying to create a list for the props that I want to place. The list can be very long. Trash bins, decals, container, boxes… etc. Again get some help from our reference.
The other challenge was the set dressing. It can take a very long time. Remembered the thing we said about rain drainage collects more stuff? I was trying to do that kind of stuff. Placing everything one by one. It was so painful for me because i just wanted to dive into lighting so bad :)
Final Advice
Do whatever is needed to achieve your goal. Do whatever is needed to understand. If you need to look at something for 10 minutes in the middle of street, do that! People might think that you are a weirdo, be the weirdo because they are the ones that you will amaze one day.
Being patient is so important. It will take time to get some good results. Learn from your mistakes.
Don’t be afraid to try new things. It can open another gates for you. Sometimes accidents can end with good results. Try to understand the logic behind that accident.
Be open to critiques and don’t get mad if they are too harsh on you. They will leave some scars but you are the one who suppose to cure them.
Look at other artists’ works. Everyday. The more you look the more you will see. Don’t look only for good examples, look for the bad ones too. Try to understand what is good or bad. If possible, ask the artist. Don’t be shy.
Watch movies or TV series. “Naahh I don’t like it” Nope. If you want to learn, you have to study. They are the best examples to see how lighting works. Try to understand where they hid the lights or is it really hidden?
“Thank you very much and stay with the light!”
Kemal Günel - Lighting Artist at Starbreeze Studios
