
OMEGA CITY ONE - FOCUS ON THE BIG PICTURE
In this article, Milan De Laet walks us through his process of working from concept and how he created this enormous scene. Learn how he used simple geometry and shapes to focus on the big picture, optimisation techniques, composition studies and much more.
Introduction
Hey! My name is Milan De Laet. I'm 20 years old, Belgian and study Digital Arts and Entertainment (DAE) at Howest, Belgium. I mainly focus on Environment Art but I don't shy away from more Technical Art subjects. I always try to incorporate something more technical into my scenes, although with mixed success sometimes.
My first actual exposure to 3D was when I started my journey at DAE at the age of 18. This is the place where I really learned it and it didn't take long for me to fall in love. But the first time I actually tried out 3D was a few years earlier when I found a Cinema4D tutorial by Dylan Abernethy on his YouTube. I followed that and also created a few things on my own. I enjoyed it a lot but for some reason didn't go further with it. I still continued watching him on his journey to becoming a Game Dev though. This in combination with having a good school rather close by is most likely what got me to enroll and pursue this career.

Inspiration and Planning
Omega City One started off as an exam for one of my courses. The brief was extremely loose. We basically had to create an environment with at least 180° view and optimise it so it could run in a game setting. So this left the style, setting, inspiration, etc. all up to us.
I really enjoy sci-fi, especially something like Star Citizen but still hadn't made anything worthwhile. The first environment I created in Unreal was about half a year earlier and was also sci-fi but I wasn’t too satisfied with the outcome. It was however, a great learning opportunity. So I really wanted to try again but this time I really felt like tackling something huge, so a sci-fi cityscape quickly came to mind.

After searching around, I found a lot of great concepts. The first plan was to use these as inspiration so I went and tried out some different blockouts, but it didn't take too long for me to come back to Layne Johnson's amazing concept. I only had 7 weeks while also having other classes next to this one, which isn't a huge amount of time for the scope of the project. So after a while, I made the decision to follow the concept instead and only make some small adjustments.

Progress
I didn’t make strict planning but I kinda knew the process that I wanted to follow. It was a pretty standard workflow where you start off with a blockout and move into a cycle where you add the detail, change some lighting and repeat this process until the end of the deadline. I just tried pushing it as far as I could within the given amount of time. You can see this iterative process of going back and forth between adding detail and lighting in the progress gif.
Production Process

Blockout Meshes
The overall production of the scene was rather conventional as stated before. I started off creating some blockout meshes that would help with creating the overall composition first. Later on, I could easily update these with the detailed final version or build over these.
Modular Kits
The city didn’t involve a lot of modeling. I created some different modular kits that could be used but all of these were extremely simple. Most of these were combined in prefabs for ease of use and to make the process of placing them faster. The scene didn’t revolve around small details but the overall feel. So these are mostly used to add a form of noise to the environment. Because I didn’t have a lot in the environment that showed the scale like characters or doors, getting the scale right on these was very important. Especially on the few parts that give away some sense of scale such as railings or stairs.


Main Material created in Substance Designer
Because it’s all so far away, none of these have any need for baking or unique maps. The entire city basically uses a simple material created in Substance Designer or a material with some tileable grunge maps. This saved me a lot of time as asset creation is a huge chunk of environment art but this way I managed to skim it down to the bare essentials. The same goes for the material creation. It consists of some grunge textures which get slightly adjusted.

Two materials created in Substance Designer
I also created some other materials in Designer that were meant for the platform close up. Unfortunately, I had to cut some corners towards the end of the project and the detailing of the platform was one of them. So they are barely visible but they were a great learning experience.

Comparison with and without decals including textures used
To help break up the main material that was used on most objects, I used some decals. Two different types of decals were used. The standard UE4 decals were used mostly on the left where there is a rather big wall that needed some extra detail. Next to this I also used some mesh decals that float in front of another mesh that represent the windows. Its emissive colors and strength can be changed in the material. I made a texture for these that consist of just some rectangles with different grey values so there would be some variety in brightness. The lower part of the texture is a screengrab from the original concept and adjusted slightly in Photoshop to fit my need. This was the perfect texture to have some nice diversity in colors and brightness when used.

Difficulties
One of the biggest difficulties was the scale of the project in combination with the amount of time I had. This led me to try and find a way to quickly make the city. As shown earlier, I opted into making some extremely simple sets that make up the different parts of the city. They are all modular so they can be combined in a lot of ways. But I wanted to go a step further and instead of having to combine the meshes myself create a way of auto-generating some bigger chunks.

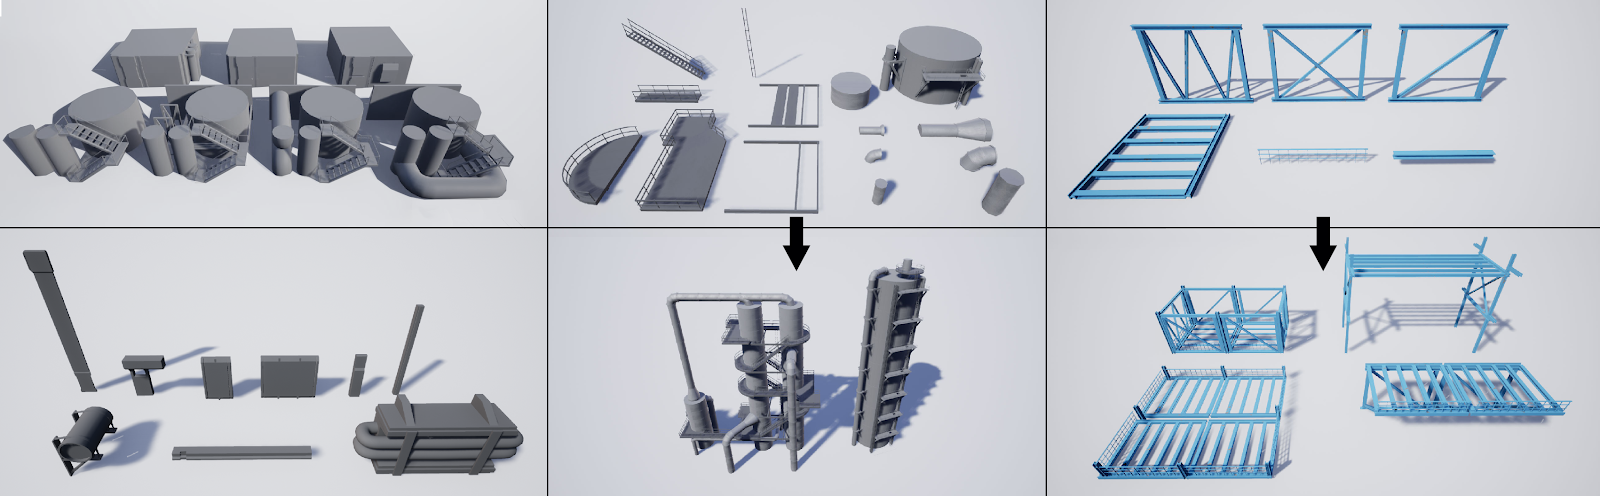
Example of prefabricator
At first, I wanted to use a plugin I found called prefabricator which basically makes it possible to have nested prefabs and randomize the used meshes. Here is an example of it at work.
How it works is that I made meshes that have the same size so they could be swapped easily. These individual meshes again have some meshes on them which can be swapped. This creates a nested prefab with each prefab having a list of meshes it can pull from.
Unfortunately, it had some major flaws which led to me abandoning the plugin. I hope the problems that occurred where a one-off because I really liked it and I could see myself using it in the future. This process took me a good amount of time however so I didn’t look into other ways to randomize my meshes and instead made some prefabs myself and manually placed these around.
Another difficulty was optimization. Because the scene was so huge, I needed to take some action to make it run at an acceptable fps, I got it eventually up to about 40 fps. Which is acceptable but not quite the 60 fps I was aiming for.

LOD System
The biggest difficulty was making sure that either the meshes were extremely simple or use LOD’s to make it possible to use the meshes at a great distance. I only implemented it on the meshes that had some sort of detail because a lot of my meshes were already cubes, which leaves no room to downscale it anymore. The LOD’s in Unreal work based on screen space instead of distance which was perfect for me because there was a big variety in how much I scaled some objects.
One thing I didn’t take into account before starting this project was thinking about draw calls. The scene consisted of a lot of small meshes combined, making it nearly impossible to load in the scene. When you looked away and then looked back at the scene, the screen froze for a good 10 seconds before everything was loaded in. So now looking back I would combine the meshes in bigger chunks so they can be loaded in as 1 call.

Lightmap Density
The same counts as before with the lightmaps, no details are needed. Most of the meshes have a lightmap resolution of 64. This was the amount where I had the minimum number of artifacts while keeping the size down as much as possible. There are some exceptions to this though such as the platform which needed a bigger resolution because it was so big compared to other meshes.
Fog and Lighting

Effect of Fog
I combined 2 techniques to create a layered effect in the scene. The first one is the use of cloud effects to create the illusion of fog that has some actual texture and movement. I found a video that provided some cloud effects. I then modified it to suit my needs as a fog particle. The max amount is limited to 50 particles to keep the overdraw down while still giving a good amount of detail. The material was also slightly changed. The original had too much randomness so I toned that down and added a little bit more control to it.
Next to this I of course also used volumetric lighting. I could ‘localize’ it by placing spot lights around with either a high intensity or volumetric scattering (they scale with each other). This was mainly to get a good separation between the different levels in the scene.
Balancing these 2 was very difficult however and required a lot of fine tuning throughout the project.
Changes to The Concept

Comparison between my final and concept
As I said earlier, I didn’t even plan to go with the same composition as the concept at first. But after playing around with different compositions I slowly came back to the original. Because I did it this way I slowly introduced some changes that I wanted to keep. The main thing I wanted to change is the focal point. In the original, the characters were the focal point but I wanted a pure environment based scene. The main focal point shifted to the platform that sticks out because of the high contrast in that area. The second focal point that I introduced myself is the oil refinery that replaces the main character in the concept.
Apart from only changing the focal points I also changed some other things. The overall color of mine is way bluer instead of yellow-greenish. This was to have a nice contrast with the orange parts I added when changing the focal point. For the same reason, I also changed up the position of the huge gas tanks right behind that secondary focal point. The entire scene consists of straight lines and these curved once create contrast in that area.
Next to all these aesthetic adjustments, I also took the decision to change the theme a bit by getting rid of the more commercial areas you can see at the bottom of the concept and focus more on the industry.
I made sure to always be critical about my own design decisions. This was right after I decided to stay close to the concept, but some of the changes I made didn’t quite work. So I took a step back and give myself feedback as if I would do it for someone else.

Self-feedback on composition

The result after the feedback
Future Projects
I recently finished a small stylized diorama and my entry for the Grads in Games ‘Search for a Star’ competition. I’ll be posting updates for both of these on my blog.
I’m also in the middle of learning Houdini which is really exciting. You can expect me using it in the future for my environments but this might still take a while.
Advice and Tips
As you could see during this breakdown, there is literally no details in this environment. All of the focus was on the big picture such as the lighting, mood, composition etc.
I wanted to show that you don’t need super detailed meshes or materials. You can get away with a lot. Now this scene is probably pushing it too far and could use some more of that but it isn’t necessary to having a nice outcome.
You also don’t need to focus on every subject in a project. Know the reason why you are making the scene. Is it to become better at lighting? Or at making materials and using them in a setting? Maybe you want to sharpen your prop making skills. Keep this in mind while working on your projects and focus on that area the most.
Apart from the technical advice, the most important piece of advice I can give is to surround yourself with like-minded and supportive people. If you are in uni, be friends with people who take it seriously. I’m lucky to have an amazing friend group with who I can both have fun with but we also work hard to progress our careers. Also, make sure to use this opportunity of being at uni to ask for feedback from people around you and alumni. I had the chance to have some great feedback on mostly my lighting by the amazing Jimmy and alumni Maxime.
It’s also really helpful to be active in an online community, for me that is The DiNusty Empire but that can also be No More Grid or now also the Exp. Points community! It is just so valuable to speak with people from a wide range of experience. I’ve met a ton of seniors over there who gave me great advice but also people just like me, who are trying their hardest to get into the industry and are helping out each other. So I would like to thank the people from the DiNusty discord server like Derk, Neil, Rasmus, Alex and many others for helping me out and of course Jeremy for making this amazing community. I cannot express enough how much this helps. In the end, we all want the same thing, to move forward and enjoy our time. So why not do it together!
