
PROCEDURAL ENVIRONMENT in two days - HOUDINI AND UE4 COMBINED
Junliang Zhang created this procedural environment in only two days. Explore this beautiful breakdown to learn how he used Houdini directly inside of Unreal Engine 4 and had fully control over how and where his assets spawned. If you’re looking to learn Houdini, this is a must read.
Introduction
Hello, my name is Junliang Zhang and I’m from Shanghai, China. I am a Technical Artist currently studying an Entertainment Arts & Engineering program at the University of Utah for my Master’s Degree in Technical Art.
My passion for the game industry comes from my childhood. I still remember how much I was sitting in front of the computer back in the 90’s, playing classical PC games like Starcraft, Command & Conquer series and Age of Empires II. When I played those games I always wondered how they were made in terms of art and gameplay and how I could make cool mods on my own.
In order to pursue this interest, I started to self-learn 3D modelling, texturing, and game engines in 2010. At the same time, I went to Shanghai Art & Design Academy to study Game and Interactive Media Design. I studied a lot of 2D and 3D game art fields, such as concept art, 2D/3D character design, environment modelling and game design.
In September 2014, I went to the New York Film Academy (NYFA) to study a BFA in Game Design program. Since then, I have kept track of the newest game industry workflows and also learned a lot from many professional artists through watching their tutorials. After graduating from NYFA, I gained a lot of great experience in 3D environment art and lighting, joined 3BLACKDOT, and participated in the production of Dead Realm (2017), No Way Out – A Dead Realm Tale (2018), which is a Playstation 4 VR title with AAA qualities and some unannounced projects.


Technical Art Demo
The goal of this project was to create a procedural terrain with Houdini and generating all of the different terrain shapes in realtime inside UE4. Procedural terrain is one of my technical art course research demos at university. I finished the whole scene in only two days. I wanted to experiment and study the entire HeightField workflow from Houdini to UE4 so that I can take advantage of it for the next exciting project!

Under the Hood | How It Works
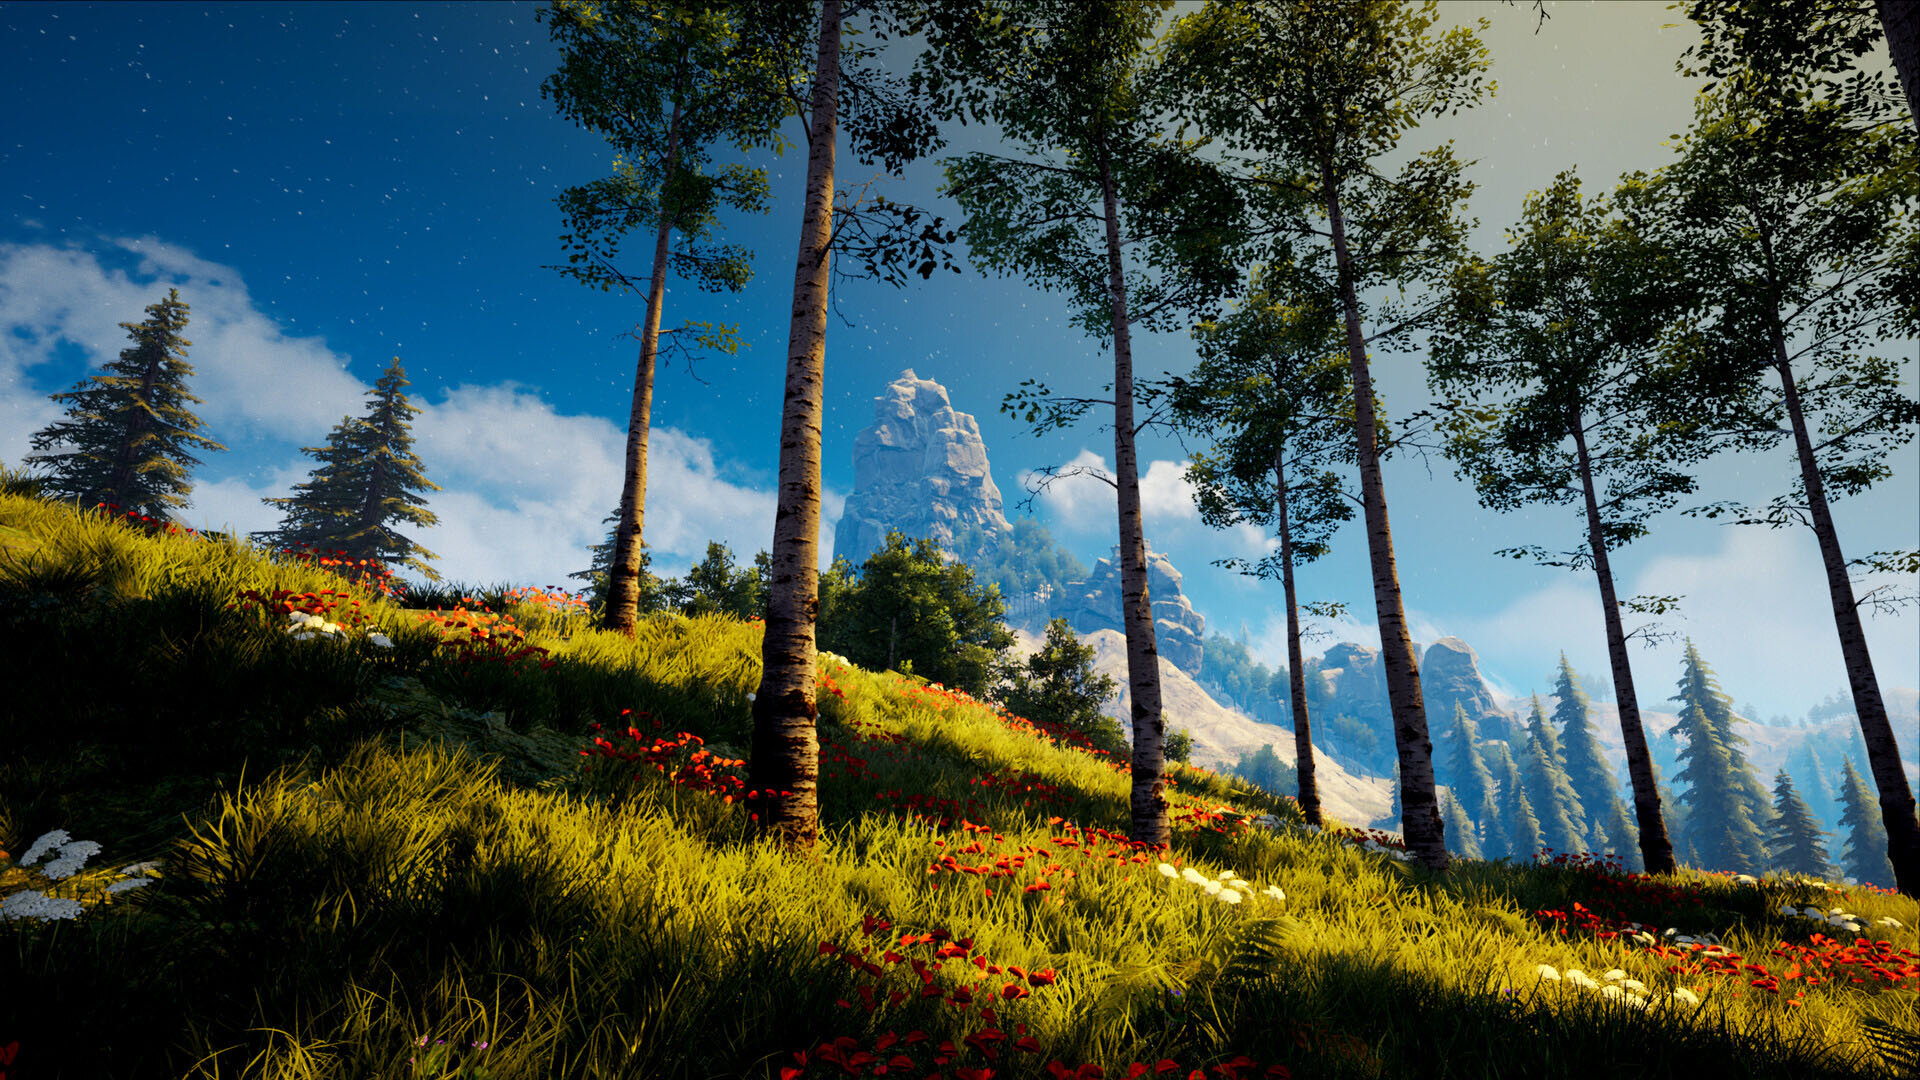
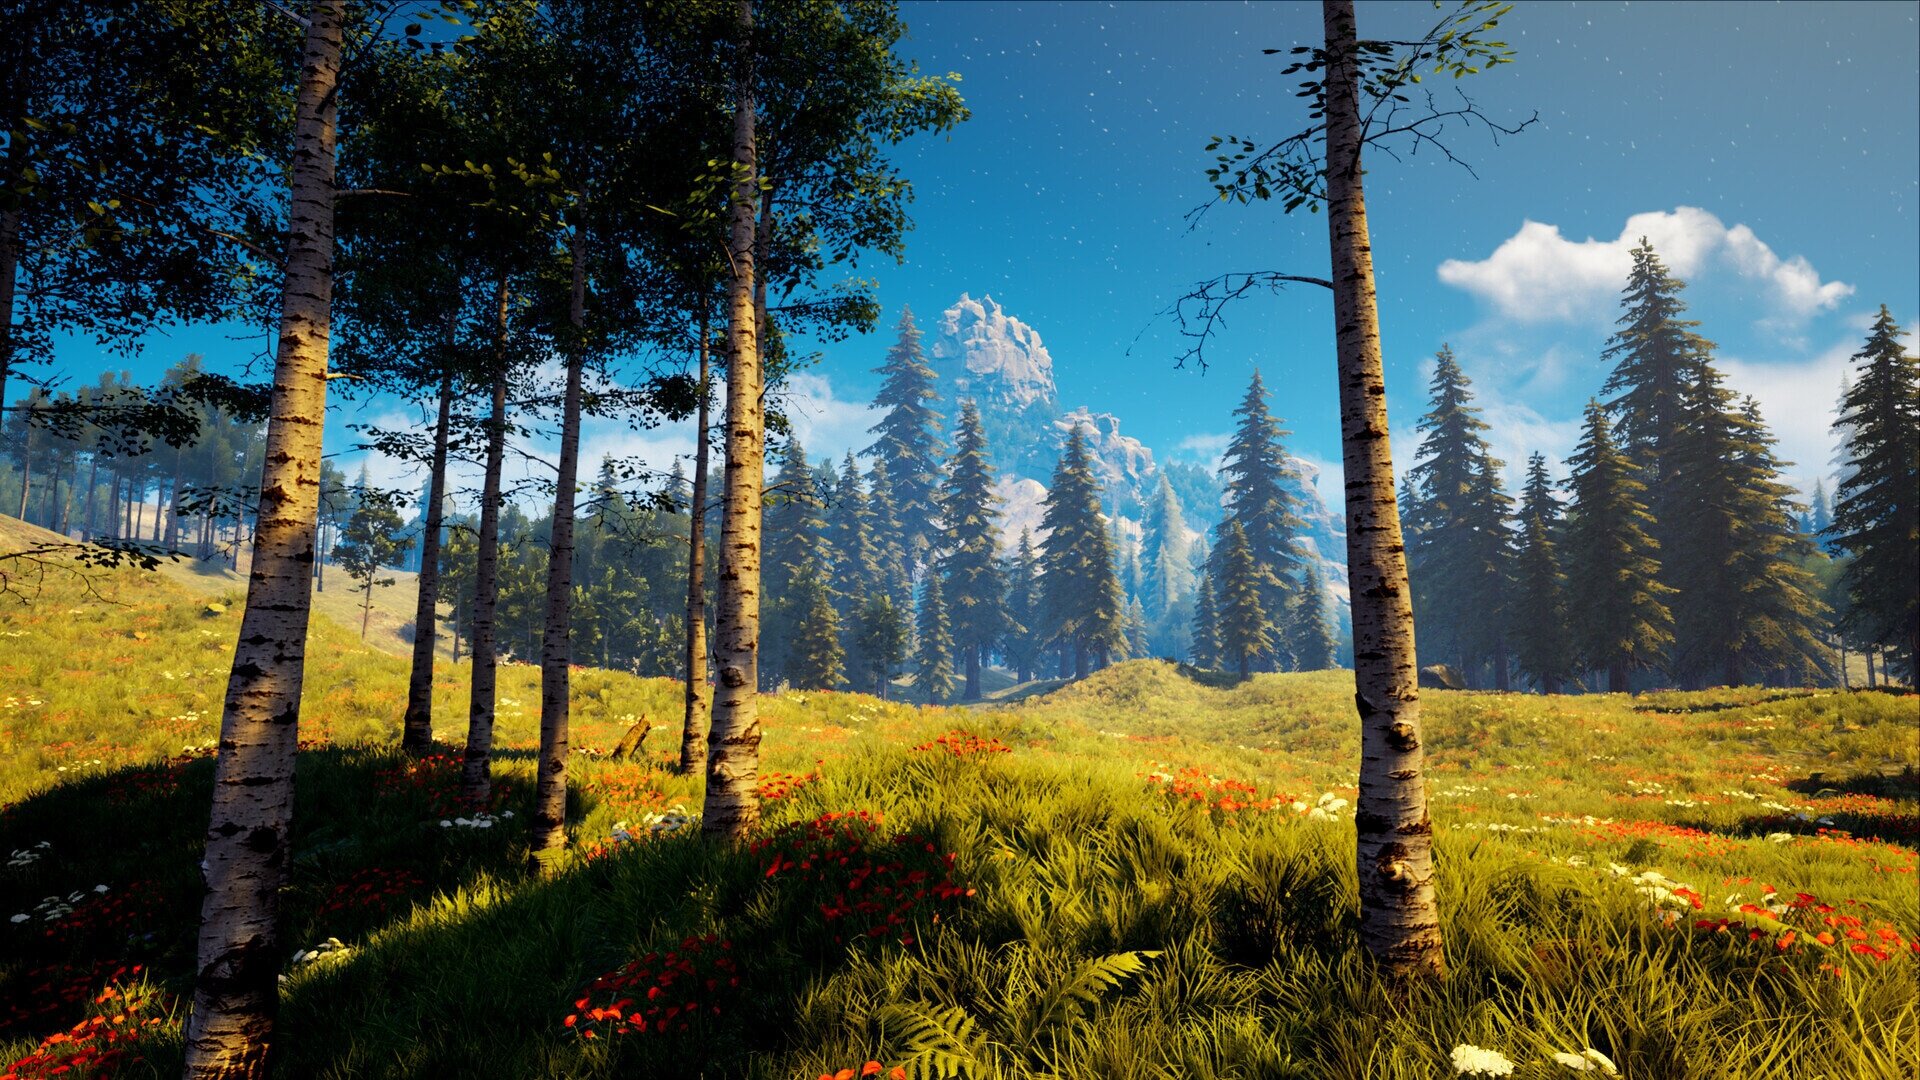
Excellent references or concept art are always a great way to get started when you want to create something in the visual world. It will help you get a lot of inspiration and ideas while designing or texturing. I took a lot of time and collected as many as I could with Google images and Pinterest. Eventually, I ended up with creating “The Witcher 3 Blood and Wine” art style for the final pitch.

Witcher 3 Blood and Wine
Unreal Engine 4’s landscape tools have a lot of restrictions in terms of procedural tools and generating masks compared with Houdini. I think that Houdini just gave me a lot of advantages such as iteration, procedural modelling, physical simulation, and it supports most game engines and texturing tools with the Houdini Engine Plugin nowadays. Using Houdini Engine allows me to expose some of the parameters that I want to make adjustments at anytime in the engine instead of going back and forth between Houdini and the game engine, which allows me to iterate faster and more efficiently.
Overview of Houdini Heightfields


First of all, I entirely generated the landscape with the Houdini HeightField Node. I added “HeightField Noise Node”; it allows me to create some basic landscape shapes and height in order to get some ideas that I have in my mind.

And then I used “HeightField Erode Node” to reduce some noises and made some grounds flat.

Next, I added “HeightField Distort Node” for the landscape variation and fine details.
If you want to create some interesting patterns, you can use the “HeightField Pattern Node” that allows you to create some desert sand styles with a gradient mask. It can blend patterns with your terrain very well as long as your finished landscape has different shapes and height.

Second, I created three different masks for the mountain top, mountain rock, and base ground by using “HeightField Mask by Feature Node”. This is a very cool node that allows me to adjust the masks in several different ways by changing “Mask by Slope” and “Mask by Height” parameters.

Once the first mask is created, it’s time to name the masks by adding a “HeightField Copy Layer Node”. This node allows me to name our landscape material layers that can be recognised directly by the UE4 landscape system. You can type the name in the Destination blank on the right tab side of the property

Thirdly, if you already created two different mask layers, it's time to combine them by adding a “HeightField Layer”. In this node, it provides a lot of cool features on the right tab side of the property, such as layer mode, similar to Photoshop’s layer mode. Remapping, you can blend with two different HeightFields by adjusting the scale and offset.
However, the essential feature is the layers blank. You can define either a mask or the height in my case. I used the "mask" for the layers, and I changed layer mode to “ADD” so that I can merge two different masks that I created before.

And then, I want to invert the mask from HeightField Layer by using a “HeightField Remap Node”. In this node, I modified the Output Min to be 1 and Output Max to be 0.

After that, I used a “HeightField Copy Layer” again for the final base ground layer and named it “Base” in the Destination blank on the right tab side of the property window.

Fourth, I created an “Attribute Create Node” for connecting with UE4’s instance material system. For the name, I changed it to “unreal_material_instance”.
I modified the Class and Type to be “Primitive” and “String” and the last thing will be adding String blank. The path will be depending on our UE4 project path.
How does instance material in UE4 connect with Houdini?
Create a landscape instance material in UE4 project
Right click your landscape instance material and choose “Copy Reference”.
Here is what you should have: MaterialInstanceConstant'/Game/Art/Materials/Landscape_Master_01_Inst.Landscape_Master_01 _Inst'
If you want to make it work in Houdini with “Attribute Create Node” for connecting landscape instance material in UE4, you have to modify this. Here is the solution: /Game/Art/Materials/Landscape_Master_01_Inst
Copy “/Game/Art/Materials/Landscape_Master_01_Inst” (without quotation marks) in the String blank on the right tab side of the property.

Fifth, it’s time to create scatter on the terrain now. I created a “HeightField Scatter Node”, and named it “Tree.” The scattering node is based on the mask that you created before. I used a SteepSlopes mask layer by choosing a small arrow.
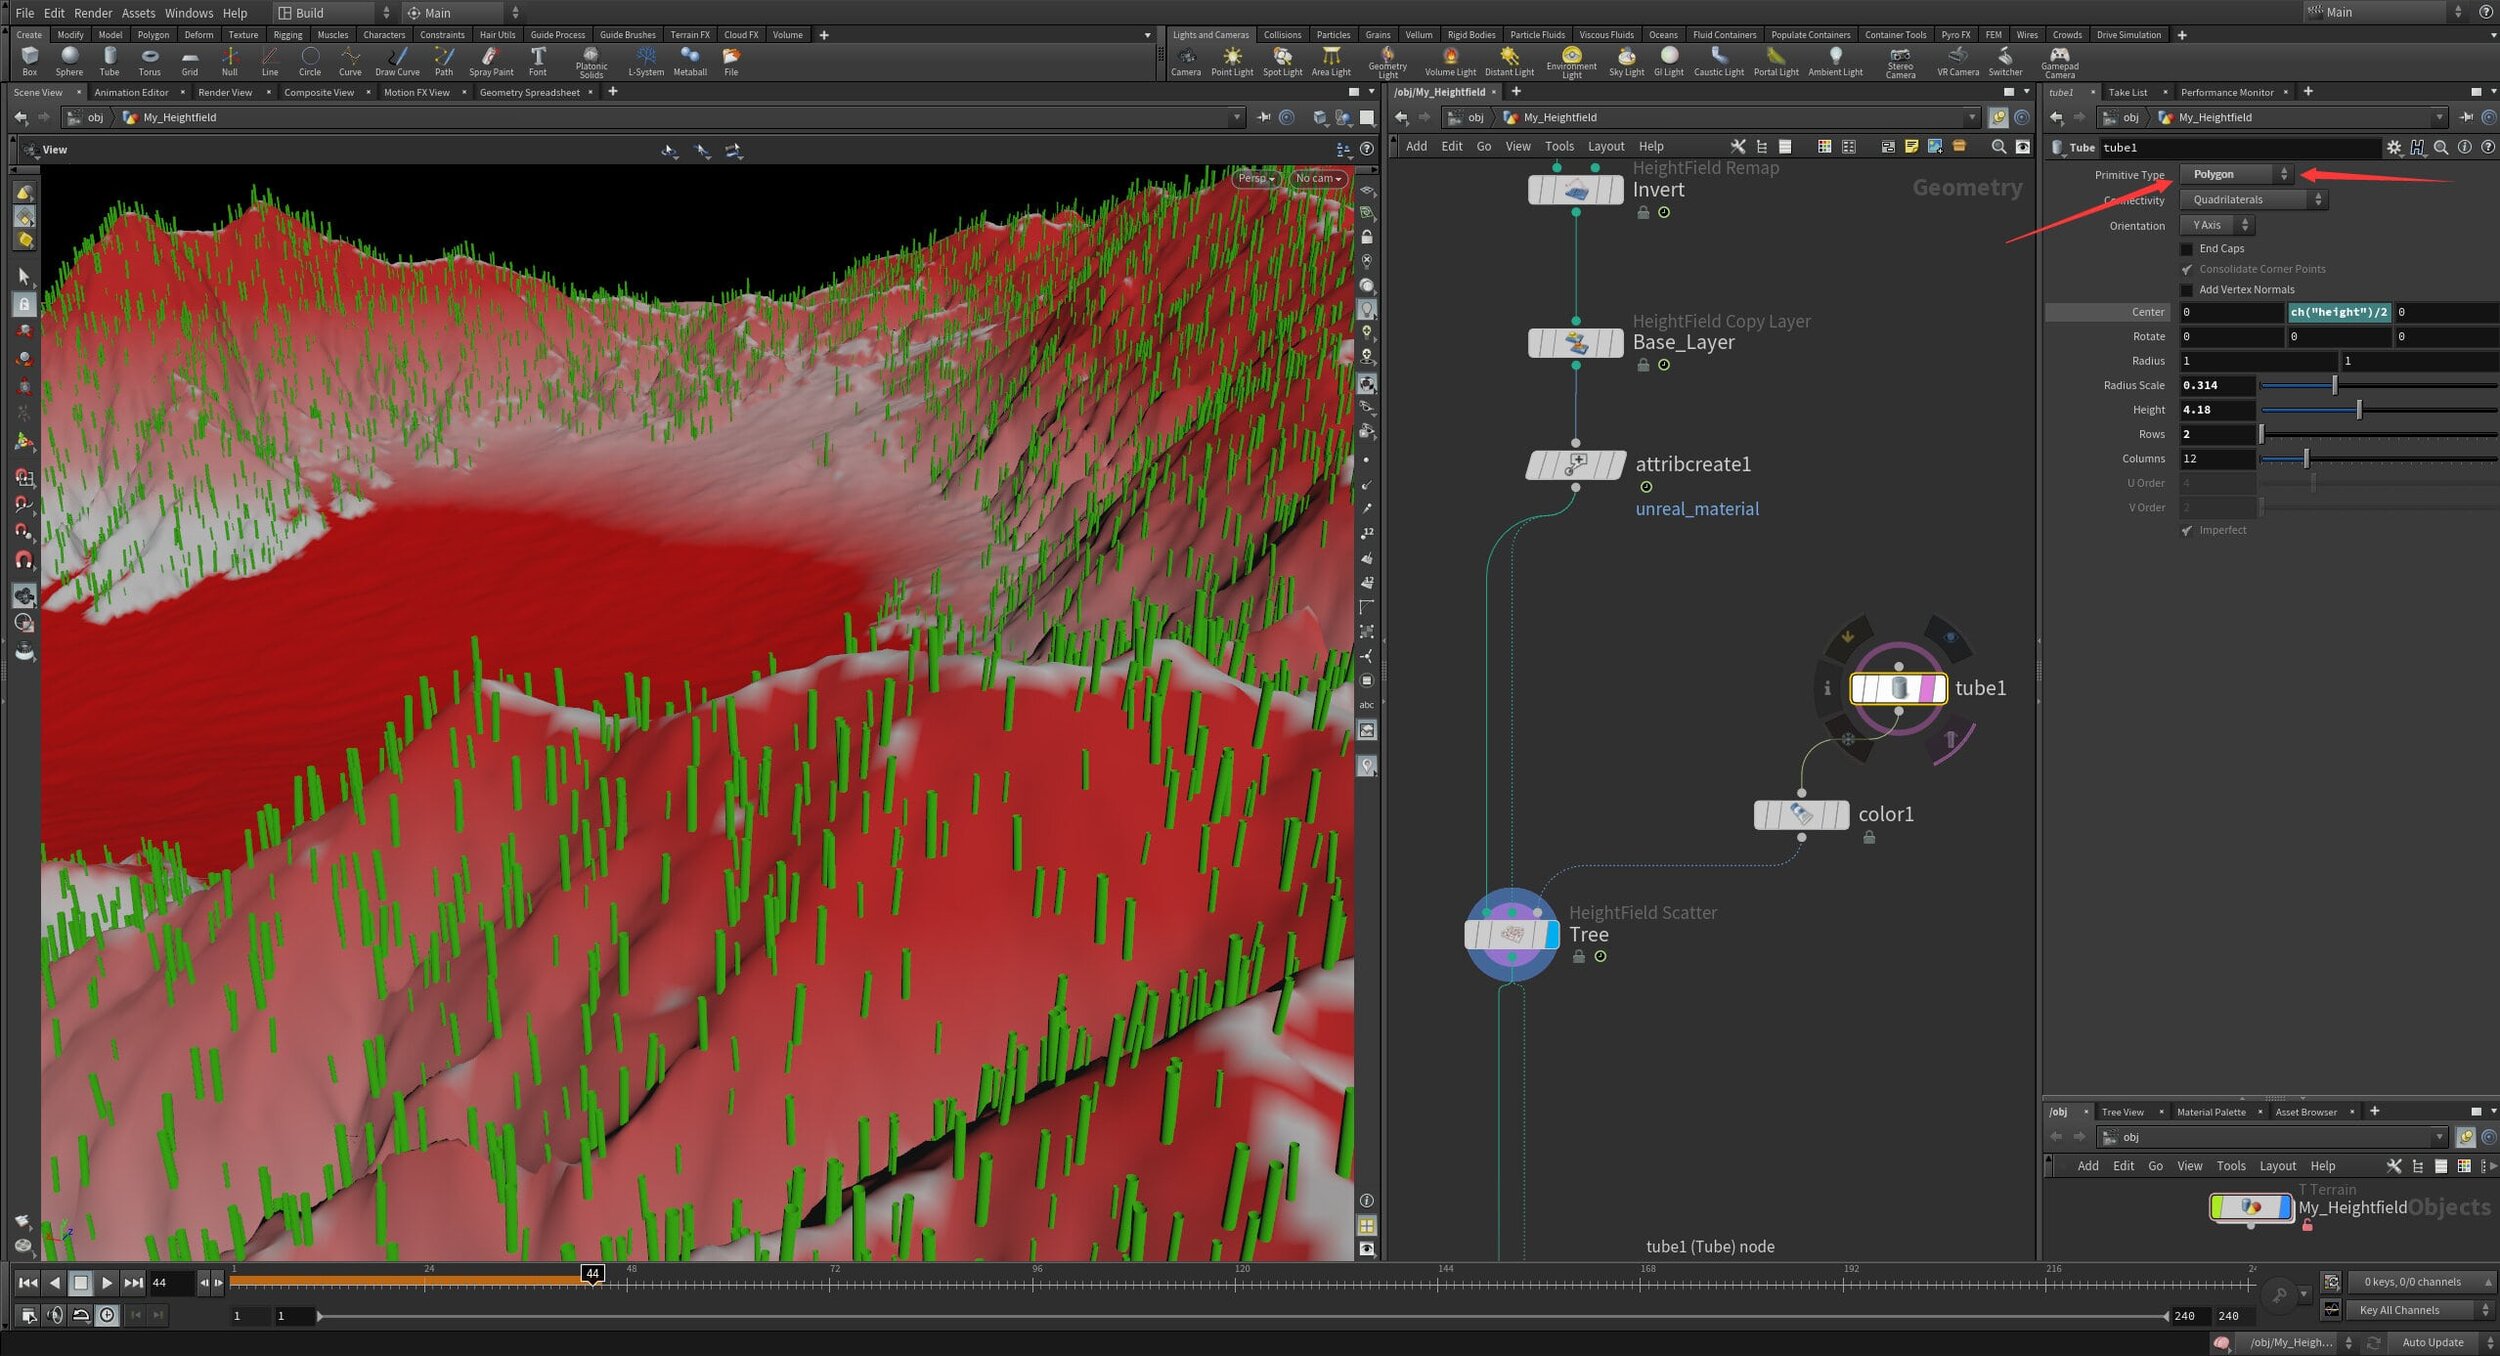
Next, I created a new tube and added a “Color Node” as an input into the tree “Scattering Node”. I modified the tube Primitive Type to Polygon and changed the “Color Node” into the green color.

At the same time, you can adjust some of the scattering settings, such as Coverage, Outer Radius, and Range. For the tree scattering, you have to turn off Match Normals with Terrain box. Otherwise, the tree trunk will follow with the terrain direction.
Pivot Points

Incorrect Pivot Point Position
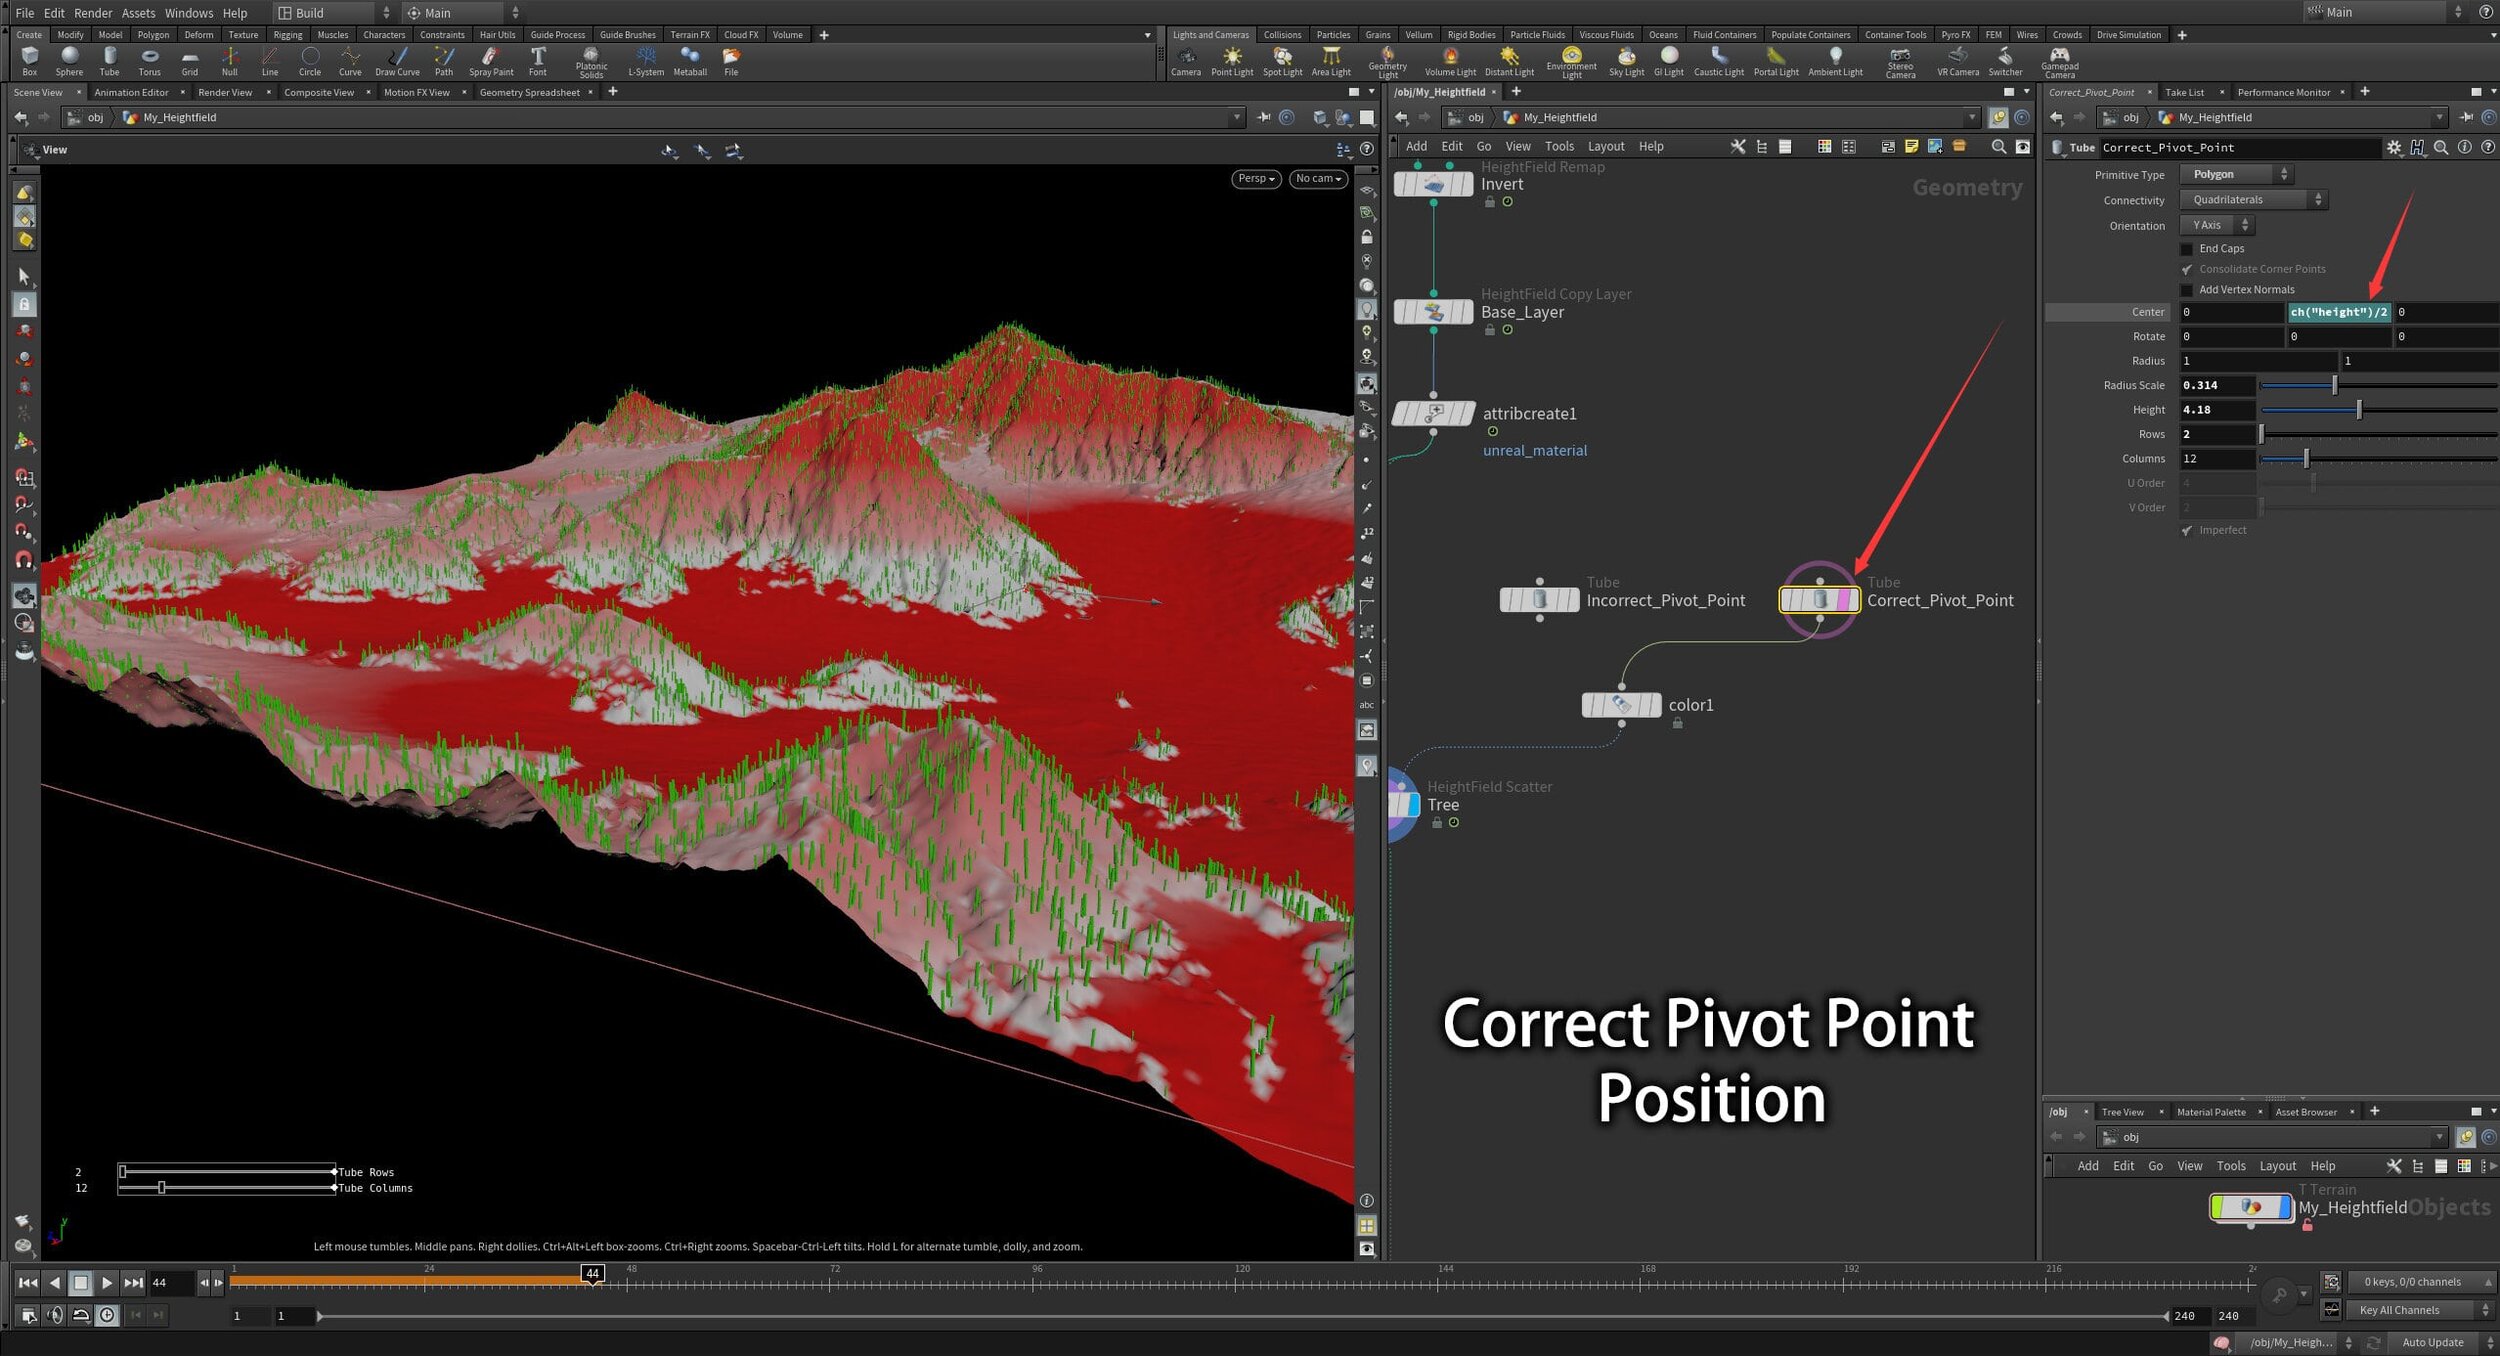
Correct Pivot Point Position
Solution
Create a new tube with Polygon Primitive Type
Hold left mouse on the Height and drag into Center Y axis.
Drop Action chooses Relative Channel Reference
Add “/2” behind “ch("height")”


Now, the pivot point of the tube is correct if you adjust Height value on the right tab side of the property.

Scattering Breakdown
I used three different scattering methods with Houdini and UE4 for this project.
First of all, I created a “HeightField Scatter Node” for both trees and rocks. The scattering tool is based on the mask that I generated from the previous “Mask by Feature Node”. At the same time, I created a simple tube model and added a green color for the placeholder of the tree.
Once I imported my HDA file into UE4, it would automatically recognise this as a mesh. And then, I can replace the placeholder of the tree with the assets in the UE4 project. Besides, you can also add more mesh array in Houdini Instanced Inputs by pressing “+” so that you can add a lot of different meshes for the random varieties, which is a very cool feature in UE4.

The second way is that I used the scattering tool in UE4, which is called the Procedural Foliage Spawner tool.
“Procedural Foliage Spawner” is a helpful nice tool that allows you to generate all of the trees with different age, heights, scale, and size, which provided a lot of varieties for scattering in UE4. It not only can scatter vegetation but also it can spread any type such as props, rocks, stones, flowers, and so on.

It helped me generate a lot of random trees, which is a very convenient tool for scattering foliage or trees on the landscape in UE4. It was so much fun doing this process at that time. I hugely enjoyed it.

Tutorials
How To Create And Use Procedural Foliage Volumes - UE4 Tutorial by Nitrogen
The third way is that I used “LandscapeGrassOutput” and “LandscapeLayerSample” for the grass and flowers in the UE4 landscape material editor. This way is the most common way to generate ground grass based on the mask generated from landscape material layers.
Landscape Grass

You need to create a “Landscape Grass Type”

Add some Grass Varieties by pressing “+” button

Expend 0, 1, or more tabs under the Grass Varieties.

Assign the static grass meshes into the Grass Mesh slots

Go back to the landscape material editor and create “LandscapeGrassOutput” and “LandscapeLayerSample” Nodes and connect with together.
Assign the “Landscape Grass Type” that you created into “LandscapeGrassOutput Node”.

Using the HDA inside UE4
You can export your HeightField Terrain as a HDA file format, which is a Houdini Digital Asset.
If you want to adjust some of the settings in realtime in UE4, you can expose your settings into the Houdini Digital Asset.
How to expose your setting into HDA for UE4?
Go to Assets >> Edit Asset Properties >> Choose your HDA file
Extend Parameters tab
Select all of setting under the Root and set Invisible and apply it.
Drag any settings you want to expose into the root.
Apply and Accept if you finished.
You can import your HDA file into UE4 or any engines that supports Houdini Engine.

For more info about Houdini Special Attributes and Groups, please check out SideFX Houdini Engine For Unreal
Unreal Engine 4 Section
First of all, I imported my HDA file into UE4. I used Quixel Megascan for the entire landscape textures.

As you can see from this picture here, you can adjust a lot of Houdini Parameters on the right side. At the same time, you can replace your trees and wooden logs in the Houdini Instanced Inputs. You can also add more mesh array in Houdini Instanced Inputs by pressing “+” so that you can add a lot of different meshes for the random varieties, which is a very cool feature in UE4.

For the landscape, the material setup is very simple. I created five different texture material functions and both connected to the Layer Blend Node.
I used “LandscapeGrassOutput” and “LandscapeLayerSample” for the grass in the UE4 landscape material editor. This way is the most common way to generate ground grass based on the mask generated from landscape material layers.

Material Function Breakdown

I used “Collection Parameter” for the landscape tiling. It is a straightforward and faster way to adjust tiling textures instantly out of the material editor

You have to make sure to set all of your textures into “Shared Wrap” in the Sampler Source. Otherwise, you will see black colours on your landscape. And also, I created outputs of all of the textures, just in case. You can skip if you do not use it.


I used some organic photo scanned materials and textures from Quixel Megascans library because I wanted to create a super realistic environment for the goal of the project. I usually will choose the textures that could easily be blended in terms of the colours and texture details. If I run into some colour contrast issues, I will crank up or down the RGB colour in the instance material editor. I want to make sure all of the terrain textures have nice transitions between them.
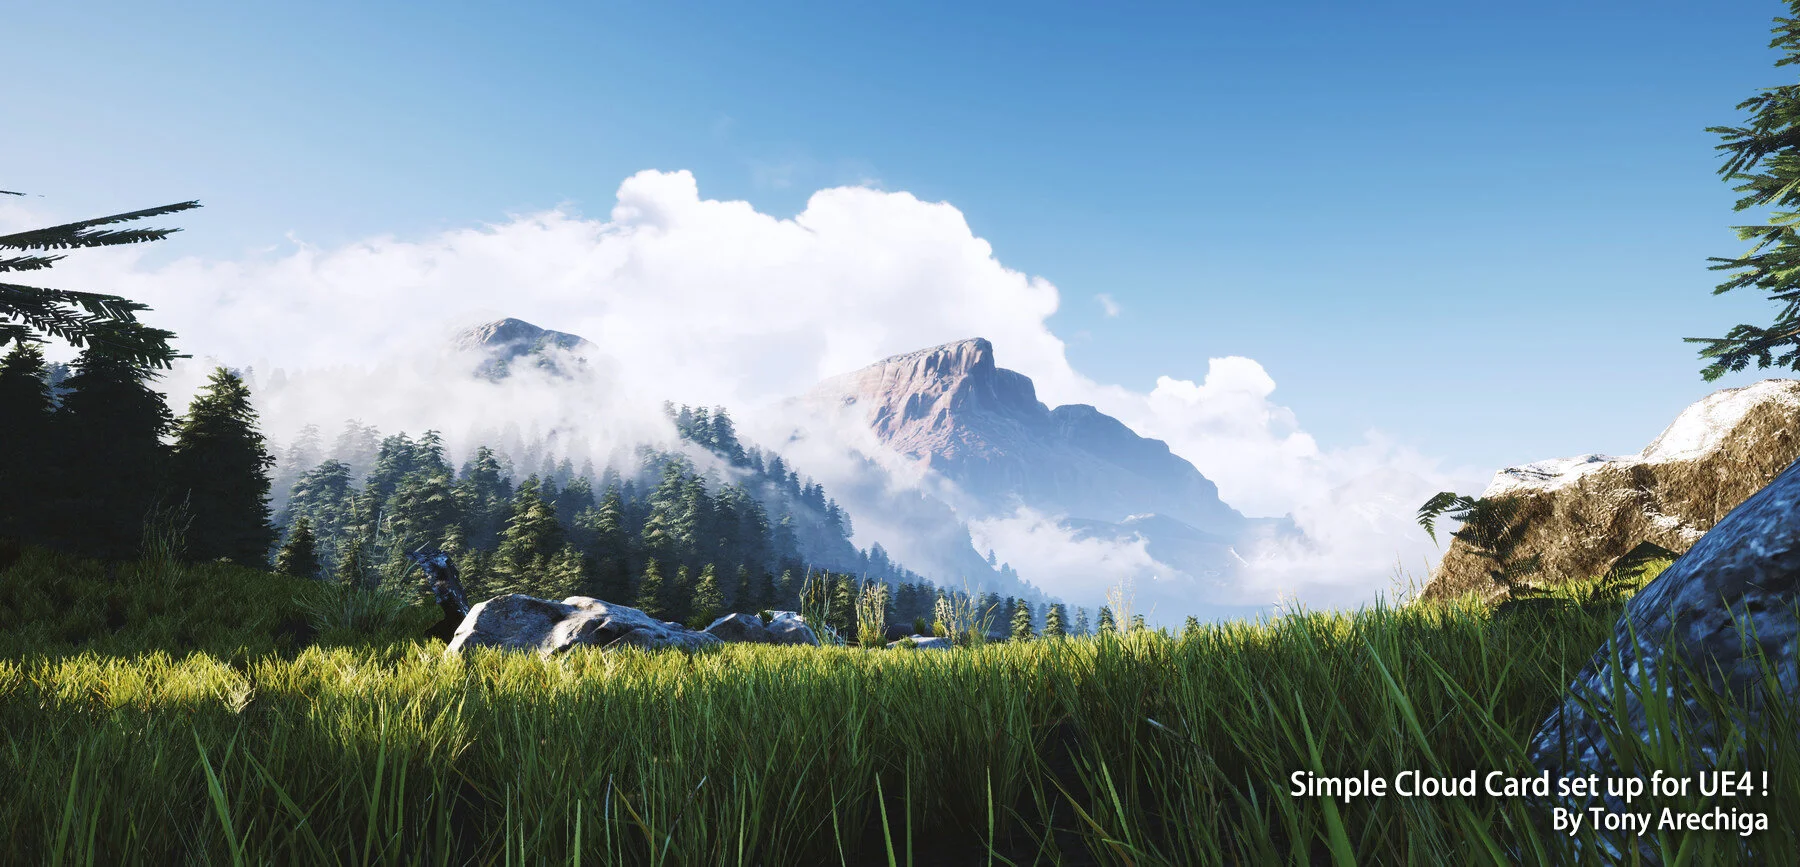
For the clouds, I watched a simple tutorial created by Tony Arechiga. If you interested in, you can purchase here.
Future Work
I studied a lot of Houdini procedural techniques, making shaders, Maya Python, rigging, lighting, ray-tracing, and rendering in order to make tools for artists so that I can improve the entire workflow to make it faster and more efficient. As a Technical Artist, every day is a critical day. I have to solve challenges and problems and need to learn all of the tools that artists have been using, improving the pipeline, and making a bridge between programmers and artists
Advice and Tips
In conclusion, the Houdini workflow has been used in AAA open-world games for many years.
The workflow not only creates landscapes but also it could create even more complicated things, such as procedural buildings, physical simulation, VFX, and dynamic city layout generations. I think that the smaller game studios could use part of Houdini pipeline for some ambitious projects.
In the meantime, I have learned a lot from my Procedural Forest Landscape project. I have been gaining a lot of great experience in 3D environment art, new pipelines, compositions, and lighting experience.

If you could not figure out some fresh ideas for your projects, I would suggest you go outside and see the real world, which could give you a lot of new inspiration and ideas, and enjoy life!
In the end, I would like to thank Experience Point for this great interview and all of the readers. I hope you enjoyed this interview breakdown and hope it can help you with your projects! If you have any questions or feedback, you can find me here:
Contact Info: