
JAVIER PEREZ - TIKI BREAKDOWN | cAREER & PORTFOLIO ADVICE
Javier Perez is back again and for his second article he breaks down this ridiculous Tiki material! Not only that but he dives deep into career advice and portfolio tips for those that are looking to build a memorable brand as well as what it’s like working in the industry as a Material Artist.
The Project
If you follow my work, you'll notice that I typically spend a few months in between projects. I really like to study and gather as much reference as possible before jumping into Substance Designer. My main goal when creating these types of materials is knowing how far I can push the basic geometry to conform to the subject matter of the material. Just like how the beehive project was naturally a rounded sphere, I chose a Tiki as it already conformed to the basic cylindrical shape. I knew then that all of the work would just have to be in the material as the base geometry was there.

I took to Pinterest to start researching different types of Tiki’s that I liked. In doing so I found that most designs I liked were novelty, and could be found on Tiki mugs rather than on a real life Totem Pole. I decided to mix the two and create a PureRef board for reference. From there it was just a matter of picking and choosing the different faces on the different references and trying to combine them on to a single Totem design that I like. It was definitely a process of trial and error as I wanted the Tiki faces to have some sort of continuity between them to make sure they all fit well together. Once that was all settled it was time to jump into Substance.
Tiki Breakdown
The entire Tiki is broken up into 4 graphs, with each graph representing a different face on the Totem. The faces were mainly the result of combining multiple shapes with the blend nodes.
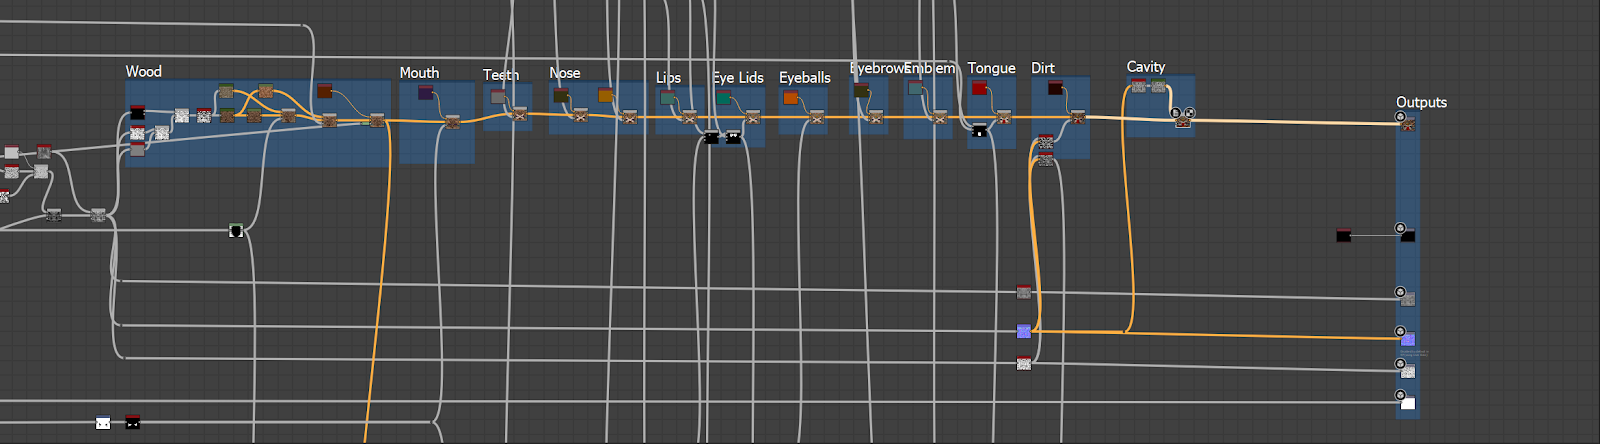
Each of the Tiki's face graphs are laid out roughly the same. The reason being is that once I finished the first face, I started to duplicate the graph to quickly make variations. It was nice to have most of the node network completed with the first face, because it meant I could start messing with the existing shapes and values to get a new Tiki face variation pretty quickly.

Explorer with different graphs used in the project

Wood Grain Substance, referenced in each of the Tiki graphs

Unused fan pattern for the top head. (can be seen in progression GIF)

Progression GIF

Graph - Top Head Mouth

Graph - Pineapple
Graph - Albedo Construction for Bottom Head - Extremely Simple

Graph - Headband Construction

Graph - Head 03 Undulation to give sides some interesting shapes

Graph - Legs for Tiki Body
Exposing Parameters
For this project I didn't expose too many parameters as everything was so unique, if I really needed to change something I would have to go back into the graph to tweak it manually. That being said, I didn't avoid them completely. Parameters I did expose were things I was constantly tweaking till the very end of the project. The main nodes I exposed were the uniform colours that controlled the colour the faces, as well as the wood grain that was overlaid on the entire Tiki.

Presenting in Marmoset
Whenever I render my materials I usually keep it pretty simple to a plane or sphere, but with this piece i wanted to do something a little extra.
I created a simple dirt mound in Maya by taking a subdivided plane and used soft selection to bring it up in the middle. I then applied an old sand material to the mesh which gave me the nice sand pile that the Tiki is standing on.
For the trees I used SpeedTree with one of their palm tree packages and kept it relatively simple by just adjusting a few parameters. I then took everything into Marmoset Toolbag to render.

Marmoset Toolbag Scene
Career Advice
Improving Skills to Stand Out
I find that a lot of students are lacking in the rendering and presentation portion of their portfolios. I see a lot of great art being downgraded because they just haven't spent enough time on presentation and renders. For me, creating my renders and my stylesheets are just as important as the art I create for them. I'd like to see more students render their projects within Marmoset or Unreal Engine 4 instead of just a screengrab from Substance Painter or Maya.
Material Artist Role
Every studio I have worked at is different, some studios have dedicated Material Artists on the team and at other studios it's up to the Environment Artists to create materials for their sections. Whatever team you may fall in, it's up to the Material Artists to communicate with both the Modellers and the Level Designers for specific purposes.
For Modellers it's about how much they can get away with in the material without having to model a bunch of extra details.
For Level Designers, there might be instances where we need to lead the player somewhere and that can be done through the different textures we use.
Consistent Quality
Most studios I've worked with have a dedicated material library that artists can grab and use from. This keeps things consistent and also lets us determine what materials we have to use and what we need to create.
Common Mistakes by New Artists
Not asking enough questions. It can be intimidating to join a studio where everyone already knows each other and already knows the pipeline. That shouldn’t discourage yourself from getting to know everyone and asking where a file goes, or how something is done. Every studio is different, so every studio is a new learning opportunity.

Common Pitfalls with Material Creation
Not focusing on their height maps enough. In Substance Designer your height map is the most important map to create as it drives the rest of your maps that you create. If you’re half-assed with your height map, your albedo, normal, and roughness will suffer from it. Always make sure you breakdown your height map into different reads. Start with the large shapes and work your way down to the fine details, avoid using grunges early on as they can produce unnecessary noise to your large forms.
Improving Your Portfolio
I would say when creating a new piece of art or just seeking advice on your portfolio, get as many eyes on it as possible. Ask friends or colleagues to take a look at it. You'll be surprised how a new set of eyes can give you different pieces of feedback whether bigger or small that can help elevate your artwork.
For me it’s always been about what the artist wants to accomplish with their portfolio, what was their main goal when creating their art pieces. It all varies, sometimes it's to learn a new piece of software or workflow, but for most people it's to get a job in the industry. For that I try to focus on what kind of position they are most interested in and try to adjust my critiques based on their discipline. Giving feedback on materials can be vastly different to giving feedback to a prop artist.

Keeping the Realism | Material Charts or Templates?
A mix of both. I always look back at my reference images to see how certain materials react in different lighting scenarios. I try to stay true to the physical properties charts set by whichever engine I’m rendering my projects at the time.
Useful Traits
A willingness to learn and always wanting to push the boundaries on whatever project or task they might have.
Expectations of Companies | Networking
Interns can come in all sorts of levels, it all depends on what the studio is looking for at the time. They might need someone for simple tasks like integration, or they might need someone to create a few props for a level. Sometimes studios have relationships with universities and schools so it would be a good idea to talk to your counsellor and be on the lookout for any talks or workshops. It's also always good to network and stay in touch with recruiters regarding any open internships.
Network as much as possible and stay connected with your classmates. You never know when you could be working again with your classmates or they could give you a recommendation within their company.
Presentation Tips
Keep your portfolio easy to read and accessible. Don't use anything fancy like flash animations or hard to navigate menus. Recruiters go through hundreds of portfolios daily, so making it difficult for a recruiter to save an image or navigate your portfolio could mean the difference between you getting a job.
To apply for Environment Artist positions I would go through the career page for whatever company is currently hiring. Sometimes it's a good idea to follow recruiters on LinkedIn as they will post the most up to date job listings and usually direct emails where you can send your portfolio. If you want to apply as an Environment Artist I would have at least 3-4 fully fleshed out environments with breakdowns that include texture sheets and individual prop renders within the environment.


Material Artist Portfolio
I love seeing material artist portfolios with a diverse selection of surfaces. Being able to show both hard surfaces and organic materials can help show a studio your versatility within Substance Designer. A big stand out for me is someone who is focused on materials but can hold his own as an environment artist. Someone who can not only create materials but also model and world build environments.
Outro
Make sure to follow me on Artstation and check out my new Learn Squared course. If you've ever wanted to learn Substance it's a great resource for learning the fundamentals and create a few materials that can be used in your portfolio.