
THE VOID CINEMATIC - TEAM EFFORT INSPIRED BY STALENHAG
The Void is a masterpiece of a tribute to Simon Stalenhag. Jakob Keudal set out on his ambitious project and assembled a team to help him create this beautiful environment. With it being only his 2nd time using Unreal Engine 4, dive into this breakdown to read his though process and how he handled everything.
Introduction
Hey, my name is Jakob, a fresh-out-of-uni 3D artist currently living in Berlin.
I was born and raised in Kiel, very close to the Baltic sea. I spent a lot of time on the water and in the outdoors but was mostly interested in drawing and sketching stuff.
Being an avid gamer, this artsy interest or hobby quickly developed into a passion for game art. Around the age of 17 I knew that I wanted to get into the games and visual arts industry.
While only tinkering with 3D tools such as Maya at the very beginning, the more I learned about creating 3D models, the more fascinated I got. During my studies, this fascination grew into absolute love for 3D environment art.

Inspiration for The Void and the Team
This project came to be because of so many different factors. During my studies, I worked as a Technical Specialist for Quixel (creators of the good old Quixel Suite 2 and now Megascans). Their lead artist Wiktor Öhman started to put out these amazing UE4 scenes, based on illustrations from Simon Stålenhag. They blew me away. Then I looked into the original illustrations and was blown away even more. I was so intrigued by Stålenhags world building, mood, colors, visual oddities etc that I wanted to capture something similar in my first UE4 project. That project – limited to 3 months, solo university assignment – was just not successful in doing Stålenhag’s works justice. It was alright and I learned a lot, but it was nothing special at all. But it left the desire to really do something with the source material. Later in my studies we were informed that we were allowed to create practical projects for our Bachelor thesis. As soon as I got that information, I couldn’t get rid of the thought to do an all-out, guns-blazing, Stålenhag inspired project.

Scene Breakdown

Scene Breakdown

Scene Breakdown
By then, I met a lot of good friends and great artists who I intended to get on this project. Both Alexander Delagrange and Shana Vandercruysse are amazing 3D artists. Their expertise in character art made them the perfect match in my eyes to help out with the corpse. Robert Hunecke has many years of experience under his belt, especially when it comes to building teams, establishing workflows and more technical tasks such as rigging. Anton Aklin has some magic ears and a great talent for composing music while David Grundmann was super knowledgeable and helpful when it came to voice recording. Last but not least, I stumbled upon Sids YouTube Channel a while back. His voice struck me as super smooth yet deep and expressive, with a bit of emotional grit behind it. They all agreed to helping me out with this project without any hesitation and I do have to stress again how incredibly grateful I am to have had these amazing friends and talented artists willingly subject themselves to my inexperienced will.
The project itself took way too long. I started pre-production around September / October of 2018, sketching out ideas, writing different scripts, etc. Production started in February 2019 and the final render was done early September. So all in all: a year, give or take.
Second Time Using UE4
I learned a lot from my first UE4 university project. But not enough. Due to my part-time job as TS at Quixel, I needed to be up to speed when it came to shader creation, engine systems, rendering techniques and all that technical stuff. This helped a lot, just to get the basics right.
Then, of course, YouTube and other platforms such as ArtStation are a great place to dive into the world of tutorials and breakdowns, soaking in information in the hopes of learning enough. But still, I knew that I was going to be under-prepared and I absolutely was. There were so many issues and so many kinks that I couldn’t iron out, simply because I never attempted to do such a large project before and lacked the experience. I had the pieces but I didn’t know how to properly put them together.


Quixel Megascans
You can see Megascans assets in pretty much every single scene, be it 3D plants, 3D scans or just surface scans or decals. The outdoor scenes are especially Megascans heavy. Even when not used “directly”, Megascans assets and tools were used in most asset and especially tree pipelines. Bark scans, leaf and branch atlases, they all came in super handy and made sure that the trees looked OK.
Working with these assets as part of my job on a daily basis, I obviously knew of their quality and the immense benefits that these assets bring to any production. While sketching out ideas for the project, it got clear very quickly that I needed external assets in order to complete any of the goals I set for this cinematic short.


Quixel Bridge made importing assets into UE4 super easy. That being said, I did not rely on the standard Bridge master materials. I created custom shader systems with extended controls for different asset types such as hard surface assets or foliage.
But other than that, all the assets are pretty much ready to go, PBR calibrated and LOD optimized.

Cinematic
Way back when I first thought about doing this large scale Stålenhag project, it was supposed to be a small game. I quickly dropped this idea because it would create more problems than I could handle. As soon as I knew that this was going to end up as a final video with no player input, I wanted to leverage the possibility to direct. I started with extremely rough mood and storyboards and then worked my way up to the voice scripts. Voice was a massively important aspect of this cinematic.

Chronological Refboard
I knew that I didn’t have the expertise nor the time to create character animations or anything in-camera to drive the narrative with motion and – more importantly – emotion, so I had to have a good script and an even better voice actor to run with it and turn it into something that would resonate. At the end of the day, the storyboard was handled pretty loosely in regards to what exactly was on screen. I stuck to the pacing, the shot content and the shot order but changed a lot of the details on the fly. That's what I like about working in game engines, you're super flexible and free to experiment.
Unfortunately, pretty much 100% of in-engine work was done by myself, including the camera setup and shot creation. I'm by no means a good cinematographer, nor did I really know what I was doing, but I just tried out different things until I was somewhat happy. Being solely responsible for these scenes had the benefit of being able to just break your own rules or expectations. A lot of the shots in the final cinematic came to be because I took the virtual camera and just played around with it, creating a bunch of what you'd usually call b-roll I guess.


The Kitchen
Thank you so much! I started every scene with super rough blockouts, just to match the shapes with Stålenhags illustrations. Surprisingly enough, the entire kitchen and house worked instantly, they made sense in 3D space, which leads me to believe that he either used a 3D blockout himself or that he's a magical 2D art wizard (which he is, admittedly).

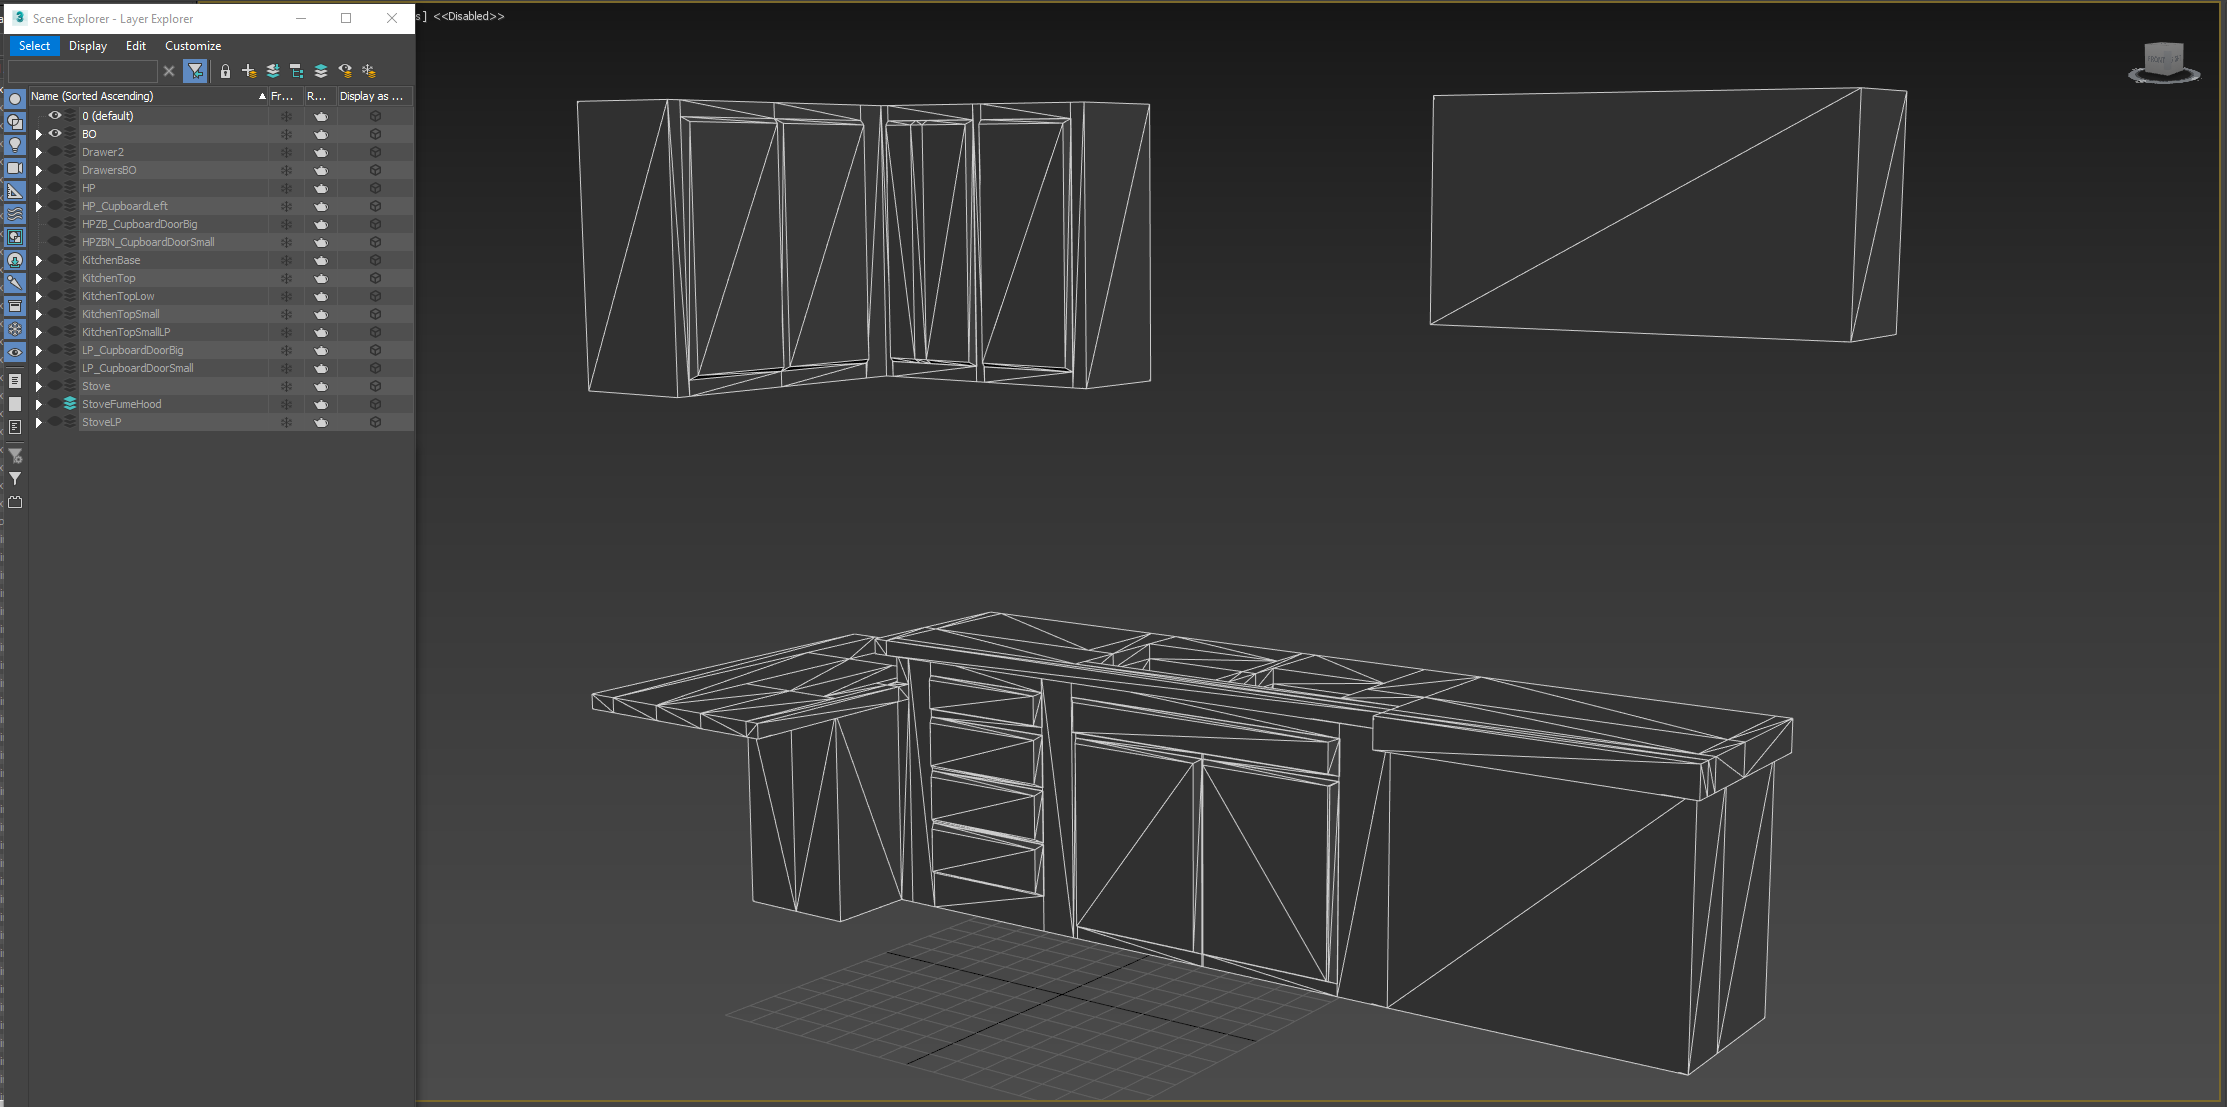
Kitchen Blockout

Kitchen Blockout

From there, it was just asset production, matching what I saw in the kitchen. Robert Hunecke helped a lot with all the assets that you'd miss if they weren't present in the scene such as the curtains and cutlery. The set dressing was done strictly to reference, things that didn't work out in 3D or didn't look good in camera were deliberately changed. That being said, the kitchen was admittedly one of the more challenging tasks, simply because it was such an iconic shot and any deviation in terms of composition or proportions would've been instantly obvious.


Bringing Everything to Life
I knew that I didn't have the time or skill to produce animated characters for this short (and I didn't want to put more stress on Alex and Shana who had their regular jobs to attend to) so I had to make sure that at least the environment seemed somewhat believable with somewhat believable wind animations for both foliage assets and trees. Beyond visual movement, I knew that music would be a huge focus point and a good way to move the cinematic forward. I'm a strong believer in the idea that music is more important than visuals. As in: you'd be more willing to watch an ugly video with great audio than a beautiful video with absolutely horrible sounds or too compressed dialogue. And music can of course be incredibly emotional, too.

Davinci Resolve

Davinci Resolve

Davinci Resolve

Davinci Resolve
Usually, you'd want to start with pre-production, plan everything out, then move on to production and only once everything is set, go into post-production to compose music and record audio. This did not work for this project, instead, music and voice were the first things I started with. Anton (the composer) and I sat together at the very beginning of the project and started discussing and testing different sounds, moods and instrumentation. After recording the voice track in December 2018 I tried to create a rough video blockout (just a bunch of placeholder greybox shots with rough timing) that would work with the voice script. This was sent to Anton who started to compose rough ideas on top of the blockout. Both the composition and the blockout got more and more refined over the course of the production to the point where I was certain that the shot timing would not change anymore. It's a bit unorthodox and a bit risky because you have to commit yourself to an idea quite early on, but I think it worked quite well in this instance.
Texturing Large Structures
Working with large structures in game engines or a game context in general requires a bit of planning. The towers were split into multiple parts and material types. I then used custom tiling textures created in Quixel Mixer to effectively texture the asset in engine. Being able to adjust everything from tiling, cropping, vertex blending etc. made it very easy to match the overall look with what you see in Stålenhags illustrations.

All these assets also used a face-weighted-normal approach – I didn't want to go through baking normals on these structures so working with this technique streamlined the workflow immensely. The clouds are pretty much a one-to-one copy of Andreas Glads amazing Cloudscape tutorial, I just customized the base shaders to fit my needs and played around with the overall project settings for volumetric lighting.

Essentially, you create a cloudmesh and then spawn fluffy particles on top of it. While this looked cool, it had a few major drawbacks that I noticed way too late. All these particles respawn as soon as you relaunch the UE4 editor or start a sequencer recording. While they would retain the overall shape, exact placement and light interaction were pretty much non-directable, leading me to up to 50 scrap recordings of certain scenes, just to achieve clouds with which I was somewhat satisfied with. Simple cloudcards with a strong normal would've been easier to set up and much more effective. Oh well...
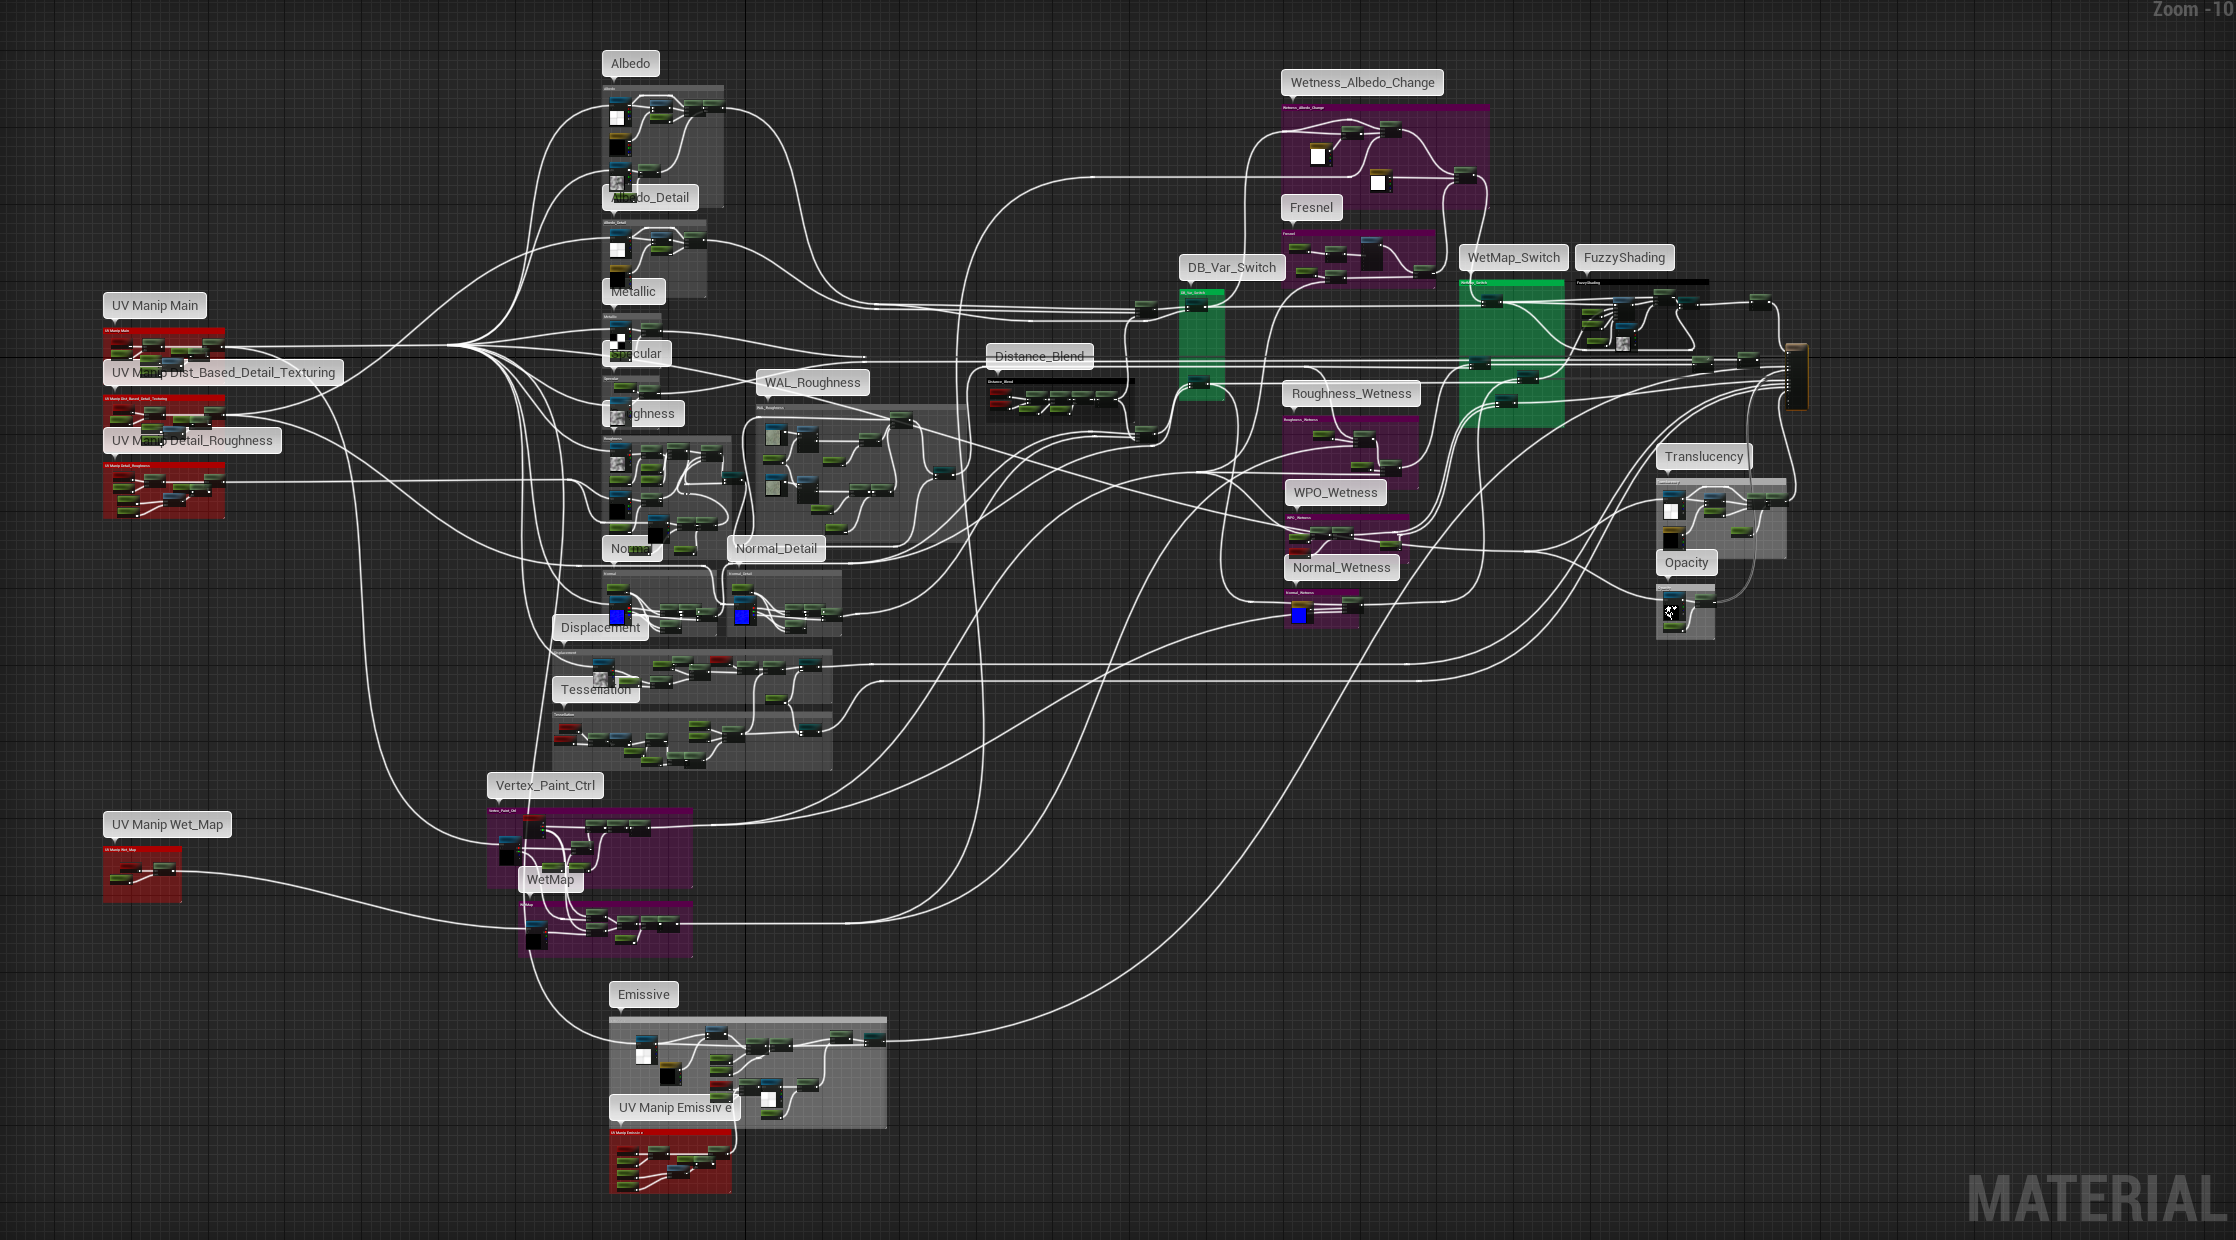

Quixel Mixer Breakdown

Challenges
There were so many challenges – I'm actually still surprised that this video exists and isn't part of a virtual dumpster fire somewhere on my desktop.
Firstly, I was - and still am - super inexperienced, especially when it comes to coordinating other artists. I never before worked on such a big UE4 scene so mismanagement and dump technical decisions were inevitable. For what ever reason I decided to create all scenes in one single, massive level. Not only did this result in a super messy and confusing setup, it also created massive performance issues.
While this project was never intended to run smoothly, working with 0.3fps isn't really enjoyable, let alone efficient. This also increased render times, which is something you don't want to hear when you're talking about real-time engines. I initially wanted to render out everything in 4K and potentially downsample that to 2K on final export, just to get some nice edge detail. Turns out, my PC would instantly crash if I'd attempt to render any of the scenes in 4K resolution, WQHD was the max I could render without risking hardware issues.

Scene Setup

Colors and compositions aren't as accurate as I'd like them to be, a few scenes feel rushed or unfinished, a few assets are in desperate need of some extra love and I can't get rid of the feeling that I abandoned this project, rather than actually completed it. Then, I of course had to write my bachelor thesis, complete other modules and work my part-time job. Because the project itself wasn't efficient to begin with, and I wasn't either, I spent way too many hours working on everything simultaneously. At the end of the production period I was walking on raw flesh, barely slept or did anything else than sit in front of my computer.

Color Breakdown
Apart from that, the project was artistically challenging. I wanted to do Stålenhags works justice while also putting my own twist on it, so it was paramount to be very thoughtful with how we translated his world from his medium into the medium of 3D art. Trying to be a 3D artist, a director and a producer at the same time was unexpectedly hard but at the same time a lot of fun, especially with the support of my friends helping me with this project. I think that's the bottom line for me: it was hard and taxing but ultimately pure creative freedom and a good experience.
Final Advice
Oh oh, let's see.
Not to beat a dead horse, but just do what you want to do! Set yourself a goal and stick to it. Make sure to gather feedback from people who know what they're doing in the process and then finish the project, even if it turns out to be something other than what you imagined initially. Nothing is as demoralizing than having hard drives full of unfinished projects.
And then... know your limits. That's the most important part I think.
I always like to shoot for something that I know I can't achieve, because even if you miss, you learn a lot and are still left with something presentable. This time, however, I completely overshot my abilities. Make sure to prioritize your well-being; if a project gets too big for you to handle it, scale it down. Hang out with your friends, go out, have a drink, get out of your chair, get some fresh air.