
Fantasy roman ruin - The power of megascans and CRYENGINE
With the power of Megascans and CryEngine, this beautiful and flourishing ancient Roman garden was born. Explore how Peter Mindas pieced this environment together and was able to focus on the artistic aspect of the project thanks to Megascans. Peter shares some advice and tips on material blending, using decals as well as composing your scene to guide the viewers eye.
Introduction
Hi, my name is Peter Minďaš and I come from a small town in Slovakia. I am a 3D Environment Artist currently working for Bohemia Interactive. I have loved video games since my childhood. I do not remember how old I was when I played my first video game but I do remember very vividly the game I played. It was Loco, loaded from a tape on my cousin's Commodore 64. Playing and seeing the beauty of virtual worlds ignited my passion for 3D art and game engines. I enjoyed creating custom missions and scenarios for games.
Approximately at the age of 16 I started learning 3D as a hobby. However, I didn't start thinking about a career in the video game industry until I was about 19 years old. There are no universities that specialise in game art in Slovakia. Therefore after graduating from secondary school I spent one year at university studying programming. It was very early that I had realised, this was a misstep and I wanted to pursue a game art career. In short, I had left university in Slovakia and after a year of preparations I enrolled onto a Game Art undergraduate course at Glyndwr University, Wales, UK.

Inspiration and Planning
My mind is like a wheel of fortune with hundreds of ideas written on it. It just keeps spinning and occasionally it stops on one of these ideas and that's how this project came to exist. I occasionally check the Quixel Megascans library and one day I stumbled upon these roman assets and that's when the wheel stopped spinning. I wish I had more time for these personal projects but unfortunately I don't have it anymore.
I had known that my next project would be made in CryEngine long before I decided to start this one. I didn't want it to be very time consuming. The goal was to create a small scene with Megascans to achieve photo-realism. There is no need to bake lightmaps with CryEngine's real-time global illumination (SVOGI) and that is a time saver.

Reference Board
I had no clear idea so I put google to work. I found some pieces that I really liked and wanted to use for my work. Here are some references I used as an inspiration for this project. Once I had those references in front of me I had much better idea about what I want to do. Each piece has a specific thing that I like. For example one has great lighting that I aim for, the other one had an interesting colonnade, lines, damage and so on.
Quixel Bridge Export
The first step was to get assets from Megascans onto my hard drive. CryEngine uses Specular/Gloss PBR workflow for textures and therefore when setting the export from Bridge those were the main textures I needed: Albedo, Normal, Gloss, Specular, Displacement and Translucency.
Quixel Bridge allows you to export textures with packed channels which speeds up the whole process of setting up textures for CryEngine. I really appreciate that the guys from Quixel made this possible rather than setting it up manually as it used to be in the past.
Just go to Export Settings -> Global Export Settings -> Advanced Settings and scroll down to Customize Maps and check pack channels option. Now you can set all the textures up the way that CryEngine uses. Name all of the textures accordingly to CryEngine rules that are as follows: ddna suffix for normal map with gloss map in alpha channel and flipped green channel for proper use within CE, diff for albedo, spec for specular, displ for displacement and translucency

My Quixel Bridge export settings
For some reason only TGA export worked properly in order to have all the channels packed.
For this project I didn't really need LODs as I was aiming for the best quality but as I use a laptop that has pretty average specs they were useful. I decided not to use all Megascans LODs. What I was aiming for was making sure that each LOD was going to remove as many triangles as possible while still keeping the silhouette of the mesh intact, reducing as much as possible without wasting memory by having LODs that do not really do much in terms of reducing triangle count.
Photoshop Export
All the textures that we exported from Bridge needed to be exported from Photoshop using the CryTIF plugin. To export textures from Photoshop into CryTIF format you will need a plugin that you will find in the CryEngine installation folder:
Crytek\CRYENGINE Launcher\Crytek\CRYENGINE_5.6\Tools\photoshop\plugins
You need to place it into the Photoshop Plug-ins folder. For more info about the plugin you can check out the Official Documentation.
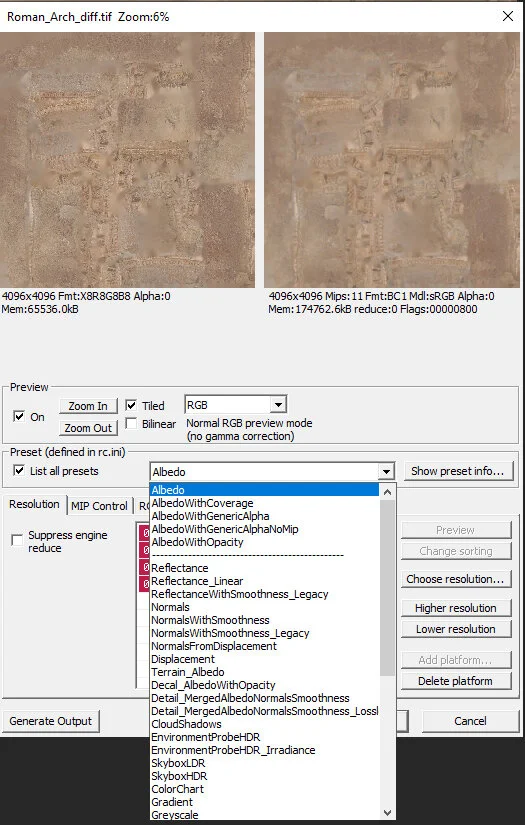
Now we just need to open our textures with Photoshop and re-save them in the CryTIF format. A new window will pop up. Because we named all the textures properly with a suffix, the plugin should offer us the right presets.
For _diff texture it should be Albedo or AlbedoWithOpacity if it has an alpha channel. _ddna should use NormalsWithSmoothness preset. _displ with displacement preset, _spec with specular preset and _translucency with Opacity preset selected.
Mesh setup with 3ds Max
3ds Max asset setup is pretty straight forward. Import base mesh and LODs. Name all meshes using proper naming convention and link meshes using Schematic view. You can assign exported CryTIF textures if you want to. It's not necessary.
In case anything is unclear You can also check Official Documentation regarding LOD creation.

CryEngine Asset Import
When importing into CryEngine just right click in Asset Browser and hit Import. Select your fbx and import it. CryEngine will import and assign all the textures that are associated with the fbx file. In case you had not assigned textures before you exported mesh from Max, you can select your mesh and all the textures at the same time and hit Import All. Once it's all imported and compiled you will need to assign textures manually. Just open the material and drag and drop your textures into slots.
The only thing that seems to not work properly is proxy mesh. CryEngine does not recognise it or set it up properly. In order to make it work it needs to be set up manually. Double clicking on mesh and setting $proxy mesh Type to Physics Proxy. Then under Material tab set Proxy material to Physical Proxy(no draw) and lastly set material shader to No Draw.


Scene Assembly
At the beginning I imported all meshes (mostly last LODs) into 3ds Max and started to block out a basic scene so I could build my structure walls around it. It took a few quick attempts till I was happy with the results. Once this was done I began with texture creation. I used three materials for this custom mesh. Two materials use CryEngine Blend Layer.


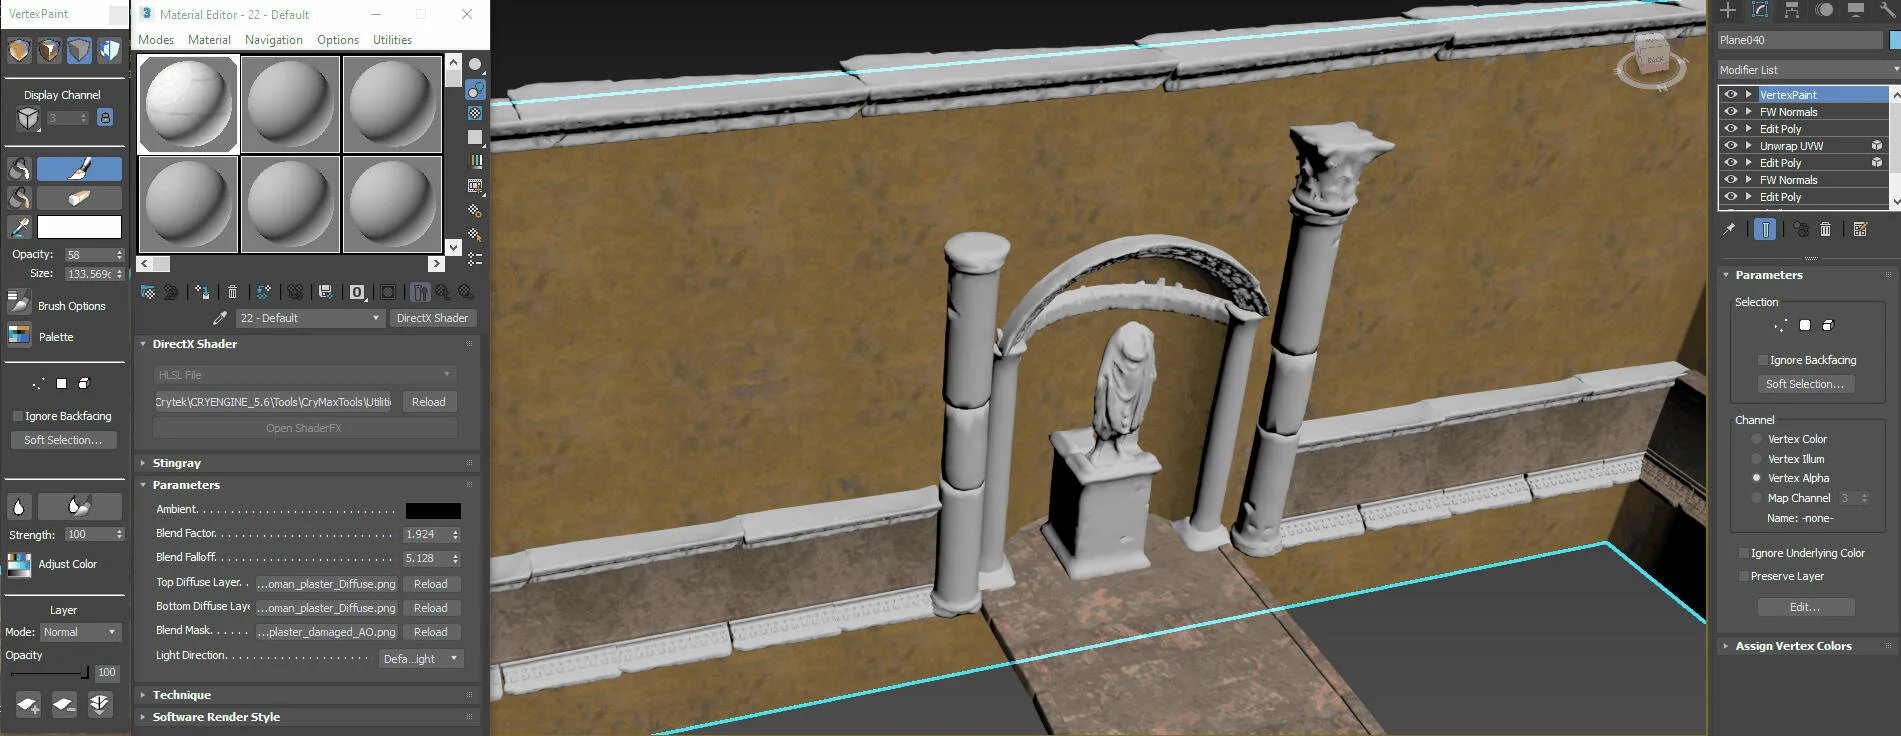
The blend layer feature allows mixing a second set of textures with the base set to get more variation on tiled surfaces. The blending is primarily based on the vertex alpha channel and a generic blend map. The vertex alpha determines where the blend layer should be visible on the surface of the mesh.
Independent from the geometry tessellation, you can achieve smooth as well as very sharp transitions between the layers. A low number of vertices is sufficient for good looking results. Unfortunately CryEngine does not allow vertex alpha painting directly inside the editor, therefore you have to paint it inside 3ds Max.
For more info check out the Official Documentation regarding Blend Layer where you can read about blend shader for preview in 3ds Max.

Materials
Here is a breakdown of the main plaster wall material made inside Quixel Mixer. It is just a simple mix of three materials layered on top of each other with some basic adjustments of values.


The terrain uses four surface textures from the Megascans Library. At first I imported them into CryEngine as they were. I would adjust the HSL of the textures to make the terrain visually easier on the eyes, more readable and fit better into the world.

World Building
Once everything is imported and ready to use I can start putting it all together. It's all about reusing a few pieces. Copy/paste, then rotate it a few degrees, scale up or down. It's all a very creative and fun process.


Decals rule the world. Breaking the tiling with blend materials just isn't enough. Adding decals into your scene can make a huge difference. Adding various weathering and damage effects

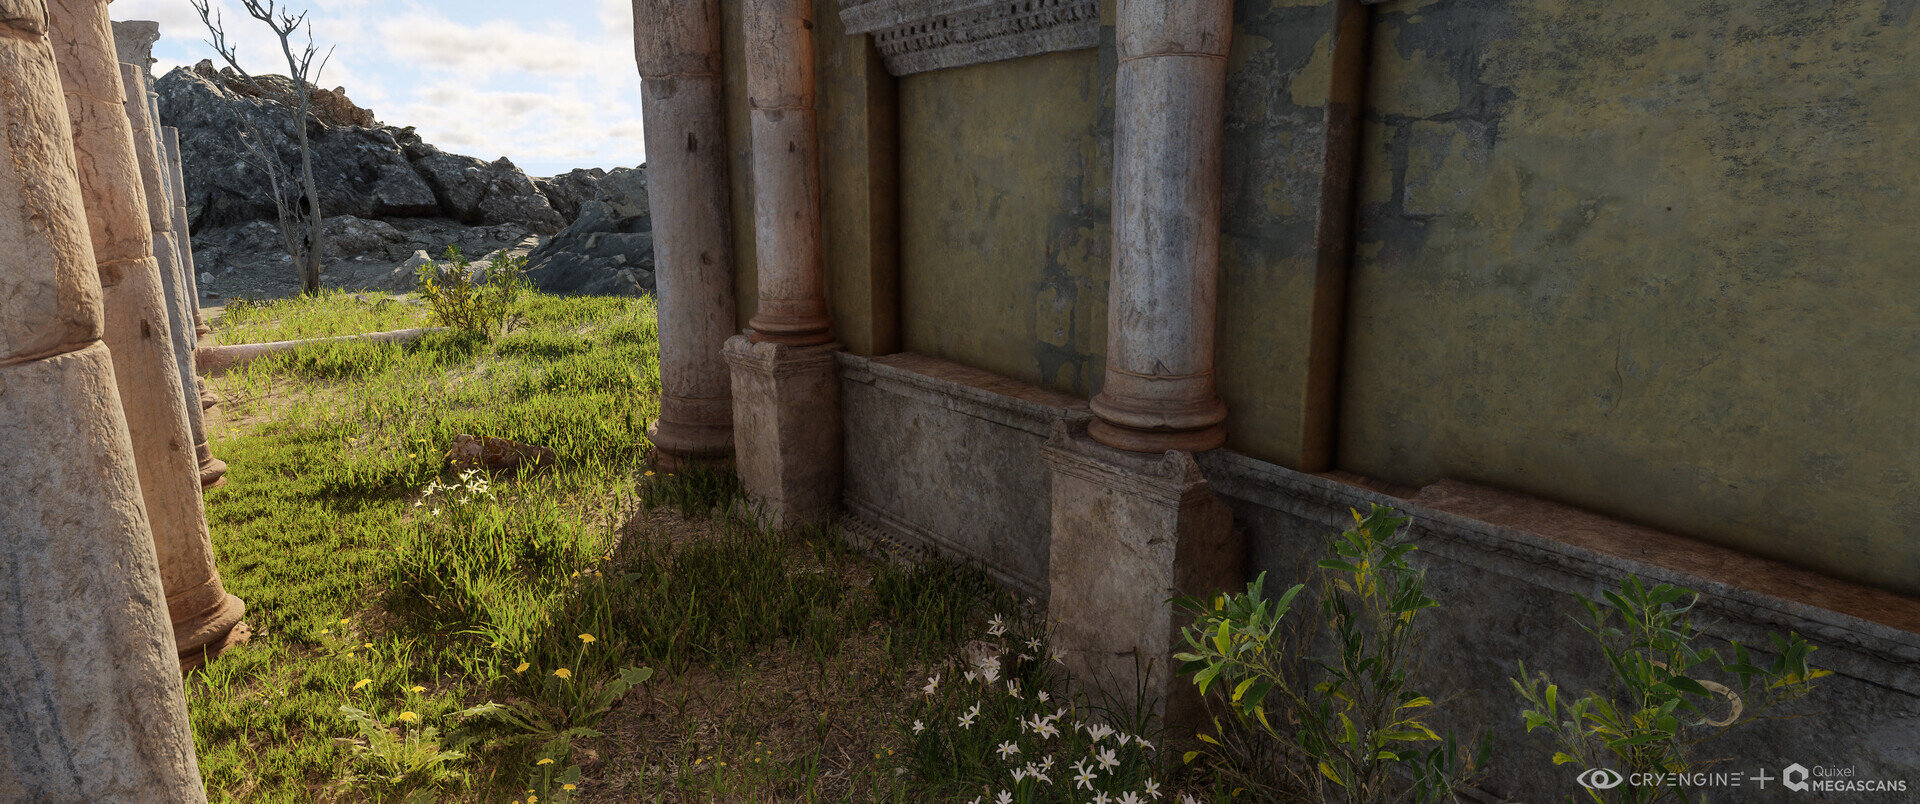
My first intention was to create a Roman ruin in the middle of the desert. A barren dry land scattered with small sand stones and medium sized rocks. As soon as I had the whole scene assembled I knew something was missing. The whole scene was giving a very flat feeling. The whole terrain blended in with walls and columns and I wanted to add some contrast and separate the ground from the walls. To add life and colour to the scene I replaced the sand and rocks with grass and flowers. A once beautiful and flourishing Ancient Roman Villa Garden is now overgrown with wild grass, dandelions and flowers that once decorated this peaceful place.


For believable renders, it's important to add subtle variation of grass and match it with terrain texture. I used three different grass clumps. One pretty dense and the other two rather sparse. Each clump was used three times with different scale settings.
In total I had nine different grass clumps. I used Megascans meshes where each grass blade is modelled separately. Even though the polycount is quite high and really not suitable for a game environment, with LODs being used it was still tolerable.
Dense grass clump's polycount: Base mesh has 8750 triangles, LOD1: 3500, LOD2: 1750, LOD3: 4 triangles

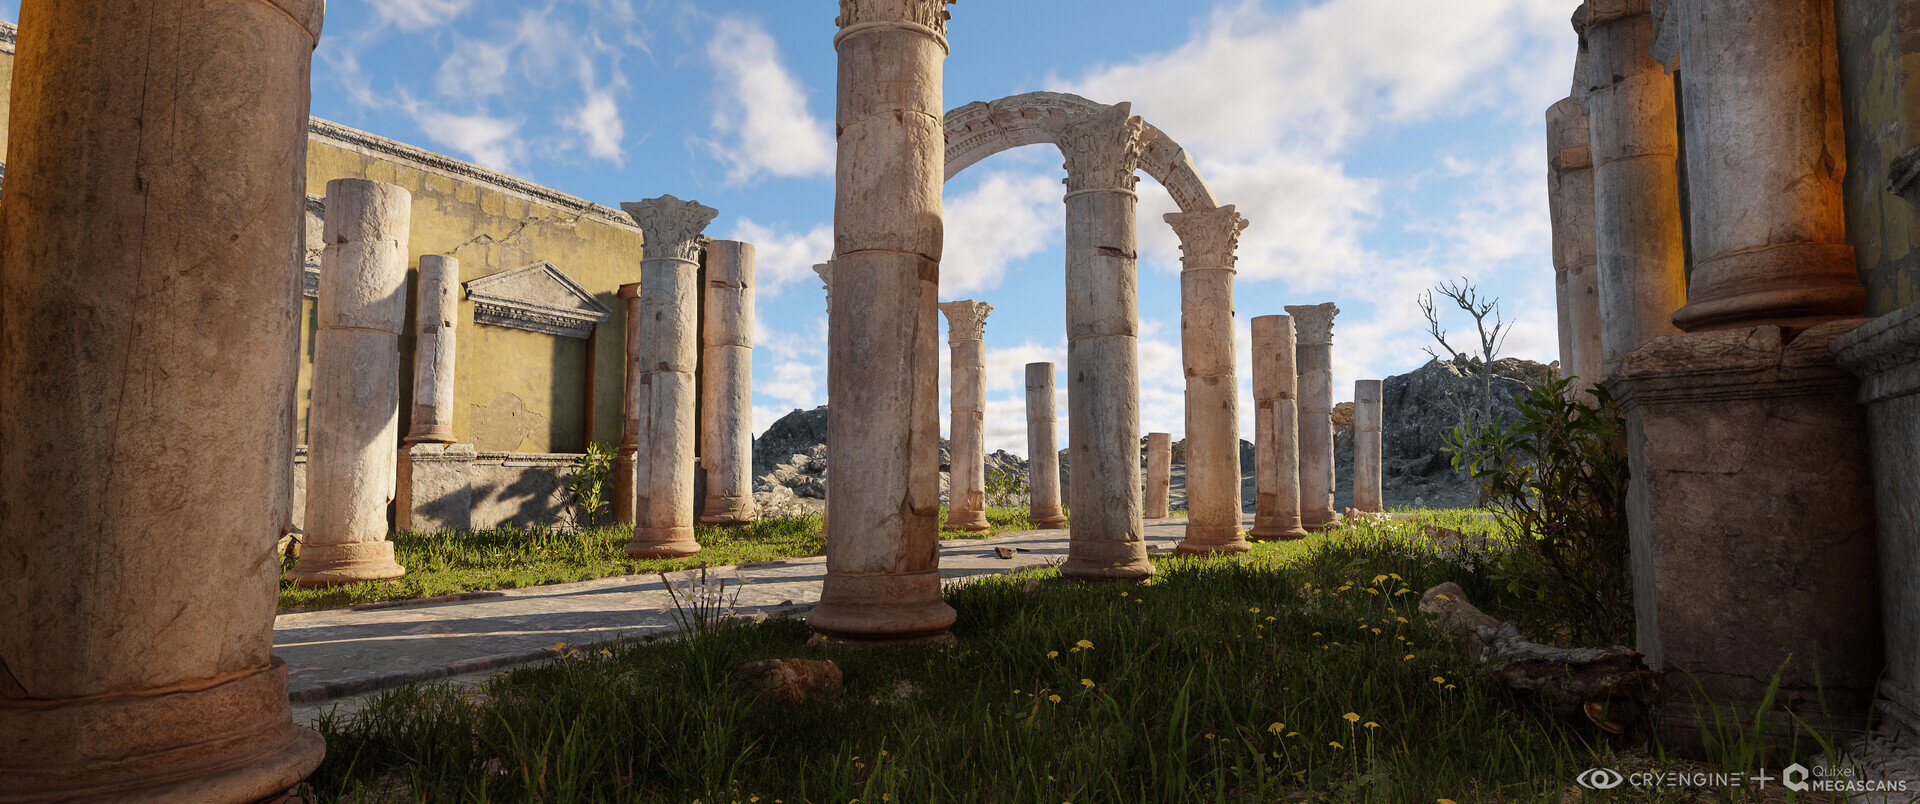
Composition and Lighting
A narrow paved road decorated with colonnade leading towards the statue of an emperor. From the game playing perspective this whole composition represents some sort of a temple where the statue within the niche is the hero asset. It's the most important object, the point of interest. Then there is this road which makes you follow it towards our hero asset, decorated with ancient columns. There is something very inspiring about colonnades. They look important. They enrich the whole scene demonstrating it's pomposity.


”Let there be light”; and there was light. First iteration was done before I started assembling the scene with just grey meshes. The very first thing that I did was to establish the direction of the sun so I would have some nice long shadows crawling on the ground. Sun light is coming slightly from the side so it supports the entire composition. It leads all the shadows towards our hero object. I wanted to have a nice warm sunlight, simulating a warm summer day with sun's position at around 4 o'clock in the afternoon.

When it comes to lighting I never settle for the first setup that looks good. Don't be afraid to experiment with different values even though you think your light looks good enough. Believe me, you can always make it look better. Make multiple time of day presets if you need and keep playing around. This is my final lighting setup:

Creating realistic lighting with CryEngine is really not that difficult. My scene uses Volumetric Fog and Volumetric Clouds which helps to add a sense of realism. Neither one of them are not enabled as default and therefore you will need to bring them on with console variables (e_VolumetricFog 1, r_VolumetricClouds 1).
CryEngine uses real-time voxel-based global illumination. One technique that was introduced to improve upon the visual quality of SSAO is SSDO. It's enabled by default together with SSAO. It works by calculating occlusion and environmental lighting at the same time. Cranking SSDO ambient occlusion from 1 to 2 can give a little bit more depth into your scene.
Console variable for SSDO amount is : r_ssdoAmountAmbient (0 -off, 1-default)


Outro
You have probably heard this phrase a hundred times before but practice makes perfect. As I mentioned before I don't have as much time as I would like to have for these large personal projects any more but I always try to challenge myself with at leas small ones no matter what. Now that we have access to a Quixel’s library it's so much easier. With the huge content they offer that is ready to use we can achieve our goals with ease. I enjoy working with Quixel Megascans and will definitely continue exploring more and more in the future. I hope you can find this article interesting. Thanks for reading.
