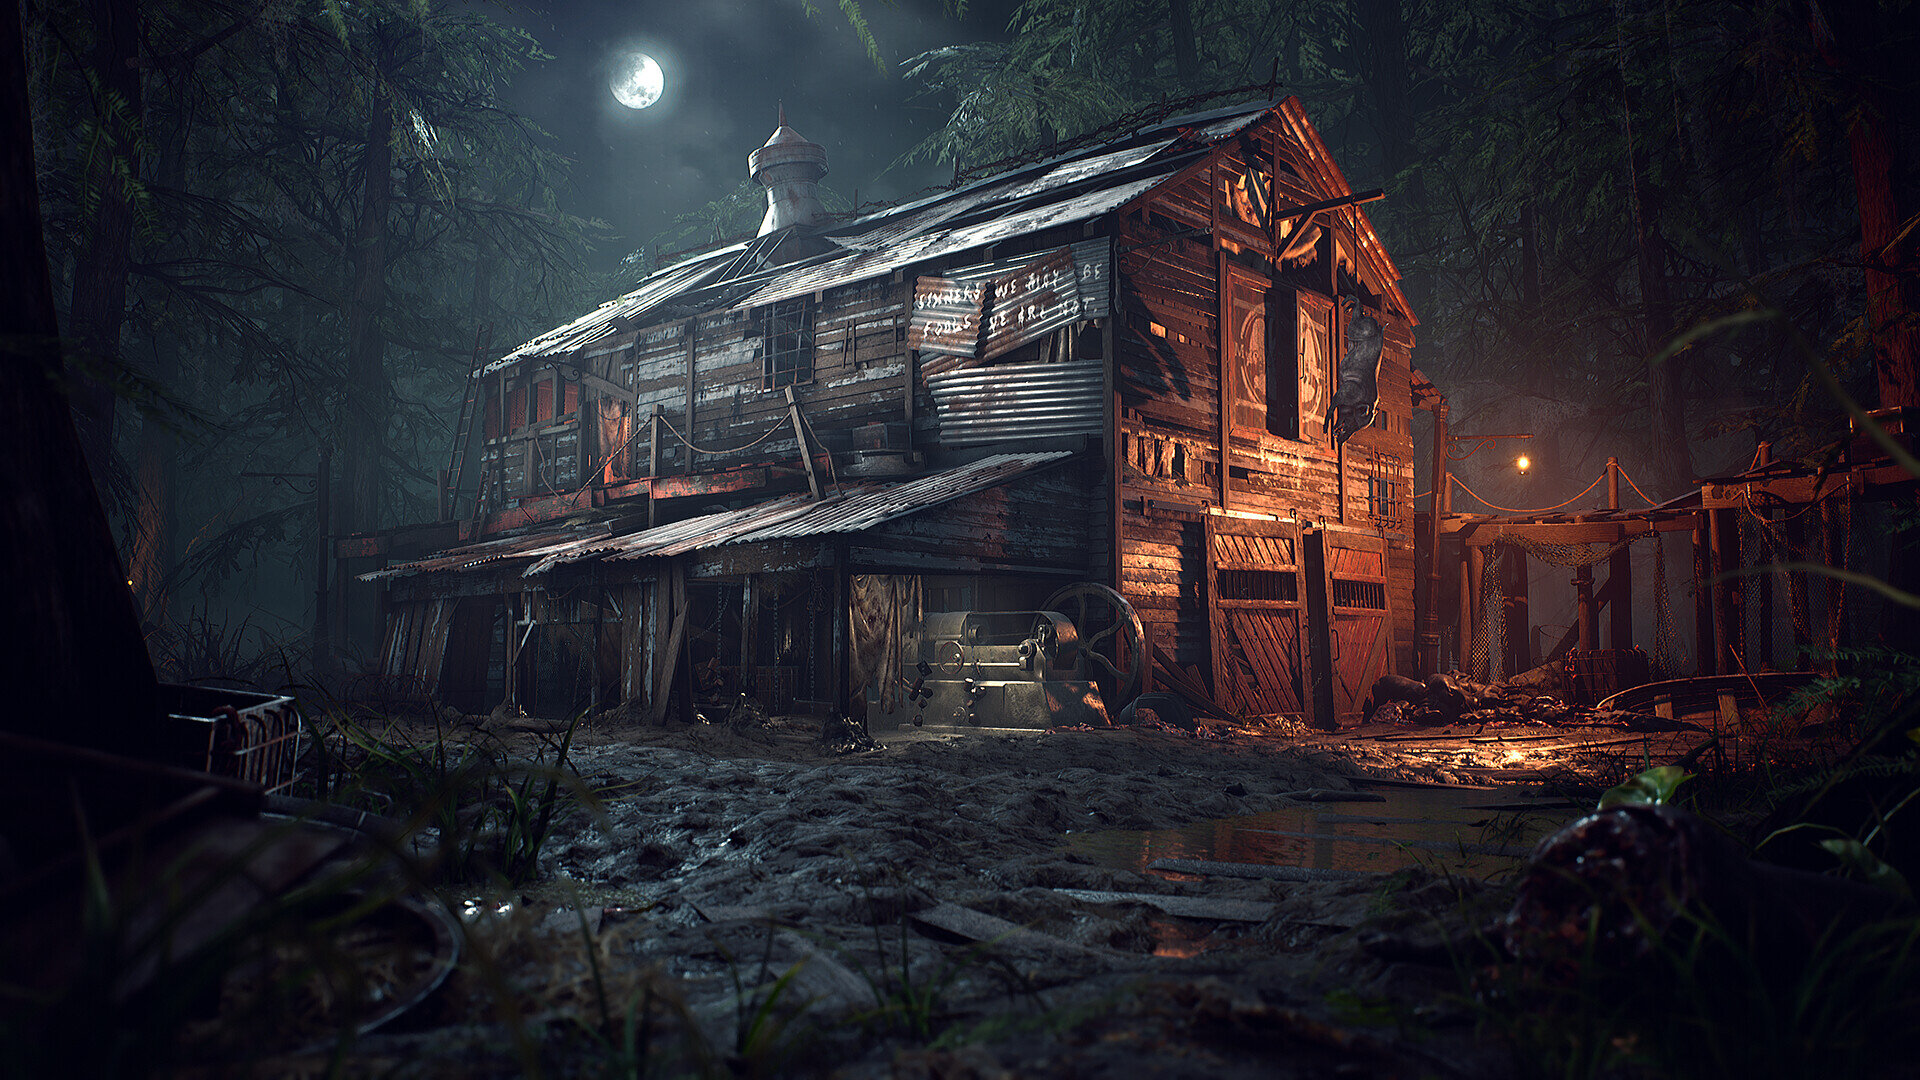
slaughterhouse - blood, sweat and hard work
Jay Cummings built this Slaughterhouse in only 14 weeks without any use of external packages. Get ready to enter the Slaughterhouse because this is a lengthy read and full of knowledge from photogrammetry, lighting, materials, foliage, marvelous, composition and more.
Introduction
Hey! my name is Jay Cummings and I'm a Junior Environment Artist currently working on the next Dead Island game with the talented team at Deep Silver Dambuster, based in Nottingham, UK. I've spent the past 9 years dabbling in 3D software, 2 years of which was in Darlington College studying Games Development, then 3 years at Teesside University on a Games Art course. Before that, I jumped around from XSI Softimage, Blender, Maya and 3DS Max, trying to learn as much as possible in my spare time. I was fortunate enough to land a position at Dambuster before graduating, and am now learning more than ever! This environment piece played a huge role in getting me this position, so I've derived a full breakdown from my university hand-in that covers every aspect of the creation of Slaughterhouse.


Project History
This project centers around the creation of a current generation environment within Unreal Engine 4, inspired primarily by a concept art piece from Arnaud Valette, with the setting and tone drawn from Crytek’s ‘Hunt: Showdown’. The environment itself is a large, dilapidated slaughterhouse structure situated within a Louisiana bayou, set in the late 1800’s. This acts as a full showcase of my abilities as an artist, incorporating organic and hardsurface modelling, technical art, optimisation, photogrammetry, an understanding of lighting, composition and visual storytelling. I utilised industry-standard software like 3DS Max, Zbrush, Substance Suite, Marvelous Designer, Photoshop and more during the creation of this environment. Another aim of mine was to ensure that no external resources were used in the creation of this environment, so everything was created by myself.

Research & Pre Production
A primary point of reference for the creation of this environment was a concept art piece of the same name by Arnaud Valette. I wanted to match the concept accurately in 3D, so preplanning was done in the form of a paint over to ensure a tight composition and plan moving forward.


To convert it into the dark art direction of Hunt: Showdown, I looked more into the game to analyse the key factors that went into determining its style.

Personal Visual Analysis of Crytek's Hunt: Showdown
This breakdown, as well as actively playing the game and taking multiple screenshots in different weather/lighting conditions, allowed me to get a better understanding of how to approach the lighting in my scene. Additional colour palette exploration was also conducted, breaking down the main colours from screenshots of the game in different lighting scenarios.

Personal Colour Exploration
More academic resources included Shelter from Lloyd Khan, a book that breaks down wooden frameworks for different buildings and layouts, showing hand-drawn diagrams and dimensions, reinforcement points, potential structural weaknesses, etc. Looking into this area allowed me to create an accurate, structurally-sound building that is well-grounded within my environment. Research was done to ensure all foliage was accurate to the wetlands of Louisiana, based on an informative PDF file – Wetland Plants in Transportation. This is especially useful as it gives information on dimensions, behavior and areas of growth, allowing me to create and scatter foliage assets accurately based on the areas within the bayou.

Relevant slides from the Wetland Plants in Transportation PDF
To appeal towards the ideal, modern & next generation specifications, I’ve chosen the software used within the industry today, including:
3DS Max – Blockout, high/low modelling, hard-surface, unwrapping
Zbrush – Organic modelling, decimation, foliage workflows
Substance Painter – Asset texturing, smart materials
Substance Designer - Material authoring, procedural foliage texturing
Unreal Engine 4 – Custom shaders, technical art tools, level creation, set dressing, final renders
PureRef – Reference gathering and organisation
Marmoset Toolbag 3 – Material rendering
Marvelous Designer - Creation of fabric elements 5
This is all software I’ve had at least some experience with in the past, so I feel more comfortable utilizing it for this project. However, this is the first environment scene I’ve created that has a strong emphasis on organic elements, requiring foliage assets, heavy sculpting, etc. As a result, I’ve also conducted research on specific pipelines in order to get up to speed. I knew immediately I wanted to emphasis optimization, and one way I wanted to do this was by utilizing trim sheets and tiling textures to reduce texture memory usage and draw calls in-engine, allowing for a higher frame rate. References for this included the infamous Modular Building Set Breakdown from Jacob Norris on Polycount Forums as well as Thiago Klafke’s full modular UDK environment breakdown on his website.

Sample of Jacob Norris’ Modular Building Set Breakdown, displaying trim sheets
One particular foliage workflow was especially helpful, that being Peyton Varney’s on Artstation. He uses a base high poly model made in 3DS Max, details the mesh in Zbrush, grabs the document normals and height from the viewport and then derives the rest of the maps needed in Designer. This method is highly efficient and proved exceedingly useful for creating varied foliage.

Foliage tutorial from Peyton Varney on Artstation
Before this project, I’ve had little experience with photogrammetry, so I wanted to try and learn as much as possible in preparation. For creating tiling materials through scan data, I referenced Grzegorz Baran’s Tree Bark tutorial. This introduced me to using Substance Designer to bake and derive colour maps, instead of relying on xNormal. This kept everything mostly in one package, as I could then go on to tweak the resulting maps to remove colour information with Designers scan data toolset. For independent assets, Unity offers a PDF that goes into a good amount of detail with the full process, ranging from pre-production, software and hardware, all the way to removing lighting and finalist the asset. It covers these points in all major programs as well, making it easy to translate into my own workflow.
Blockout & Scene Setup
For the blockout, I started with a rough to-scale bounding box mesh, importing it into the engine and setting my main camera angle to match with Arnaud Valette’s concept art. From there, I split up the dimensions of the bounding box in Max and adjusted them to fit within a modular specification, allowing me to create a kit. From this, I’m able to keep it detailed enough to the point where I can later refine it into my final building kit.
I set most of my environments up the same way – I designate my lightmass importance volume, adjust lighting parameters in World Settings, apply a Sharpen post process material to the viewport, import a UE4 Mannequin for scale, increase Reflection Quality to max in my post process volume and add a large reflection capture to my scene as a base.

First Blockout in-engine (Week 1)

Full block-in & initial material experimentation (Week 5)
With initial materials and lighting being implemented early on, I’m able to get a better sense of where the scene is going. Due to the majority of the building being textured on one trim sheet, I’m able to unwrap modular pieces quickly and see the final result within a small timeframe. This allows for fast iteration and look development, so tweaks were made accordingly as I dressed the scene. The main aim at this early stage is to add in elements that make the largest visual change, so the first materials created were mud, puddles, the wood trim and the metal trim. This ensures I’m able to create the slaughterhouse itself, as well as the surrounding land first. Getting these elements in early is especially important as you want to see exactly how these materials work in conjunction with your preliminary light setup, so you know what tweaks to make going forward.

Breakdown GIF
Modelling & Modularity

Modular Kit Elements – Adhered to fit 3x3m
The modular kit started with single planks with damage and form variants. From there, I branched out and started to create wall variants of 3x3 and 2x3, overhead supports, columns, poles, elbow braces and more. Using this modular method, everything can snap into place in-engine and I can build the framework of the structure with ease, whilst still making look-dev changes easily. To avoid harsh laser lines in the geometry of my kit, all edges were chamfered with face weighted normals applied to provide a cleaner curvature to the smoothing of the mesh. This method is especially favorable with games that have a lower memory budget as normal maps aren’t required to smooth the shading – Cloud Imperium are especially fond of this technique with Star Citizen.

Face Weighted Normals Example
The modular kit is textured in full using trim sheets and tiling textures, so avoiding repetition was a fun challenge. I ended up adding functionality to my Master Trim shader for a vertex painted paint layer based on the height map, as well as a 11 scattered grunge albedo overlay for dirt. This is then further blended with a layer of lichen and controllable wetness, both also via vertex colours. Everything is parametrised, allowing me to make multiple variations through instances of the same material, controlling colour, roughness, normal intensity, detail normals and more. This gives me greater freedom in the look development process.

M_Trim Material Graph
For my main generator asset, I took both still images and video reference to get an idea of how it functions when animated and what precautions should be taken during the modelling process. I adapted a mid-poly workflow for this piece as it acts as an additional focal point that is lit by an overhead lamp, meaning I can justify heavy detailing through additional geometry. This also meant that I could again use face weighted normals and achieve a baked appearance without additional texture maps. That said, I wanted a unique bake to push the detail of this hero asset, so I baked it on top of itself and textured it in Substance Painter

Generator Asset Process

Generator Texture Breakdown

For the assets that were uniquely textured, I start with a base template of an AO multiply, Curvature overlay at 30 – 55% and an overall sharpen adjustment layer. These tweaks are to help the asset pop and bring out the detail in the materials. After this, I begin building up layers of base materials, assigning masks where appropriate. Once an initial pass has been completed, I start a wear pass with fill layers and select paint layers to break up flat areas, adding in logical damages to build a story for the asset. Ground dirt, splats of paint, dents, oil leaks, cobwebs and metal welds are an example of this. Anchor layers are also used to inherit stamped normal data and use it to drive different smart masks.

A lot of the layers and subsequent materials from my painter files are typically merged into Smart Materials, allowing me to re-use them across assets and slowly build up a material library

This project gave me the opportunity to get to grips with Marvelous Designer a bit more, so I followed some basic tutorials and used it for shredded, blood-soaked fabric that is strung up around the exposed areas of the building. I played around with the idea of having it draped around the exterior and around objects, however this was later removed to avoid too much visual clutter.

Marvelous Designer to 3DS Max – Gladiator Tools in use
After simulating the cloth in Marvelous, I used Gladiator Tools to wrap a properly retopologised flat mesh around my simulated mesh, removing the need to manually retopologise. This was especially useful as the cloth within my scene is fully physics based, so proper topology is required to ensure correct deformation during simulation.
Materials

Mud Render – Material authored with Designer
Due to the highly iterative nature of Substance Designer, I chose it to author my trim sheets and other materials to ensure that if any changes were necessary throughout development, I’d be able to go back and alter without losing any progress. My workflow doesn’t differ from most other Designer artists – I block in height forms in segments, starting with primary, secondary then tertiary, then derive most of my other maps from the final height output. I like to work with multiple graphs depending on what the material requires. I’ll often create utility graphs to generate things like pebbles, stones, grass or my own grunge maps for use in my main graph.

Substance Designer Mud Graph Breakdown
As I’m working with PBR (Physically-Based Rendering), I typically export Albedo, Normals, Height and a packed AORM (Ambient Occlusion-Roughness-Metallic) map. This is the advised workflow as it packs all grayscale textures into an RGB format, 16 with additional room in the alpha channel for any extras – as a result, there are less individual maps to load, resulting in less draw calls within the shader.

Trim Sheets used for the structure and various props

Utility graphs for both rock and grass generation
Foliage

Foliage layout in 3DS Max
As foliage was a new area for me, I stuck closely to Peyton Varney’s method of foliage creation in order to get great results quickly. The base high poly meshes are created in 3DS Max from a plane, formed into the base shape from reference, Shell modifier, then FFD’d to achieve the primary forms. I then use the Freeform Polydraw tools to curl up edges and achieve more variation per leaf.
With the base shape formed, I take it into Zbrush for detailing. This typically involves secondary forms like finer stems and folding/curvature in the profile of the leaf. I use a mixture of Standard, Dam Standard, Clay Buildup and Move to adjust the silhouette.

Elephant Ears in Zbrush – Exporting maps using GrabDoc
From there, I use the GrabDoc functionality alongside the Al_NormalMap Matcap from Pixologic to get my normal and height map. With this data, I can derive all of the maps necessary through Substance Designer.

Foliage map creation in Designer
Within Substance Designer, I rely on a combination of blended grunge maps in combination with my height map to generate my albedo. I use a Height Selector node with adjusted falloff to select specific sections of the leaves, allowing me to introduce more colour variation and aging. The last step is to apply the finalised textures to a plane in 3DS Max and use the cut tool to create my alpha cards. I used a fairly high poly count for my foliage to reduce alpha overdraw as much as possible, allowing me to have denser foliage with less of a frame rate hit.

Example forest made using my foliage assets
The biggest challenge of this environment came from the creation of the trees. With the scene taking place in a bayou within Louisiana, the tree required for my scene is the Bald Cypress, a deciduous conifer that is usually found in swampy climates. Not only is it a challenge in regards to its unique shape and size, but it also comes loaded with Spanish moss draped across its structure – another layer of complexity to consider. For the creation of the trees, I looked at the process that Agnieszka Nogalska utilised for her swamp environment, which involved using Zbrush to kitbash pieces together. I felt like this was the correct approach to take over something like SpeedTree as I don’t need a wide variety of unique shapes and forms with this scene, and this method allows me to focus more on my organic sculpting skills.

Branch/Fern Final Layout in Zbrush
I found the ZSphere workflow to be perfect for tackling something that relies so heavily on harsh angle transitions. I started off modelling the base of the tree with ZSpheres, using my foliage PureRef board as a reference to the shape, curvature and scale. Then, I used Adaptive Skin and Dynamesh to achieve a solid mesh to start adding secondary forms to. I use a combination of brushes throughout this process, mainly Standard and Clay Buildup to define larger forms, Dam Standard to refine sharp peaks and deep cuts towards the base and Trim Dynamic to cut away and create areas of interest.
The branches were a much more tedious process – I started with a sphere and created a few fern blades, followed by some stems and branches using ZSpheres.
These were then kitbashed together to create a good variety of ferns to be placed on branches and used independently on my final texture sheet. As only one tree variant is required for the scene, I manually retopologised it in 3DS Max to ensure a high level of detail is maintained towards the bottom of the tree. This is then kited and reduced towards the top, taking into consideration the angles the player would see it from.

Bald Cypress Tree Topology

Final Bald Cypress in 3DS Max
For retopologising, I use the Freeform tools available within Max to pull out and manipulate geometry that conforms to the surface of my high poly. With a single tree variant, I can get away with additional detail from a baked normal map, so I bake my low poly with my sculpted high poly within Marmoset Toolbag 3 and apply it in-engine as my detail normal, blending with my bark material.
Photogrammetry
I used Reality Capture and a Canon EOS 1300D to capture and process the photogrammetry elements within my scene. Reality Capture works by calculating the angles and locations of the camera in 3D space, then using high contrast areas of the images it’s given to create a dense point cloud. This cloud can then be further refined into a high poly mesh, even storing vertex colour information that can later be extracted to form an accurate albedo map. It’s highly regarded as the fastest and most accurate software for photogrammetry, which is why I chose it for this project. One area I used photogrammetry for is the creation of ground clumps – a process seen in games like Farcry 5 and Hunt: Showdown. To start, I capture around 100 or so images from different angles and distance in RAW format, batch process those images in Adobe Lightroom and then feed them into Reality Capture to generate a dense point cloud, high poly mesh, then embedded vertex colours.

Generated High Poly scan mesh rendered in Toolbag 3
From here, I use 3DS Max’s ProOptimize modifier to give me a mesh more appropriate for real-time use, going from 6 million polygons to 900. I then use an FFD 3x3 modifier to create a rounded appearance, making it easier to intersect without leaving geometry floating above the terrain surface. Texture information is then baked down and refined in Substance Designer using AO Cancellation, sharpening and colour adjustments. Typically it’s best to avoid using ProOptimize as the topology can require some clean-up after, which even still results in some triangles. Normally I’d be more careful with this, however I can justify it as the mesh doesn’t deform and the asset shades correctly in-engine.
Implementing this in-engine required the creation of an optimised intersection blend shader, so I followed some resources online to create a Material Function that can be re-used between shaders. This technique relies on Mesh Distance Fields to determine when meshes are intersecting with each other. This then generates a parametrised mask that is blended alongside a noise texture sample. Then a pixel depth shift with dithering is applied to fade out the intersecting areas. This functionality is easily added to any master shader by plugging the function into the Pixel Depth Offset input.
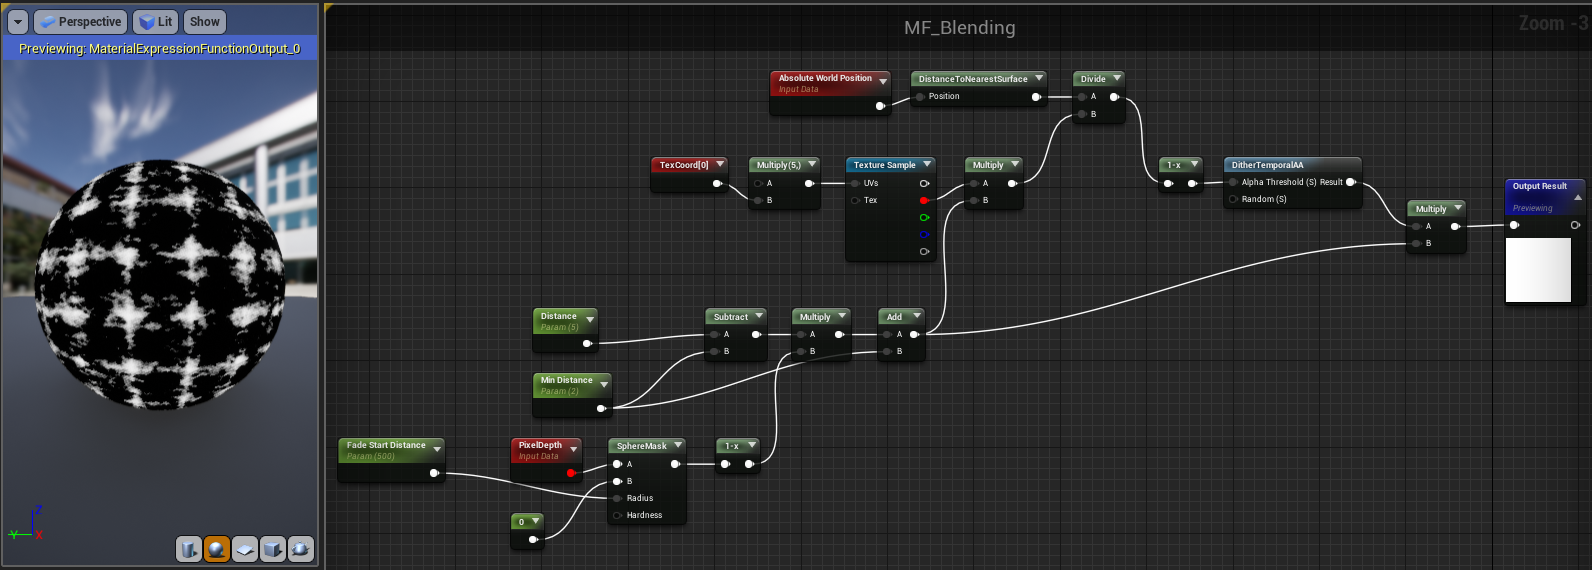
Distance Field-based Dither Blending Material Function

Practical use of this scan data within the environment – Blending with my mud material made in Designer
Lighting & Post Processing
The initial plans of having a warm scene juxtaposed with the gritty art direction fell through towards the beginning of the project. I switched to a much darker approach as I felt it fits the art direction of Hunt: Showdown closer, as well as giving me more control over what I want the viewer to see, as well as being able to highlight areas of interest and potential paths that the ‘player’ can maneuver through.

Major lighting iterations
The first step was to ensure the World Settings are adjusted to allow for additional light bounces, higher indirect lighting quality, Distance Field Ambient Occlusion and more. These settings are lowered somewhat to ensure build times don’t take too long, but it’s worth keeping in mind for the final pass. I’ve also turned on ‘Generate Mesh Distance Fields’ in Project Settings to allow the use of DFAO and Dither-based Mesh Blending on intersection

Following this, I set up my Post Process Volume (switched to unbound) and locked the Auto Exposure min/max to 1.0. You can also un-check Eye Adaptation in Project Settings to permanently disable this setting. As I’m handling an exterior scene, I need to designate a Lightmass Importance Volume to ensure I’m not baking large portions of the landscape that won’t be seen. Following this, Lightmass Portals are used in the larger opening to the building to boost the amount of Global Illumination on the interior. I’m using Volumetric Fog within the Exponential Height Fog component to create a much more atmospheric, gloomy appearance. This affects the behavior of the lighting in the scene quite drastically, so blocking this in early was very useful. In order to get more control over the lighting, I take advantage of Inverse Square Falloff options and tweaking the settings to get the desired effect, whether it be the interaction with specific materials with Min Roughness, or a harsher falloff with the Light Falloff Exponent. These options aren’t physically accurate, but are useful for unlocking the full potential of individual lights.

Reflection Captures example

Shader Complexity

Detail Lighting
Reflection captures are also used to correctly render reflections on reflective surfaces. A planar reflection capture has also been used on the puddles that litter the ground to achieve a high quality reflection of the slaughterhouse, adding another point of interest in the various camera angles.
Research Resources
To further aid with lighting my environment, I looked at the popular Color & Light: A Guide for the Realist Painter by James Gurney. Despite its intended audience being painters, it contains full breakdowns of colour properties, atmospheric effects and lighting conditions. This gave me a solid understanding of where to start with lighting my structure, how heavy fog diffuses the light and later on, how I went about re-lighting from scratch to create a moonlit scene

Color and Light: A Guide for the Realist Painter (Gurney, 2010)

Shelter (Lloyd Kahn, 1973)
Finally, I spent a lot of time watching 51Daedalus’ Unreal 4 Lighting Academy videos on Youtube. He assesses existing environments and breaks down the good and bad areas in the lighting, then restructures it from the ground up while explaining his process. This was very valuable in understanding how lighting and colour aids certain compositions and visual styles.
Given the amount of corpses and organic pieces that make up this scene, I needed to ensure I had enough resources to work with to ensure correct anatomy and form. My supervisor directed me to a really informative Sketchfab page from Idaho Virtualization Laboratory, which contains scan data of skeletons/bones from hundreds of animals. Additionally, a blog from Jean Lafitte’s Swamp Tours that documents the animals of the swamps of Southern Louisiana helped in narrowing down what potential creatures could be created, whilst still maintaining a level of accuracy for the environment.

Sample from Idaho Visualization Laboratory’s Sketchfab page
Furthermore, I looked to the artists involved in the development of Hunt: Showdown for inspiration. Throughout the project I referred to the quality of their work in personal renders and in-game screenshots. Artists like Sebastian Stolaczyk, Ron Frölich, Lars Sowig, Matthias Wagner, Marcel Schaika, Ivan Tantsiura, Seid Tursic, Alvaro Canizares, Alexander Asmus and Maren Gerbach were all included in my reference sheets, which helped me to better replicate and understand the art direction of the game. Other artists like Harley Wilson with his Hunt: Showdown fanart were also useful points of reference.

To prepare for the practical workload, I narrowed down the Zbrush brushes I’d be using for this scene, as a lot of organic sculpting was necessary.

Personal Brush Breakdown
These are the main brushes used, all serving their own purpose in the sculpting process. The only downloaded brushes are JRO Tools’ Wood Damages and Fredo Gutierrez’s free Wood & Bark brush pack.
To speed up my 3DS Max workflow, I worked with a few scripts that increase functionality and streamline certain processes that I use frequently. The biggest one is IFW Normals, an expanded face weighted normals script that has the inclusion of setting a coplanar threshold to achieve more accurate results. I also use a personal Drag and Drop Reference script that automatically sets up a chosen reference image in my viewport with correct dimensions, with adjustable view angle.
Advice, Tips & Challenges
Tackling an environment with the intention to create everything is incredibly rewarding in the evergoing challenge to grow as an artist. With this in mind, it comes with its challenges and drawbacks. For me, it became apparent quickly that there would be issues with keeping the asset quality consistent within the overall scope of the scene, mainly as it was my first time with a lot of these processes.
For example, there's a visual disparity between my scanned assets and the foliage I made. Thankfully, the scene is tailored in such a way in which the foliage takes a step back, and instead acts as a way to draw the viewer towards the other elements in the scene instead. This is also aided with the use of lighting and PostFX like volumetric fog. It's problems like this that we, as artists, need to be able to solve, especially in situations like this in which the environment needed to be completed within a restrictive time frame.
A big piece of advice that I can give if you're wanting to tackle an environment - establish and focus on your main angle. If you're able to create an environment with a compelling composition in mind, you can then branch out and focus on other micro-areas within the scene. It's very easy to get caught up in small details that aren't going to matter from your main camera angle, and you're not always in a position to be able to waste time. Tackle the biggest visual tasks first and work your way down!