
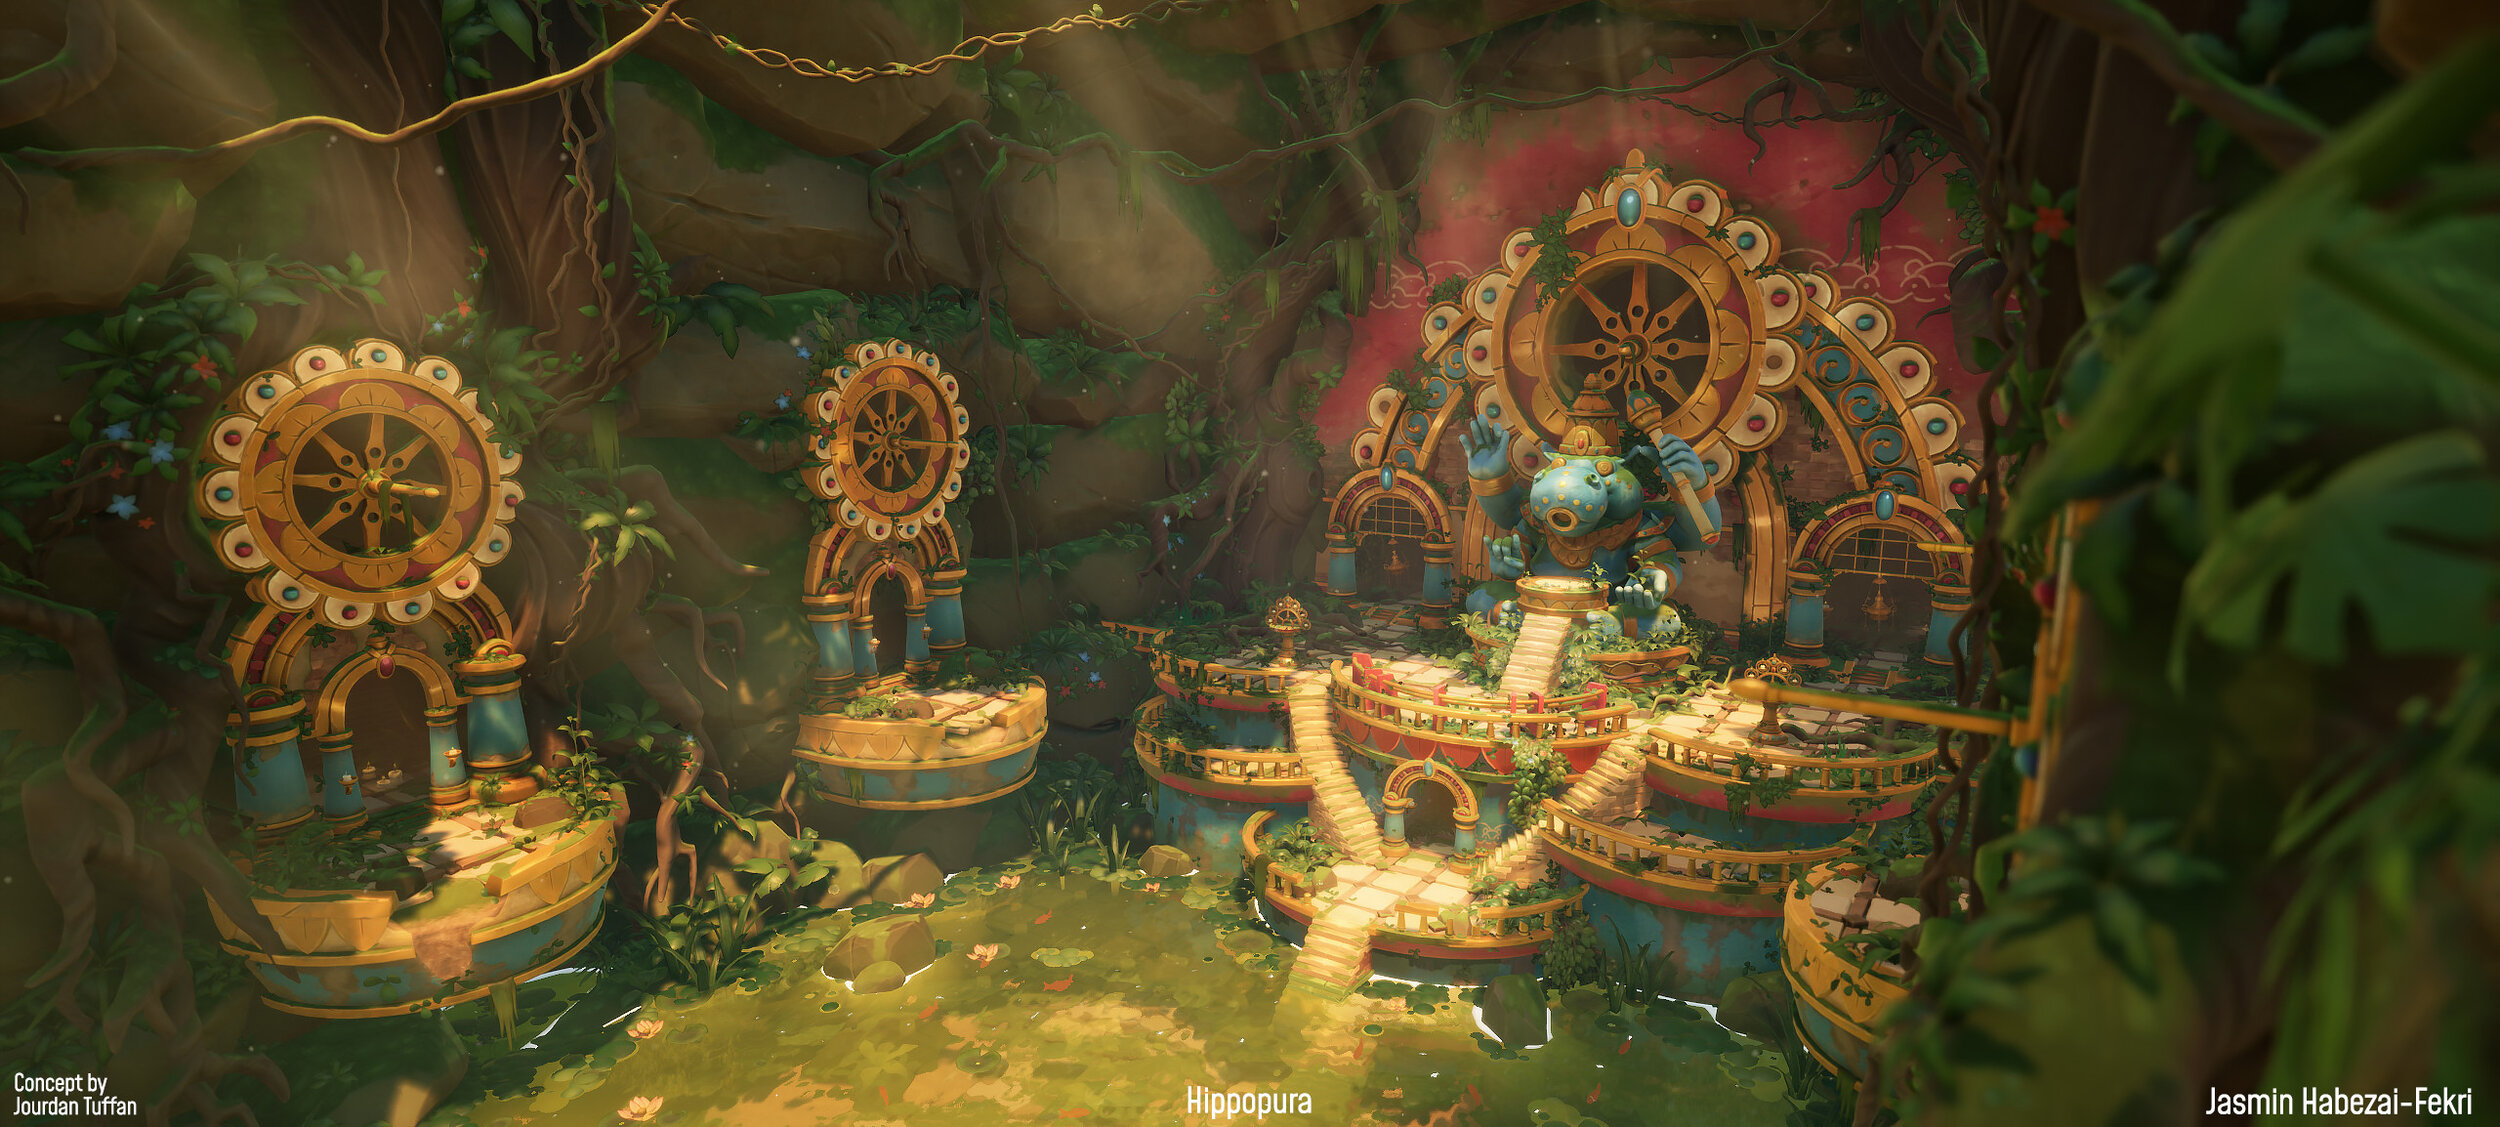
Hippopura Sanctuary - Stylized Ancient Ruin in ue4
Come with us on a journey to Hippopura, a ruined ancient sanctuary for Hippo’s nestled away in the lush jungles. Jasmin joins us again for another breakdown! Learn how Jasmin crafted her beautiful scene including blocking out, trims and tileables, sculpting, foliage creation, making VFX and all of Jasmins tips and advice for other artists.
Intro
Hey everyone! Thank you to Experience Points for inviting me for another Breakdown.
I am Jasmin Habezai-Fekri, a 3D Environment Artist from Cologne, Germany currently working at Airship Syndicate. In February, I graduated from University with a Bachelors Degree in Game Development. Simultaneously with my studies, I had been freelancing within the Game Industry (most recently for Airborn Studios). I previously interned at Square Enix Montreal and am also working within the Sketchfab community. Another little highlight of mine has been participating in The Legend of King Arthur Artstation Challenge, in which I placed 1st in the Prop Art Category. I was also very excited to win the Google WTM Gaming Scholarship, which will support me during my university studies and of course being part of the Experience Points community, where I help out as a mentor for the Patreon and judging the most recent World of Discoveries Challenge in collaboration with the Rookies.
Hippopura Sanctuary
The Hippopura Sanctuary Project was the practical part of my Thesis project for graduating from university, which I worked on from October 2020 to January 2021. In the months leading up to my graduation, I started learning Unreal and have been making scenes such as the Bird House or a Stylized Landscape to see how well I can translate my style into the engine. While I also had to write a theoretical dissertation on another topic (“How Historical Games Influence the perception players to have of historical events”, I know, it’s very different to Game Art and the Practical aspect I worked on ;-) ) I still wanted to use this time to create a big scale environment piece, that can be explored and walked through inside Unreal. For a long time, I had Jourdan Tuffan’s “Hippopura” Concept project
In my inspiration folder and was hoping I’d be able to recreate it inside 3D someday. When I was looking for a potential thesis project, I was wondering if it’d be possible to integrate Jourdan’s concept into my thesis. After contacting him, I was excited that he was more than happy to collaborate and offered me his concept pieces for Hippopura.
Concept and Interpretation
Jourdan’s concept is very accurate in terms of scales, proportions and the distances between different objects, which was extremely helpful during the blockout phase of the project. I was able to test my scene within Unreal in comparison to the angles that are shown inside the concepts, to roughly see if the feel of my blockouts is in line with the original.That way, I could easily export my blockouts back to Blender and start refining them over time.
Blockouts
Another big plus was the little scale mannequin Jourdan included in one of his concept breakdowns, where he describes how the level design of the environment works. That way, I got an even better idea of how large the structures were in comparison to a potential player. I also made sure to always have the Unreal mannequin present within the scene but also exported it into my Blender files to keep the scale in mind at all times.
Scale Comparison
When I reached the Hero-Prop creation phase of the project, I was very thankful for the great callout sheets and breakdowns of the props inside the temple, which made it very easy to translate those pieces quickly and closely inside 3D due to the sheer amount of details inside the illustration, leaving little room to solve gaps in the design inside 3D.
Hero Props Callout Sheet
Hero Prop Unique Parts
The only main drawback of working with concepts is that sometimes one can get too focused on translating the concept very faithfully but overseeing what works well inside 3D compared to 2D. My advice would be to not get too fixated on getting every single detail from the concept right and rather focus on translating the overall mood and atmosphere created in the concept. This connects to the main change I did to the concept: the lighting. Whenever I realised that I am slowing down during the creation process, I noticed it is because I was getting frustrated that I couldn’t get the lighting exactly how the concept had it.
After some while, I reminded myself though that I am free to try out different lighting scenarios too and started experimenting more in that field. In the concepts, it felt very fitting, however inside 3D, it just seemed too bright to me for being inside an enclosed area, that has a very limited amount of sunlight coming through. I ended up darkening it to fit those condition to match with the key art of the concept piece instead.
Lighting pass where I tried to emulate concept vs Final version
Colour and Light
The temple is composed of the colors Gold/Yellow Red, Blue composing all the primary colours in one place. This automatically creates some sort of harmony in the colour palette of this place, however, also demands creating various hue and shifts that it doesn’t start feeling too obvious that those are the primary colours. This comes into play with the secondary colors, Here, I tried to stay within the same range of colours, while also introducing new ones, such as beige tones, a muddy green/brown for the rocks or a brighter green for the water. It was also important to pick up the main colours not only on the big scale props and structures such as the Hippo, Walls and Temple entrance but also in small elements such as the koi fish or the flowers.
Everything in the temple is build to lead up to the Hippo God, which is positioned in the middle end of the place, with the spotlight and rays framing it as the focal point. However, after second glance, one can observe the path leading up to the main stage, with plants covering the outer edges more densly than the pathways and floors.
Colour Scheme
Learning Unreal Engine
The biggest hurdle was actually getting started! I feel like we make things a lot more scary in our heads than they actually are and Unreal was definitely one of those things. I always imagined that I’d have a difficult time wrapping my head around it due to how technical it is and my lack of knowledge in the field of shaders and creating them. However, once I opened the engine and watched some videos that covered the basics of how to use the interface, material creations etc. I felt like it was very accessible to learn compared to other programs. The sheer amount of resources on Unreals own documentation site, Youtube or Artstation made it so fun to dig into it. Also having a support system like an online community that Experience Points have, I was able to ask questions whenever I had a roadblock or search within the Discord server for resources or tips on how to solve issues that others might have had too. Another thing that helped was having an actual project on hand to learn the engine with instead of aimlessly watching Youtube videos without applying them to a project. That way, it is easier to focus on goals that you have within that project and not get sidetracked by getting overwhelmed by how many exciting techniques or specifics that the engine has to offer.
Foliage and Vines
I personally really enjoy sculpting the foliage I create inside Zbrush. Here, I put a square plane inside my Zbrush Document and make sure that all the leaves and plants I am making are positioned in front of the plane. For the shape, I usually take a plane again, draw out the shape of the leaf and extract. After extraction, I start playing around with deformers, such as Inflate, so that the leaves get some depth and don’t appear just flat, since, through the extraction, they are basically just extruded. After that, I mostly use the Move brush to break up the linear silhouette. Here I try to avoid straight lines and add some dynamic-ness to the shapes of the leaf. Due to mostly using 1-2 leaf variants for one plant, I try to make them look as unique as possible, so that if I flip the leaf cards later, I can get the most out of the leaf I made.
Baking Foliage Onto Planes
After baking the sculpts onto the previously created (and UVed!) plane inside Substance, I start texturing. Since the Sanctuary is very foliage heavy, I had to be careful to not overdo it with the details within each plant. Here, I tried to add subtle gradients to each leaf, so that the ends are always a bit lighter. I also hand-painted light colour and roughness variations for more interesting light interactions inside the engine.
Placing The Vines
There are two types of vines inside the scene. The first group includes the thicker roots of the trees, which are growing across the tiles in the temple area and the ones growing beside the temple balconies across the rocks. For those big vines, I actually “frankensteined” my tree meshes. In total, there are 3 unique trees across 2 UV sets inside this scene. Here, I only made the main trunk and some of the bigger roots that are growing outwards. For additional roots, I cut out parts of the tree meshes and applied them to my spline system. The spline enables me to stretch, scale and rotate those root meshes, which gives me the possibility to fit them almost perfectly around structures and rocks.
Vine and Roots
The second group of vines were the small and thin ones that are growing across the scene and are twisting on top of the main tree meshes. Here, I made one twisted and one single vine mesh that can be tiled horizontally. These were fed into a second spline system, which has the same functionalities as the first one but it also tiles the vines when pulled longer. This part was super fun to do actually since I could almost “paint” these splines on top of all my tree meshes without issue. Even though I hand placed the initial spline, I still was able to quickly populate the scene with vines. Funny enough, I was very intimidated by the whole idea of making the roots and trees for this scene since I thought it would be very time consuming but the assembly stage was one of the fastest steps of the whole scene in the end.
Trims and Modularity
Early in the project, I wanted to use golden trims for every part of the temple, since it seemed logical at first thought: lots of gold = opportunity to use trims to facilitate the process. After the initial blocking phase, I realized quickly that I won’t be able to use one trim sheet across all golden assets. It was too repetitive and was missing any sort of uniqueness to the temple. It also ended up looking too clean overall and adding more damage to my trim sheet would only make the overall look of the temple too noisy. After some research into how other games handle big scaled environments and reusability, I decided to keep one trim sheet for the golden structural parts of the temple, which included mainly the stair railings, platform and specific parts of the main arch.
The planning of the trim itself was pretty straight forward. I measured the thickness of each platform I had blocked out and added that height to my trim sheet. In the end, I had 4 different sizes for the golden trim, giving me enough variants to build the whole temple. The two patterns are also adjusted to the sizing of the scale within the environment and are used for the Hippopura God Statue and the other side of the temple, which I only ended up blocking out roughly. Midway through my thesis project, I decided to focus on one side of the temple to be able to polish it fully to a point I was happy with, instead of doing both sides and finishing them halfway.
Planning Modular Sections
Whenever I start a scene that has a lot of architectural structures, I sit down and look out for:
Repeating patterns
Shapes
Colours
Materials
Planning Modular Sections
As soon as I notice that a specific shape is used more than once or twice, it lands on my list of “modular items” . As described earlier, I looked into how other games handle the mix of trim sheets and modular items and decided to mimic something similar by creating a small set of unique items that can be easily reused and reassembled into different assets from the same architecture.
This can be best described by the Balcony and Main Arch. Both the Arch and the Balcony have the same structures, with the balconies being a smaller version of the circular main structure. Here, I created 2 variants for the round side pieces with the blue and red gems and half of the inset flower piece. The screw-like shape in the middle has also 2 variants with the spiky middle being unique. With those pieces, I was able to rebuild the balconies several times with the broken pieces created by boo-leaning the broken edges and simply mapping the broken sides onto other golden parts of the existing texture of the modular pieces. No one would notice the difference in textures, especially from the angles the environment is viewed, no matter if it’s bird perspective or 3rd person as I intended the map to be.
I did a similar technique for the pillars. I sculpted one thick and thin pillar, which has enough variation on each side that it can be easily rotated, so that each side makes it look like a variated pillar, without any repetition being noticeable.
The floor is also made out of a set of uniquely sculpted floor tiles, with 4 variants for the beige tiles, 2 of the light brown ones and 2 for the gem-shaped middle pieces. Since they all fit onto 1 texture sheet, it is still just as efficient as using a tiling texture for the floor but giving it overall more depth and the wanted “chunkiness” I like in stylized 3D.
Trims and Tiling Textures
Getting More Mileage From Modular Assets
What helped to get more mileage out of the assets was adding moss through absolute world position and vertex paint to everything. I created a Master Moss Material, which I used all across the assets. Through the vertex paint, I was able to paint out moss on undesired spots, add more on other parts to achieve some visual variation. I tried to consider the way moss grows in nature, with the shady and possibly more moist parts being more populated with it, such as closer to the water where moisture could affect the structures. I also added a masking effect for both the moss and concrete vertex paint, so that it looks like the moss has rounded edges, growing it patches and for the paint adding the effect of it crumbling off.
I also used several decals for additional cracks on the pillars or walls and coloured decals for adding more dirt on the walls or the bottom of the platforms, again, to visualize the influence of water in this place, which would possibly make the paint and colours crumble off the concrete. It is a subtle yet powerful difference with an easy way to add additional color variation to tiling materials.
Another trick I liked to utilize was painting or “filling” foliage with the bucket tool of the foliage tool on some assets with small moss-esque plants so that the structures merge together with the organic side of the environment.
Decals Comparison
ZBrush
All the assets inside the scene, except the tiling textures, had a sculpting pass done inside Zbrush, with most of the time not straying too far from the blockouts I did for the meshes before. This sped up a lot of my process since I did not spend too much time on retopology afterwards. For the sculpting, I liked to keep it fairly clean on the surfaces with some of the paints chipped away or small indents and scratches on the metal surfaces.
Architectural Sculpts
For the trees and Hippo God statue, I heavily relied on Zspheres. This was especially useful for the anatomical parts of the Hippo, where I had to block out the body parts first. With Zspheres, you can create bodies very quickly while retaining volume. Since I personally really don’t enjoy making characters, I dreaded making the Hippo. However, it ended up being quite fun to focus on something completely different from my usual comfort zone of environment art and sculpt hands/feet. That’s probably why the Hippo is one of my favourite achievements of this project.
Hippo Sculpt
Tree Sculpt
I also used Zspheres for creating the trees and the various trunks/roots, since similar to anatomy or human bodies, trees can have a very lively shape language which makes it a lot easier to form those with Zspheres, which can be deformed and moved into any direction.
After having the rough shape done, I convert it to a sculptable mesh and build up details slowly. Here, I go in with the Standard brush first to build up the main trunk grains that twist around the tree. After those are established, I use the Orb Cracks brush to deepen the grain and Dam Standart for thinner/sharper grain. Throughout both steps, I use hpolish to clean up the inset grain and occasionally the inflate brush to add some slight thickness variation on the “elbow” area of the trees or invert it for tree hollows.
VFX
The VFX is usually something I pick up on doing when I am reaching the end of a project. First, I tackled the water. Since the water is rather murky and green due to all the moss, it was quite a challenge to make it look appealing, since most references for water out there are the typical blue/turquoise variants. After some experimentation though, I managed to find a nice middle ground, where I simulated a slight ripple effect. I had to be careful to not add too much movement to the water, since after all, it is actually a huge pond and not a river that is in constant movement. For the edge outlines for intersecting meshes, I decided it’s best to limit it to the platforms, rocks and stairs and have a green-ish outline for the plants, since it’d look too busy if every single intersecting object has a white outline. Less is more!
Water
Once the water was in, I spotted the small koi inside Jourdan’s concept and couldn’t resist adding them. I made a very simple fish mesh, which I coloured red and animated through the material. The fish itself swim along with a spline system, where the path can be drawn out on which the fish swim. That way I also was able to randomize their speed by making the spline curves sharper or smoother through the handles.
Fish Paths
The focal point of the temple is the Hippo statue, with the concept also showcasing slight God Rays. Here, I created a material, which is applied on simple rectangular planes, which I arranged diagonally, facing the way the sun is shining into the temple area. The material itself pans two cloud textures that fade out from the outside. It also has a slight Fresnel for adding a slightly shiny look to it when the god rays disappear.
Since the temple is also pretty old, I decided to add small dust particles too, which spawn across the whole temple and disappear slowly.
God Rays Material
God Rays Direction
Motivation
I love speeding up my process and practise different fields of environment art by starting new projects and see what challenges await me once I start them. In the future, I’d like to create more big scaled levels and even try to make them more playable. With the Hippopura project, I got a taste of how amazing it is to walk through your own Game Level and explore it as if a player would. It’d be a fun challenge to make a little build of an environment I created and let people walk through it.
Inspiration
My main sources of inspiration are nature, architecture/historical sites either from my immediate surroundings or places I travel/want to travel to. I think it’s important to have a varied “media diet”, which means looking outside of games to get a fresh view of my own art. This doesn’t only mean interacting with art per se that isn’t digital, but also enriching your creativeness with things like reading books, cooking a new dish or journaling. It took me a while to realize this but it is healthy to have an outlet that is outside of game. For me personally it helps to take off the pressure when creating. Since our day job revolves around art, it can be exhausting to spend that extra time we have after our jobs on art again, with our whole existence being tied completely to our craft. Therefore I like to keep it balanced overall. After spending time doing other things, I can tell how I am getting more excited to get back to art again.
Feedback
I seek feedback from online communities such as Experience Points and other artist friends. Over the years, I build a great support system of artists that I know I can trust and ask for honest (and brutal) feedback when needed. I don’t like having things sugar-coated,, therefore I am really grateful for having a community that helps me grow and can support each other throughout our journeys.
Staying Motivated And Seeing Projects To The End
In general, I have always been very self-driven and follow through with most tasks or goals I set myself to do. Another thing I noticed is, and I have talked about this with various people, is that I don’t belong to the type of artists that have various work-in-progress pieces. I mentally cannot start a new project once I finish another one, which subsequently helped me a lot to get to the finish line, partly because I was keen on seeing it come to an end and be ready to tackle the next challenge, fully devoting my attention to that. However, as everyone else, it can be tough for me to stay motivated and positive throughout a whole project, with internal pressures growing depending on the scope and tasks on hand. My strategy for this is rewarding myself with finishing small milestones and being happy with the small wins I made throughout a work session. I also learned to be patient and trust myself enough that I can finish projects, no matter how long it might take. After all, I love to create environments and virtual spaces that I’d like to visit myself and having this initial drive that got me into this field is something I can remind myself whenever I feel like my efforts are not going anywhere. Perseverance is a big aspect of our craft.
Additional Advice
Stop overthinking and start doing! As mentioned earlier, I feel like most fears we have connected to art get worse the less we do and stay in our heads. Once you start tackling projects or aspects of a scene that are daunting or scary to you, you will realise that it isn’t as bad as you imagined it. Yes, there will be a failure and probably a lot of retakes on an approach you thought would work out straight away, but that doesn’t mean you failed or aren’t capable. Just keep going, no matter how small the steps are, it still means you are moving forward. And biggest advice: Get off social media for a while. Networking, socializing and connecting with other artists is important, however, social media is also a real-time sinker and not great for our mental health when spending hours scrolling through it, even though it is tempting. I personally realized I have a much more positive relationship to my work and progression when I merely focus on my work and literally leave the online space for several days and check whenever I feel comfortable with it to gather some inspiration.
Future Work
Now that I graduated, I am excited to leave uni life behind and focus on work and continue learning as I go. I will keep creating art that makes me happy and see where my path will take me, while I am also excited to have recently joined Airship Syndicate as an Environment Artist.
Outro
Thank you Experience Points for inviting me! I hope my breakdown gave some insights into how I made the Hippopura Sanctuary come to life. For any further questions, you can find me here: