
ben keelinG - environments, foliage, and materials
Join us in this article by Ben Keeling, where he breaks down the different aspects of his Beyond Human environment, followed by an in-depth look at his foliage creation process. He explores his Substance Planet works and gives tips and tricks for people starting out.
Introduction
My name is Ben Keeling and I am an Advanced Environment Artist at Rocksteady Studios. I went to University at De Montfort in Leicester, I studied a foundation art course and then a degree in Game Art. Before graduating I posted my first environment art project on Polycount and it got spotted by an artist over at Criterion Games. He was kind enough to recommend me for a position and I had my first ever interview. I was very lucky to get the job before I graduated and stoked to start in the industry.
My first title was Graduate Artist at Criterion. I made Need for Speed as my first game and was responsible for scene dressing, texturing and modelling, and outsource management. I also got the opportunity to do a lot of keyframe animation while I was there which was an interesting and fun challenge. Subsequently I have worked at Sony making VR Worlds and Creative Assembly on Halo Wars 2, before moving over to Rocksteady.
The first game console I ever owned was a Sega Mega Drive and the first game I remember playing was Sonic. My fondest memories are of Crash and Spyro on the first PlayStation. My favourite game was Ratchet and Clank; I love how creative the design is and how beautiful that whole game is.
Beyond Human Analysis
When I started out with the scene, I picked Eugene Shushliamin’s amazing concept featured below. I picked it because I loved how rich the world he created was and the variety of assets. I thought it did a great job of telling a story with lots of little enriching narrative details. The more I looked at the scene, the more I had the urge to explore the world and find out more about the setting.

Composition and Flow
When I started the challenge, I battled a lot with the lighting of the scene. In the original concept it featured a character, this helps to draw your view to the focal area of the chair because humans are naturally trained to look for the silhouette of a person. The character also looks in the direction of the chair which helps to guide the viewer. For the environment scene, I didn’t have the luxury of having a character guiding the eye, and halfway through I even tried a body in the chair.
When I started blocking out in 3D and got halfway through the process, I spent some time trying to find a way of lighting the shot that I felt happy with. I started by sticking to the direction of a day-lit scene from the concept.

Flow in the Image
The above shot was taken about halfway through the challenge. The pipes and assets did a good job of establishing flow in the image, guiding the eye towards the focal area of the chair. However, there were a lot of brighter hotspots that I just couldn’t get to work. I had lights in there that became a little distracting and the big windows became more of a focal area in the image than the chair. In the concept I loved how the light cuts across the scene from the window, but when I did this it just interrupted the pipes and lines leading to the chair. The windows also boosted the fog atmospherics further into the scene. In the concept lighting can be cheated a little and the atmospherics are pushed downwards to not impact the scene as much as it does in 3D.
For the final image I pushed my lighting away from the intent of the original concept. I pushed more towards a night-time lighting with stormy weather hinting at a larger cityscape outside. This allowed a couple of things to happen that helped the scene a lot. Firstly, I was able to drop the intensity of the windows down and make them less impactful in the scene. I turned off a lot of the light fixtures that bothered me before and went for one single light source above the chair. I used smaller lights to rim light certain assets such as the balloons. I also gave a subtle warm focus around the bottom of the chair highlighted in the paint over by the yellow circle. I worked more on the asset placement and flow to try and guide the player to the chair more with pipes that came down from the ceiling or up from the floor. I think I could have maybe pushed the foreground elements out a little further, perhaps pushing them slightly out of focus to create a vignette style. Overall, I think the change in direction helped a lot.

Final Lighting and Flow Setup
Colour and Light
With the challenge I played a lot with warm red tones in both assets and textures to hint at an idea of life before VR. With cold tones I tried to describe some of the more industrial elements and bleaker moods of the scene. I purposely made the wallpaper red which was a switch from the wallpaper in the concept to reinforce the story. I wanted all the elements that were warmer to describe the hacker’s life before the VR takeover. I had the idea in my head that he collected books and old paintings in a former life and some of the richer reds and browns in the scene were to describe that. There is a red suitcase in the scene which hints that maybe he could leave and escape back to normality.

Environment Shot
The lighting surrounding the edges of the scene are purposely a little bit warmer. Areas such as books and chairs being richer to hint at the life he used to have.
With the chair I had the idea that he had taken one of the existing furniture pieces from around the room and strapped it to the medical bed to keep him alive and comfortable while he strapped into his virtual world. The servers, pipes and machinery around are all cold industrial tones to help enforce the bleak concept of his journey. I also made the balloons colder tones with hints of brighter colours and the lighting hitting the chair is quite cold. Again, this was to make the viewer feel a little uncomfortable when they look at that area.
You can also see the purposeful colour choices when you look at the asset breakdowns. Most of the furniture assets are a lot warmer and chair stuff is cooler.

Chair and Machinery with Cooler Tones

Furniture Assets with Warmer Tones
Story
The format for the challenge is 2D artists create concept art first and then 3D artists can use the concept art for their 3D scenes. Often this means a lot of the story is already worked out. I chose an existing concept for the scene and when I read through Eugene’s thread, I learned about the story he was trying to tell. He set his world 20/30 years into the future where VR has taken over and people move to modular houses providing life support to VR ‘capsulers’
I also like to put my own spin on the story or expand it further. This really helps me when set dressing and figuring out what I want to include in the scene. As well as the VR hackers’ nest, I wanted to try and give more character to the person in the situation. I came up with the story that he had got addicted to plugging himself into a virtual world. It had started to affect his life outside of the virtual world and impacted him in the real world in negative ways.
His health had suffered and he was bed bound and he started to move a lot of his necessities into the same room as him. This is reflected in the scene with various food items and even the shower being in the same room. He is eating but only fast food and protein bars to keep his energy up. The room is covered in literature to show the research he has done and articles he saved to do with VR.
I also hint that he has a family and there are notes on the fridge to suggest he has a child who used to draw him pictures. There are notes in the scene that say his wife has had enough of his addiction and wants to leave, and ultimately the character passed away suggested by the get well soon balloons. A little dark and depressing story-wise but I had fun embracing the theme.
Foliage and Optimisation
For my foliage I went back to basics. Although I have created foliage for different projects in the past, I never felt fully comfortable with my workflow. I started by absorbing as much information as possible from online courses, tutorials and friends. This way I could create a workflow that worked well for me and what I wanted to achieve.
I always start by collecting reference and breaking it down, I wanted to truly understand it and broke it down in a lot more detail. Once I am happy that I have broken down and assessed all the elements of the plant, I start on a 3D plan by making a blockout. The blockout is created by either tracing over bits of reference to create a first pass alpha card or photo bashing images together. I use this to create a low poly that I can put in game and start to assess early whether the plant is going to work.

Blockout of a Sage Bush Alpha Card in Photoshop
Once I am happy that this is working in engine, I can start the high poly. It’s worth spending a little bit of time making sure you are happy with the plant before going into the high poly as it takes longer to change when its geometry based.
In the past I have approached my high poly using traditional modelling packages and utilising instancing to layout the sheets. I created the high poly leaves and plants in ZBrush. The technique of sculpting plants and leaves was something I picked up from the vegetation course at CGMA. I always felt like this generated a better result as far as the normal map was concerned. You are easily able to bend, twist and manipulate the leaves and get a more interesting texture overall.
The good thing about modelling packages is how the leaves and plants get instanced. I wanted to retain that in ZBrush or find a way to layout the cards faster. I did research and eventually landed on IMM curve brushes. It was useful for plants as I could create a tiling section, top piece and bottom piece and draw it out using a curve. Then I can twist and manipulate that curve afterwards. You can even keep the curves if you want to edit it later. I was able to create different ones for branches, leaves, flowers and stems.

Example Brushes that I Created for Foliage
I layout my alpha card using the Photoshop layout as a guide. The high poly mesh then gets exported and baked inside of Substance Painter. With the IMM, you can paint Polypaint data into the brushes as well which can be useful for masking with an ID map in the bakes. Texturing wise I made a couple of tiling materials such as bark and used smart materials to texture across the various plants.
To create the plant, I layout the plane and cut around it. These separated pieces are made into a branch arrangement and then put together to create the plant. For UE4 the plant receives edited vertex normal data and is setup using the Pivot Painter plugin for wind. Once it’s in Unreal I use a shader with options to colourise areas with a mask and subsurface controls.
Finding Reference
Gaining reference is all about answering questions. When I look at something, I try to leave no stone unturned. I try to make sure I know the answer to every question I have about the asset. What is it made from, how is it formed, what is the silhouette?

Example of Reference for Sage Bush
When I first started looking at pushing my skills with vegetation, I discovered a great tutorial by Patrick Gladys – which you can find on his Artstation. He suggested breaking down the plant piece by piece and analysing it at each stage to thoroughly understand the characteristics of the plant. It starts with the leaf, then stem, then branch and finally the whole plant. For the first few that I did, I sketched each section and made notes to analyse what I was finding.
I organised my reference to respect these individual parts as well so that when I came to make it I had all the shots I needed. I try to find as many reference images as possible and as high resolution as possible as well. I even visited botanical gardens to track my chosen subjects down in person to get better reference.

Example Breakdowns for the Sage Plant with Sketches and Notes on Creating a 3D Plan.
Key Points
The key thing I focused on with foliage through the entirety of the process was how it shaded. I had made some similar plants before such as the bush for my Substance planet. When I went back and reviewed this against foliage assets I downloaded from the UE4 marketplace, I found a lot of aspects of my older work that could be improved. Something I noticed was how well the downloaded plants shaded in comparison to mine, especially at a further distance.

WIP Scene Showing Shading at a Distance
For this project I worked a lot on how the plants worked across both near and far distances. It was important to me that it shaded smoothly. I didn’t want shadows to be too dark and I needed it to work well in multiple lighting setups. I setup an asset zoo with terrain and plants painted in so I could analyse how they looked from multiple viewpoints.
I wanted the overall scene to have a more ‘exaggerated realism’ to the plants. It should look more like a concept image and like the plants were a bit more painted than ultra-realistic. I know that the art team at Naughty Dog had a similar approach for the plants in Uncharted and this was something that inspired the look.
I achieved the shading in several ways. Firstly, to make sure the shadows aren’t too dark, I did a lot of balancing between the plants to ensure the albedo was bright enough and that the subsurface had good masks. This meant that when the plant was in shadow it never got too dark or turned black. This is also covered somewhat by lighting as you must have a skylight that helps to fill the ambient correctly.
For the smoother shading to work properly it also came down a lot to mesh decisions. Using the bush as an example, I would make sure I had laid out the cards to give a fluffy silhouette and put enough branches and leaves in to roughly fill out the plant. This ensured I could avoid too many gaps that light could pass through. It was important to do this step both close to the plant and at a good distance. I could then address areas where cards appeared flat, or if you could see the edge of one of the card planes. Normally I would cross plane the geometry here to avoid this problem. Once I was happy with the overall fullness of the plant asset, I would setup the vertex normal and this would make a huge difference to the overall shading.

Shows the Difference Between Edited Vertex Normal and Not
Common Mistakes
I think the biggest issue I see is related to either bad card placement or bad shading. For artists beginning with foliage assets, you often see cards that look flat from certain angles. In games as we can’t afford to model every foliage leaf and we have to cheat a little and make flat planes with texture on them. It is always a challenge for the artist to try to make it look natural and not as if it’s made from flat planes.
The way I combat this is all down to workflow. When I have finished the high poly part and baked my alpha cards to a plane, I begin in my 3D modelling software by creating a flat plane and setting it up with the diffuse and opacity channel. This workflow is not program specific so you can use any 3D modelling software. I cut around the plane attempting to get as close as possible to the edges of the alpha as possible. This means you are less likely to get overdraw.
Once I have the pieces, I separate them out and use modifiers such as bend, FFD or twist to manipulate the card pieces. Here I am specifically looking to stop them from appearing flat at different angles. If you twist them a little, then when you rotate around the cards, they never appear flat.
Next, I go about constructing my 3D branch arrangements. Again, the aim here is to avoid it looking flat from different angles. I use the various cards to create nice 3D branches, which will be used later to create the final plant asset.

Showing Foliage Cutouts
I also see a lot of issues relating to the shader setup and in-game low poly section. Often shadows of the plant can be dark and shade black. This is about having a good foliage shader which supports subsurface. You need to author a good mask for this as well which stops the sub-surface on branches and only lets it through on the correct section, such as the leaves. Make sure your low poly also has good vertex normals. I always make them face as much towards the player as possible; up towards the player if it’s grass and more of a hemisphere shape if it’s a bush for example.
Substance Planets
The normal process for the Substance planets is a combination of both material work in Substance Designer and meshes placed procedurally on top.
First comes the idea, this is normally sourced online. Anything from a concept art that sparks an idea to a rough idea I have in my head. For the plant one it came from wanting to create a desert material and then grew when I took a CGMA course on plants and vegetation. I wanted to adapt my existing work and then had an idea to create a mini world. For the coral one, I just always wanted to make something related to the sea. After spending a lot of time snorkelling on various trips I had been on and living near to the beach throughout my life, I got inspired by the world that lives under the sea and the various rock pools that I used to go hunting for crabs in as a kid. The mushroom planet is based off a concept I found with all these crazy scaled mushrooms. I was inspired by that and wanted to create a mini world from it. I now have a Pinterest board just for ideas for this project, so I hope to do more worlds in the future.
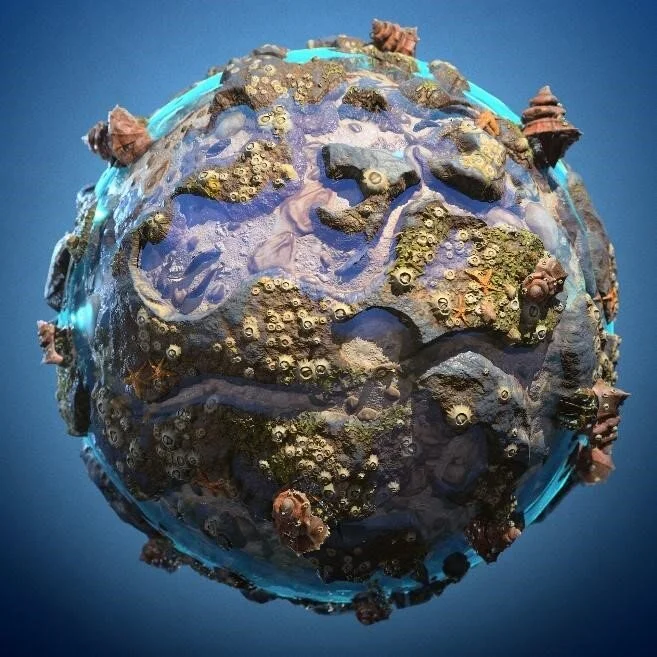
Coral with Meshes Added on

Coral without Meshes Added on
Process-wise I try to do as much as possible with Substance Designer, the only parts I add on top are things I just can’t do with that software. The limitation of a height map is that it is linear and can only do additive and subtractive detail. Especially for things that have convex or concave shapes- I tend to sculpt and model these details. A good example is large mushrooms or crabs on the coral planet. I normally start with the Designer process first as that often gives me the base and helps to blend all the elements together.
The Designer part of the process comes with its own challenges depending on the material. Most materials I do tend to have quite a few layers and elements in them, which can make the material hard to manage. For the mossy ground material in the mushroom planet the hardest thing was to keep clearly defined pathways as part of the story was to have them as little walkways between the mushroom clusters. It was a challenge to all the layering of stones, clover, moss and dirt all blending together correctly. For the coral planet I struggled to get the rock pools to stay defined. The more I worked on it the less carved out they looked and the softer the edge got. I needed them to stay sharp as I planned to have animated fish in the pools.

Keeping the Height Map Sharp
Once I have a good base established for the planet itself, I start to think about what could be cool to make the planet feel alive. For the desert planet this was stones, rocks and plants. For the coral planet it was crabs and animated fish swimming in the rock pools and for the mushroom planet small waterfalls and spores from the mushrooms, plus the clouds. I normally work out how I am going to create these details but in most cases I use unique meshes. For the first planet I did, I placed the vegetation by hand, but with each one I slightly evolve and improve the process. For the next one I attempted I used 3ds Max’s particle system to place the meshes on a sphere. This worked out well because it meant I could update the meshes as they were instanced. I could try out ideas without having to replace anything. In the future, my plan would be to do this with Houdini because I think that will probably work even better.

CGMA Experiences
I am under no illusions that I have finished learning or that I can’t push my skills further. I took courses targeting things I consider to be weaknesses with the plan to turn them into strengths. The first course I took was plants and vegetation, it was an amazing course and Jeremy Huxley is a great teacher, he taught a lot of engaging lessons, which focus around sculpting plants in ZBrush and this helped to see the benefit of using this software. The course focused on working on a scene. Unfortunately, with my other commitments I was unable to create a full scene. Instead I opted to create something more focused instead. Jeremy was susceptible to this and gave me great feedback and advice along the way, despite me choosing to alter what I wanted to create. I also took Omar Gatica’s ‘Lighting for Games’ course. Again, as I felt that it was a weaker area for me. I wanted to learn what it was like to be a Lighting Artist day to day and some of the techniques they use to create compelling work. His course is slightly longer at 10 weeks, but what I loved was how he approached different topics and different genres of games. He did Lighting for FPS, RTS and Cinematics. He even had longer weeks towards the end of the course so he could art direct the work you created. I picked up some great tips from his course and I think whatever scene I do next will benefit from what I learnt.
I teach a Substance class through CGMA and one of the things I love as a lecturer and as a student in the course I have taken is how great the classroom environment is. Being able to interact with other students and speak to the lecturer with questions and feedback is what makes it great. Having homework that is submitted every week keeps you focused and on track and I consistently see improvement across the students. I felt this myself when I took the classes which was one of the main driving points behind doing them. Plus, I learnt a lot of great things for my own course from taking them, great stuff the teachers did or ways they did their feedback for example.
Thoughts on the Future
I am always open to the idea of great topics. For me personally, I love the environment-based courses, but I want to push into fields I don’t know that well. I have done a ton of environment modelling, sculpting, modular work across my career and in personal artwork so seeing that stuff, while awesome, isn’t where I want to push. I love looking into areas that ensure I work smart. Outside of work I have less time so working more efficiently is important to me.
Blender is something I picked up recently and hard surface modelling is something I always loved- I would quite like to just play around some more there. I am starting to pick up Houdini so any courses in that would be very exciting. With the courses, I would be tempted to pick them up if the instructor is someone that inspired me. There are a lot of great guys over there with amazing folios and seeing some of that and gaining their wisdom and guidance appeals to me.
I think I will always target things I am weaker in. Lighting and vegetation are good examples of this. I am excited by pushing into topics I have never tried before. I would love to look more into offline rendering and compositing. I would like to learn more about film and different techniques used in that industry to get the amazing quality and finishes that they can achieve. There is also a lot to be said for the 2D style courses that teach the fundamentals such as composition, perspective and anatomy. Those skills don’t have such an obvious pay-out when you look at 3D work directly but over time they can really help an artist to stand out.

Recommendations for Artists Starting with Substance Designer
There are so many things I could mention. I can only try my best to describe the steps I took and tell you what worked for me and what didn’t.
I was sort of accidentally forced to learn Substance when I first picked it up. The accidental part being Substance Painter. I played with the software when they released their first trailer demo-ing the particle brushes. I was making a vehicle back then, so it was perfect for trying that stuff out and mostly I just had a lot of fun. I thought it was amazing I could paint that sort of detail on my models and not spend ages painstakingly authoring burn marks by hand.
Designer was more ‘quick I need to learn this’ approach as I was asked to do a masterclass in Substance. Allegorithmic approached me to do a class in London and at the time I only used Substance Designer a little bit. I was certainly a lot less comfortable in the program than with Substance Painter. With a deadline for the class I got quickly into tutorials for Designer and worked out what it was about and how to use it so I could give the class. Playing around with it and watching tutorials was how I found a love for the software. I always used to spend ages in Photoshop adding storytelling to my texturing. This obviously takes a long time to craft this sort of stuff and then you must repeat the details for the other texture channels. Being able to go back down the chain of nodes to reuse stuff and update it was what opened my eyes to a great new way of working.
It took me a longer time to get proficient with Designer. I sort of moved around a lot and made different types of textures and always failed at making them how I wanted. I spent a lot of time relying on previous graphs I worked on and didn’t necessarily know how to make certain types of materials. I think this was more my understanding of how to learn things than what I was doing being necessarily bad.
If I had my time back, I think I would have waited a little before using Substance Painter as it was a very early iteration when I first picked it up. It has changed a lot since I first started experimenting with it. Substance Designer was comparatively more established. There wasn’t the wealth of tutorials there is out there now for the Substance programs, but I personally find I learn more from using them. The best way for me to learn software is to set myself a challenge. Make a material or learn what a type of node does and how to use it. I would have set myself different materials working from easier stuff, such as ceramic tiles, up to harder materials like tree roots. Doing this I would have encountered all the nodes and would have forced myself to problem-solve and figure out the software. This is what I do now when I need to learn something new and I am able to pick things up far faster. Of course, I wish I had known that was the best way to learn at the time, but I was just finding what worked best for me. This can be true for a lot of art stuff, learning the way that works best for you takes practice and repetition. What works best for you may not for others.

Finding Inspiration
Inspiration for me personally is in so many places, but I have some that give me consistent results. I always get inspiration from other people’s 3D work, such as places like Artstation or on forums and chats. Inspiration happens quite quickly and can fade away rapidly. This can often leave you with the feeling you had a great idea for something in your head but can’t quite put your finger on how it will look or what you were thinking of. To combat this problem, I use sites like Pinterest or Artstation to bookmark and save my inspiration. I am constantly organising stuff on Pinterest, and this often bulks out the majority of my commuting time, when I have nothing else to do except watch TV shows and movies. I use Pinterest boards to organise things into different ideas and collections of work such as reference from games, movies and TV shows. Ideas for projects or current projects that I am working on. A lot of these boards I keep hidden on Pinterest because they don’t make sense to anyone else but me, but they end up turning into my projects in a lot of cases.
I of course get inspiration from other media such as movies and shows that I watch or games that I play. I have made stuff in the style of certain art styles that I love. Illustrators or artists work I enjoy as well. I always try to twist it though so take what I love about their work and frame it some other kind of way. Set design is always a great place to look for this sort of stuff because they do a lot of hard work for you. Lighting, mood and atmosphere is already laid out for you, as well as framing the camera in a great composition.
The other big and quite successful one is a visual library. I try as much as I can to get out in the world away from media and computers and try and experience life by travelling or walking and visiting places. This is one of the most successful ones for me because this is where I find the most surprises. They often tend to come back to you when you don’t expect it. You might be thinking of the design for a structure and then you remember a place you visited, and you can revisit pictures or search for it online and you suddenly have the start of a design for something. Visiting places gives you something you can’t get from any of the other methods, and that is scale. For environment art, scale is a very important element in almost everything we do. You can even use other things that trigger your other senses that can inspire and feed an idea for a scene. Being on the side of a rock with a cold chill in the air while you climb up a giant mountain range as the sun is setting isn’t something you can really feel in photos.
Seeking Feedback
I get feedback from so many different places. In the same way as inspiration some methods are more successful than others. A good place is always asking your peers, that can be other people you work with. Communities and groups online such as Discord, Facebook or Artstation. My experience has always been that the 3D community is full of like-minded people that are willing to give feedback and help you improve your skills. I think that is because there is a mutual understanding that you will return the favour when the shoe is on the other foot.
I also use individual chats to ask for feedback, I normally find this is the method that works the best. Asking people directly what they think and especially choosing people whose opinion you trust. That could be people you work with currently or have done in the past. A good tip is to ask people who are detached from 3D. I always ask my girlfriend, for example, as she is artistic but not trained or involved in 3D at all. She normally gives me some of the best advice as her ideas are not limited by the software restrictions or technology aspect of making 3D assets.
Tips and Advice
Some tips that have always kept me passionate about my artwork and I hope will continue to do so long into the future.
First: always try to push yourself and learn something new with each piece you create, that could be a new software that excites you or a new process or workflow. I have always attempted to learn as much as possible and especially if it’s something I have never done before or something that scares me. This is how you become extremely versatile and how you become a better artist. If you can’t do something, don’t shy away from it. It can be a painful process but it’s always where I have made my biggest leaps.
Have fun and be passionate about what you create. I have always focused very hard on creating art that I am truly excited by. I think how engaged you are in what you are creating will come across in your work, and that it also shows when a project has completed without much enthusiasm. I really loved Sci-fi and making hard surface art when I started out. My dream was to work on Halo. At the start of my career that is what I focused on and I created stuff I loved. Despite it having very little relevance to the racing genre, that was the first project I got hired to work on. I think that this is because the quality of my work was governed very much by how passionately I felt about it. You can really feel when someone has a love for what they are making, and I think sometimes that is what it takes for someone to give you a shot.
Try to always be respectful, kind and learn from others. I have found this to be an important lesson from becoming a teacher and from seeking feedback in the past. Some of the best changes and greatest steps I have taken towards creating successful pieces has been from people’s advice. Listen to your peers, respect their advice and actively seek it. It’s a huge part of our job and something you must do to create great work. If you don’t, you will always make the same mistakes and only create work within your comfort zone.
The Future

My current project is an on-going series titled “Human Emotions”. I chose this title because I wanted the story to be about a world where humanity has died out due to disease. The population is replaced by robots trying to fend for themselves and understand what it is like to be human. I want the work to become something that my portfolio and body of work is recognised for. Picking common elements across my series of projects can help the viewer to easily identify it as my work.
With this project I am planning on creating a series of scenes. It is the sort of artwork I love to see when I get inspired, it is more about establishing a series of scenes in a world where they could all belong together. As well as creating interesting environment projects that could be in the world, I plan to create tutorials for a lot of the content. The tutorials will hopefully be tackling lots of different elements of environment design and how they play together. It’s a culmination of all aspects of environment art I have learnt across my career.
As well as this, I really enjoyed doing small side projects such as competitions like the Meet Mat. I also would love to go back to the Substance Planets at some point. It’s something a bit different but it allows a lot of fun creative ideas. Plus, the more I do them the better refined my art and rendering is and more perfected the workflow.
Overall, I want my work to have a few key things that its recognised for, so these ideas listed above are my attempt to push more towards that.
Outro
I want to say a huge thank you to Experience Points for featuring the article. I think the questions are well crafted and I enjoyed answering them. I hope that it is helpful to people who read it and it inspires other artists out there like me. As always, I am hugely grateful to all the amazing people I meet across my career and want to say thank you to those who have inspired and helped me to become a better person and artist. I can’t wait to meet more in the future.
Feel free to connect and chat on different social media channels out there like Artstation, Discord and Facebook. I am always open to hearing feedback, offering advice and feedback and just generally chatting about life. Thanks again for reading my article, I hope you enjoyed it!