Turning Passion for Coffee into an Environment
Felipe Almeida De Abreu did a breakdown of his coffee shop scene and how the substance we all love inspired him.
Introduction
Hello there! My name is Felipe Almeida De Abreu and I'm from Brazil. I'm currently working with a bunch of Half-Life fans on Project Borealis, a game dedicated to revisiting the Half-Life series with a fresh new episode for fans of the series, old and new, to enjoy.
I got into the world of 3D environment art by trying out many aspects of creating a game, from programming to music, making environments in 3D was the part that really seemed to connect with me. I am completely self taught in environment art and everything else related.
New Coffee
Inspiration, Asset List & Blockout
Since I like coffee so much, I thought it would be nice to create a little coffee shop. I wanted a nice morning feel from the start, one that drive the narrative about the shop being setup for the day, with chairs still on top of tables and items being delivered to the table tops.
I always start scenes by looking at references and taking the elements that I like the most about the. I also look for parts or objects that repeat frequently since those are generally the ones that will give me the most bang for my bucks. In a coffee shop or restaurant for example, chairs and tables are most frequent so those are very good items to invest a lot of time in.
After figuring out which objects I want to have, I fire up Blender and start doing a rough blockout, at first just using cubes with the real life dimensions of the models, then refining them to a better state that more or less matches the reference that I have. Approaching it this way makes it very easy to pinpoint problems that I will have to fix in the future when creating the model final model. At the end of the this stage I end up with these meshes:
New Coffee: Blockout Models
New Coffee: Final Models
Tiling Materials
For the texturing I knew I wanted to use tileables and trim sheets as much as possible for this one, so I started to work with Substance Designer to get those made. Starting first with creating each material separately, then assembling them together in a single sheet. I used the "Multi Material Blend" node with some masks to combine them. At the end I had one sheet for the tables, chairs and booths, one for the ceiling piping and one for the wall trims:
New Coffee: Trim Sheet Materials
Then I made the regular tileables, these materials were really simple ones, like some wall paint, ceiling plaster and a epoxy flooring.
New Coffee: Materials
The table top and wall props were uniquely textured. I used a combinations of Substance Painter and Adobe Photoshop for those, Photoshop was used for the logo and writing.
New Coffee
Lighting
For the lighting I knew I wanted a nice hazy feel to it, I also wanted nice shadows being cast from the exterior light. There were many iterations to get where I wanted it to be. I had a HDRI on the outside (simple emissive material applied onto a sphere), and a directional light too. The directional light was about 3 times as intense as the HDRI in terms of brightness. The volumetric fog was also a great part of creating that hazy feel, I had this at a rather sublet amount, but it greatly helped.
New Coffee: Progress GIF
And these were the settings I used for the baking in lightmass. Mostly kept them low for quick baking times.
Lightmass Settings
Post Process
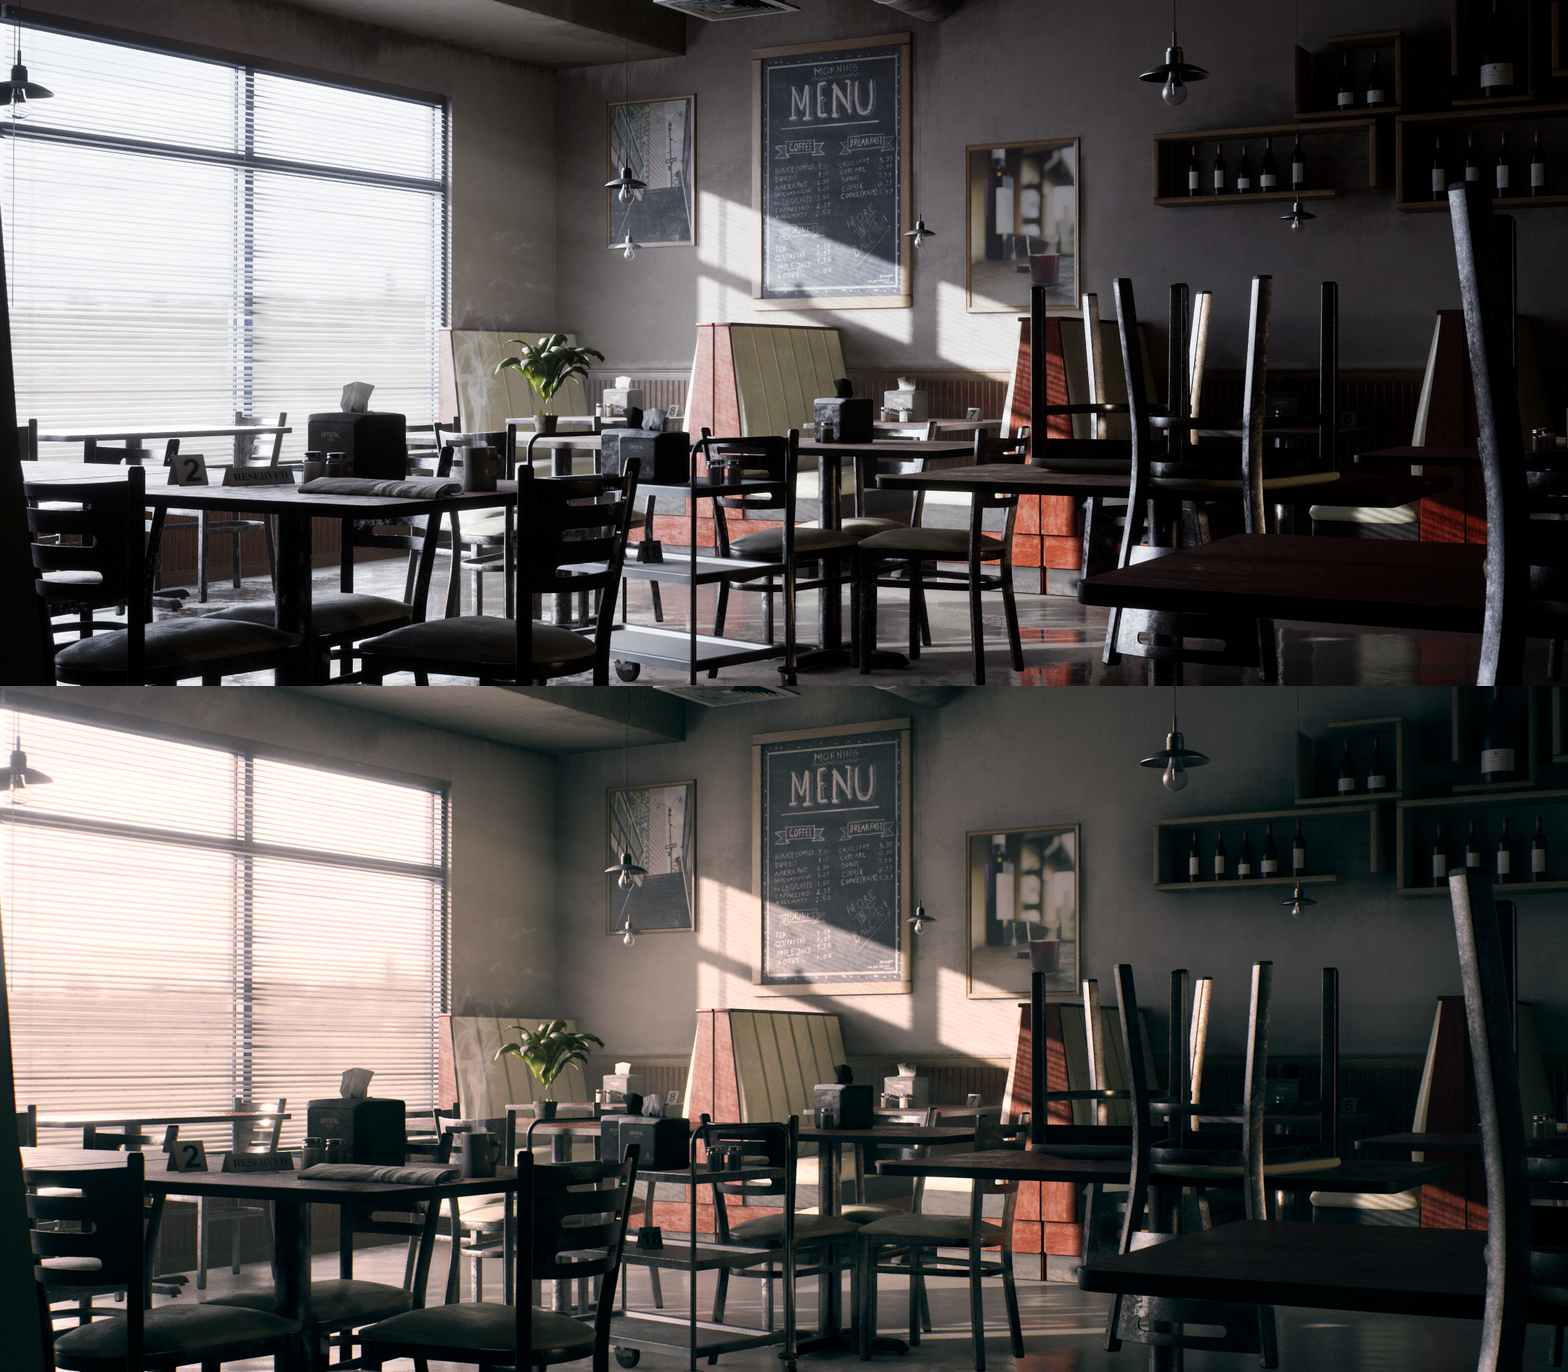
The post process was also integral in getting the mood correct. I did most of the colour grading in Photoshop and then imported it into Unreal with the little RGB table thing (Unreal’s LUT). Adjusting the tonemapper was also very helpful, I lowered the slope to 0.7 and the tone to 0.35, it basically gave me a higher dynamic range that allows for dark areas to still show detail white maintaining detail in bright areas (the grading in Photoshop was done after the tonemapping in engine). A little bit of bloom on bright areas for a little more punch, and a bit of AO for occluded areas for more grounding and done! Here’s a little comparison between the post process on and off.
Post Process: Before & After
Tonemapper Settings
Challenges
When it comes to creating an environment, I think the most important skills to have is the ability to tell a story, creating a narrative with all the elements within, and the ability to make the viewer feel something, an emotion, or maybe recall a memory.
While building this scene, the biggest challenge I faced was getting the lighting/mood just right. There were soooo many iterations! In the begging I thought about having some of the lights on, but that ended up not working very well, and the moment I turned the lights off and let the sky and sun do their job, it got so much better. I also went back and forth on the colour grading, doing it with a cooler tone then a warmer tone, in the end I chose the warmer tone.
To me the biggest advice I can give is to not be too precious about following a workflow to a tea. Doing stuff your own way sometimes is a great a way to learn a new and better way.
New Coffee
Conclusion
Thanks for getting to the end of the article! I really hope you enjoyed it and maybe learned a thing or two. Any questions at all feel free to contact me on discord (FelipeAbreu#8280) or on Artstation.


